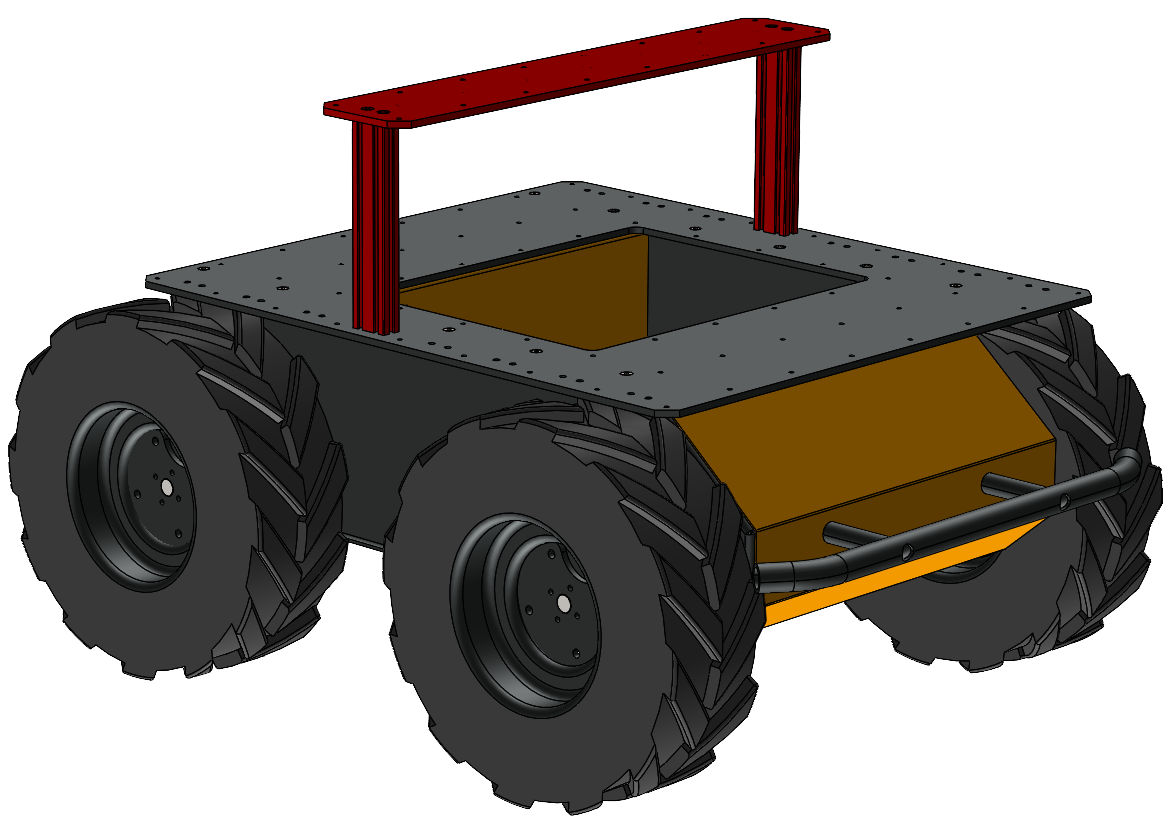
Partial Riser

Sales Kits
These kits require a Husky with a Top Plate. Refer to the Top Plate page for further details.
| Description | Sales Kit | Installation Kit, With Fasteners |
|---|---|---|
| Installation, Kit, Riser Partial—Husky, 100 | 026932 | 027236 |
| Installation, Kit, Riser Partial—Husky, 200 | 026933 | 027237 |
| Installation, Kit, Riser Partial—Husky, 300 | 026934 | 027238 |
| Installation, Kit, Riser Partial—Husky, 400 | 026935 | 027239 |
| Installation, Kit, Riser Partial—Husky, 500 | 026936 | 027240 |
| Installation, Kit, Riser Partial—Husky, 600 | 026937 | 027241 |
| Installation, Kit, Riser Partial—Husky, 700 | 026938 | 027242 |
| Installation, Kit, Riser Partial—Husky, 800 | 026939 | 027243 |
| Installation, Kit, Riser Partial—Husky, 900 | 026940 | 027244 |
| Installation, Kit, Riser Partial—Husky, 1000 | 026941 | 027245 |
Parts List
| ID | Description | CPR item | Quantity |
|---|---|---|---|
| 1 | Plate—Integration, 110 X 590 | 026887 | 1 |
| 2A | Beam—93.5 X 20 X 40, T-slot, 4X M5×0.8, Aluminum, Black | 026921 | 4 |
| 2B | Beam—193.5 X 20 X 40, T-slot, 4X M5×0.8, Aluminum, Black | 026922 | 4 |
| 2C | Beam—293.5 X 20 X 40, T-slot, 4X M5×0.8, Aluminum, Black | 026923 | 4 |
| 2D | Beam—393.5 X 20 X 40, T-slot, 4X M5×0.8, Aluminum, Black | 026924 | 4 |
| 2E | Beam—493.5 X 20 X 40, T-slot, 4X M5×0.8, Aluminum, Black | 026925 | 4 |
| 2F | Beam—593.5 X 20 X 40, T-slot, 4X M5×0.8, Aluminum, Black | 026926 | 4 |
| 2G | Beam—693.5 X 20 X 40, T-slot, 4X M5×0.8, Aluminum, Black | 026927 | 4 |
| 2H | Beam—793.5 X 20 X 40, T-slot, 4X M5×0.8, Aluminum, Black | 026928 | 4 |
| 2I | Beam—893.5 X 20 X 40, T-slot, 4X M5×0.8, Aluminum, Black | 026929 | 4 |
| 2J | Beam—993.5 X 20 X 40, T-slot, 4X M5×0.8, Aluminum, Black | 026930 | 4 |
| 3 | Screw, Cap, Round Head—M5×0.8 X 14, Stainless Steel | 023319 | 4 |
| 4 | Screw, Cap, Flat Head—M5×0.8 X 14, Stainless Steel | 023472 | 4 |
Tools
- Hex Key, 3 mm
- Torque wrench (optional, for safety applications)
- Loctite 243 (optional, for high vibration applications)
Installation
Step 1
Fasten a Beam (ID2) to the Husky's top plate using 2 screws (ID3). Torque these screws to 5 N·m.
You may add a small amount of thread locker to these screws if you are concerned about them loosening from high vibration applications.
Step 2
Repeat this for the remaining Beam, adding the Beam to the other side of the robot, but in the same attachment row.
Step 3
Place the Riser's Plate on top of the Beams. The top of this Plate has the countersink features. The plate is symmetrical, so there is not a front / back side.
Step 4
Fasten the Plate using 4 screws (ID4) Torque these screws to 5 N·m.
You may add a small amount of thread locker to these screws if you are concerned about them loosening from high vibration applications.