Husky Tutorials
Husky Overview
Introduction
Husky is a rugged, outdoor-ready unmanned ground vehicle (UGV), suitable for research and rapid prototyping applications. These tutorials will assist you with setting up and operating your Husky. The tutorial topics are listed in the right column and presented in the suggested reading order.
For more information or to receive a quote, please visit us online.
These tutorials assume that you are comfortable working with ROS. We recommend starting with our ROS tutorial if you are not familiar with ROS already.
These tutorials specifically target Husky robots running Ubuntu 20.04 with ROS Noetic, as it is the standard OS environment for Husky. If instead you have an older Husky robot running Ubuntu 18.04 with ROS Melodic, please follow this tutorial to upgrade the robot OS environment to Ubuntu 20.04 with ROS Noetic.
Husky ROS Packages provides the references for the software packages and key ROS topics.
Husky Software Setup outlines the steps for setting up the software on your Husky robot and optionally on a remote computer.
Using Husky describes how to simulate and drive your Husky. Simulation is a great way for most users to learn more about their Husky; understanding how to effectively operate Husky in simulation is valuable whether you are in the testing phase with software you intend to ultimately deploy on a physical Husky, or you do not have one and are simply exploring the platform's capabilities. Driving Husky covers how to teleoperate Husky using the remote control, as well as safety procedures for operating the physical robot. Anyone working with a physical robot should be familiar with this section.
Navigating Husky is a follow-on to what is learned in the Simulation tutorial, as navigation and map-making may be run in the simulated environment. However, this content is applicable to both the simulator and the real platform, if your Husky is equipped with a laser scanner.
Husky Tests outlines how to validate that your physical Husky is working correctly.
Advanced Topics covers items that are only required in atypical situations.
Husky ROS Packages
Husky fully supports ROS; all of the packages are available in Husky Github.
Description Package
The husky_description repository provides a URDF model of Husky.
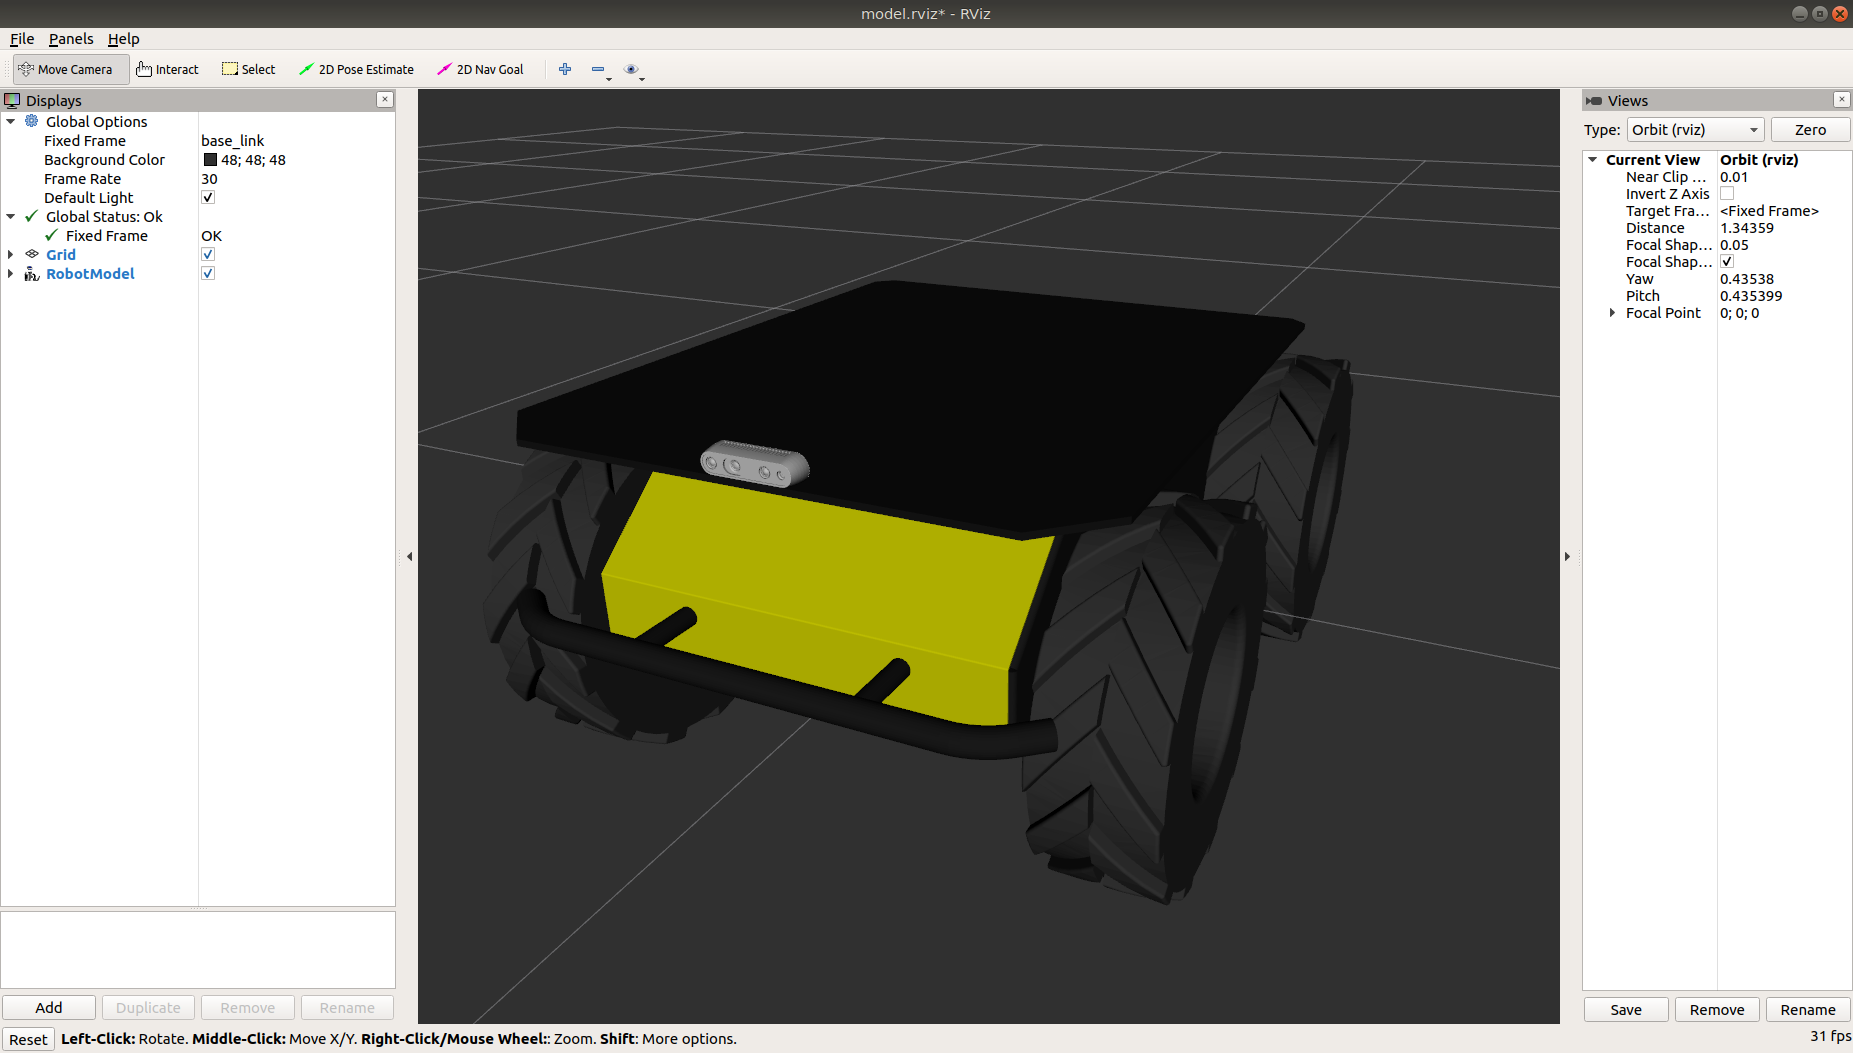
Husky's URDF model can be visualized in RViz. Once you have installed the desktop software in an upcoming tutorial, you will be able to run:
roslaunch husky_viz view_model.launch

Husky can be customized and extended through the use of several environment variables. These are summarized in the README file.
Key ROS Nodes and Topics
Nodes
You can use rosnode list to see all the nodes running by default on a Husky computer.
The most important nodes are summarized in the following table.
| Node | Description |
|---|---|
/husky_node | Provides control and communication between the Husky platform and ROS. Accepts velocity commands and provides system feedback on /status |
/robot_state_publisher | Subscribes to /joint_states and publishes the robot's state to /tf |
/bluetooth_teleop | Publishes velocity commands from a joystick to /twist_mux |
/twist_mux | Takes in multiple sources of velocity commands, and prioritizes what actually gets sent to the controller |
/ekf_localization | Part of the robot localization package, more information regarding this package can be found at http://wiki.ros.org/robot_localization |
Topics
You can view all topics that are active using rostopic list.
The most important topics are summarized in the two tables below.
General Topics
| Topic | Message type | Description |
|---|---|---|
/bluetooth_teleop/joy | sensor_msgs/Joy | Receives joystick commands, echo this topic to verify your controller is publishing |
/tf | tf2_msgs/TFMessage | Transforms between coordinate frames, this should always be publishing, and hence a good topic to echo to test your ROS connection |
/status | husky_msgs/HuskyStatus | Displays system status information |
/estop | std_msgs/Bool | Displays the estop status |
/odometry/filtered | nav_msgs/Odometry | The odometry estimate of the robot from \lstinline!/ekf_localization |
Motion Topics
| Motion Topics | twist_mux Priority | Description |
|---|---|---|
/husky_velocity_controller/cmd_vel | - | Receives motion commands from twist_mux based off their priority |
/joy_teleop/cmd_vel | 10 | Joystick teleop input |
/twist_marker_server/cmd_vel | 8 | Interactive marker teleop input |
/move_base/cmd_vel | 2 | Autonomous movement input, for the Husky navigation packages |
/cmd_vel | 1 | Miscellaneous external input |
Husky Software Setup
Backing Up Robot Configuration
Upgrading your Clearpath Husky to ROS Noetic from older ROS distributions is a straightforward process; however it's important to understand that each Husky is different, having undergone customization to your specifications. For more complete upgrade instructions see this guide.
Please take the time to understand what these modifications are, and how to recreate them on your fresh install of Ubuntu Focal/ROS Noetic.
Performing a Backup
-
As a fail-safe, please make an image of your robot's hard drive. You should always be able to restore this image if you need to revert back to your previous configuration.
- The easiest approach may be to either connect a removable (USB or similar) hard drive to the robot's computer, or to unplug the robot's hard drive and insert it into a computer or workstation.
- You can then use a tool such as CloneZilla or
ddto write a backup image of your robot's hard drive onto another hard drive. - Alternatively, you can simply replace the robot computer's hard drive, reserving the drive and installing a new one to use with Noetic.
-
There are several places in the filesystem you should specifically look for customizations for your robot:
Location Description /etc/network/interfacesor/etc/netplan/*Your robot may have a custom network configuration in this file. /etc/ros/*/*-core.d/*.launchWill contain base.launchanddescription.launch, may contain custom launch files for your robot configuration. Replaced byros.din newer versions./etc/ros/*/ros.d/*.launchWill contain base.launchanddescription.launch, may contain custom launch files for your robot configuration. Replaces*-core.din newer versions./etc/ros/setup.bashMay contain environment variables for your configuration. -
Please save all the files listed above and use them as a reference during Noetic configuration.
Installing and Configuring Robot Software
Installing Husky Software
The physical Husky robot comes pre-configured with ROS and the necessary Husky packages already installed; therefore, you will only need to follow the instructions below if you are re-installing software on the Husky.
There are three methods to install software on the physical robot.
The preferred method is using the Clearpath Robotics ISO image, which is covered in this section.
The second method is using Debian (.deb) packages, which is also covered in this section.
The final approach is installing from source by directly cloning Clearpath Robotics Github repositories and building them in your ROS (catkin) workspace; however, this method is not covered in this section.
Install from ISO Image
Installing with the Clearpath Robotics ISO image will completely wipe data on the robot's computer, since the ISO image will install Ubuntu 20.04 (Focal), ROS Noetic, and robot-specific packages.
The Clearpath Robotics ISO image only targets Intel-family computers (amd64 architecture).
If your robot runs on an Nvidia Jetson computer, see
Jetson Software for software installation details.
Clearpath provides a lightly customized installation image of Ubuntu 20.04 "Focal" that automatically pulls in all necessary dependencies for the robot software. To install the software on a physical robot through the Clearpath Robotics ISO image, you will first need a USB drive of at least 2 GB to create the installation media, an ethernet cable, a monitor, and a keyboard.
-
Download the appropriate Noetic ISO image for your platform.
-
Copy the image to a USB drive using
unetbootin,rufus,balena etcher, or a similar program. For example:sudo unetbootin isofile="clearpath-universal-noetic-amd64-0.4.17.iso" -
Connect your robot computer to internet access (via wired Ethernet), a keyboard, and a monitor. Make sure that the robot is connected to shore power (where applicable) or that the robot's battery is fully charged.
cautionThe next step wipes your robot's hard drive, so make sure you have that image backed up.
-
Boot your robot computer from the USB drive and let the installer work its magic. If asked for a partitioning method choose
Guided - use entire disk and set up LVM.noteYou may need to configure the computer's BIOS to prioritize booting from the USB drive. On most common motherboards, pressing
Deleteduring the initial startup will open the BIOS for configuration. -
The setup process will be automated and may take a long time depending on the speed of your internet connection.
-
Once the setup process is complete, the computer will turn off. Please unplug the USB drive and turn the computer back on.
-
On first boot, the username will be
administratorand the password will beclearpath. You should use thepasswdutility to change theadministratoraccount password. -
To set up a factory-standard robot, ensure all your peripherals are plugged in, and run the following command, which will configure a ros upstart service, that will bring up the base robot launch files on boot. The script will also detect any standard peripherals (IMU, GPS, etc.) you have installed and add them to the service.
- Husky
- Jackal
- Dingo
- Ridgeback
- Warthog
- Boxer
rosrun husky_bringup install
sudo systemctl daemon-reload
rosrun jackal_bringup install
sudo systemctl daemon-reload
rosrun dingo_bringup install
sudo systemctl daemon-reload
rosrun ridgeback_bringup install
sudo systemctl daemon-reload
rosrun warthog_bringup install
sudo systemctl daemon-reload
rosrun boxer_bringup install
sudo systemctl daemon-reload
-
Finally, start ROS for the first time. In terminal, run:
sudo systemctl start ros
Installing from Debian Packages
If you are installing software on a physical robot through Debian packages, you will first need to ensure that the robot's computer is running Ubuntu 20.04 (Focal) and ROS Noetic.
-
Before you can install the robot packages, you need to configure Ubuntu's APT package manager to add Clearpath's package server.
-
Install the authentication key for the packages.clearpathrobotics.com repository. In terminal, run:
wget https://packages.clearpathrobotics.com/public.key -O - | sudo apt-key add - -
Add the debian sources for the repository. In terminal, run:
sudo sh -c 'echo "deb https://packages.clearpathrobotics.com/stable/ubuntu $(lsb_release -cs) main" > /etc/apt/sources.list.d/clearpath-latest.list' -
Update your computer's package cache. In terminal, run:
sudo apt-get update
-
-
After the robot's computer is configured to use Clearpath's debian package repository, you can install the robot-specific packages.
-
On a physical robot, you should only need the robot packages. In terminal, run:
- Husky
- Jackal
- Dingo
- Ridgeback
- Warthog
- Boxer
sudo apt-get install ros-noetic-husky-robotsudo apt-get install ros-noetic-jackal-robotsudo apt-get install ros-noetic-dingo-robotsudo apt-get install ros-noetic-ridgeback-robotsudo apt-get install ros-noetic-warthog-robotsudo apt-get install ros-noetic-boxer-robot -
Install the
robot_upstartjob and configure the bringup service so that ROS will launch each time the robot starts. In terminal, run:- Husky
- Jackal
- Dingo
- Ridgeback
- Warthog
- Boxer
rosrun husky_bringup install
sudo systemctl daemon-reload
rosrun jackal_bringup install
sudo systemctl daemon-reload
rosrun dingo_bringup install
sudo systemctl daemon-reload
rosrun ridgeback_bringup install
sudo systemctl daemon-reload
rosrun warthog_bringup install
sudo systemctl daemon-reload
rosrun boxer_bringup install
sudo systemctl daemon-reload
-
Finally, start ROS for the first time. In terminal, run:
sudo systemctl start ros
-
Testing Base Configuration
-
To test your configuration, start the background service with the following command:
sudo systemctl start ros -
The
COMMlight on your Husky should go from red to green. You can check that the service has started correctly by checking the logs:sudo journalctl -u ros -
Your Husky should now be accepting commands from your joystick (see next section). The service will automatically start each time you boot your Husky's computer.
Pairing the Controller
PS4 Controller
To pair a PS4 controller to your robot:
-
Ensure your controller's battery is charged.
-
SSH into the robot. The remaining instructions below assume you are already SSH'd into the robot.
-
Make sure the
ds4drvdriver is installed, and theds4drvdaemon service is active and running:sudo systemctl status ds4drv -
If
ds4drvis not installed, install it by running:sudo apt-get install python-ds4drv -
Put the controller into pairing mode by pressing and holding the SHARE and PS buttons until the controller's LED light bar flashes rapidly in white.
-
Run the controller pairing script:
sudo ds4drv-pair -
In the output of the
ds4drv-pairscript, you should see that the controller automatically pairs via the script. The controller's LED light bar should also turn solid blue to indicate successful pairing.
Alternatively, if ds4drv-pair fails to detect the controller, you can pair the controller using bluetoothctl:
-
Install the
bluezpackage if it is not installed already by running:sudo apt-get install bluez -
Run the
bluetoothctlcommand:sudo bluetoothctl -
Enter the following commands in
bluetoothctlto scan and display the MAC addresses of nearby devices:agent on
scan on -
Determine which MAC address corresponds to the controller and copy it. Then run the following commands in
bluetoothctlto pair the controller:scan off
pair <MAC Address>
trust <MAC Address>
connect <MAC Address> -
The controller should now be correctly paired.
Logitech F710 Controller
Logitech controllers are not considered safe, and usage should be experimental only. If your robot has bluetooth capabilities, please switch to using a PS4 controller instead.
Some Husky robots ship with a Logitech F710 controller instead of a PS4 controller. Pairing these controllers is very easy: simply plug the USB dongle into one of robot's USB ports and turn the controller on.
By default Husky will use the PS4 controller for teleoperation and ignore the F710. To enable the F710 to control
the robot, run sudo nano /etc/ros/setup.bash and add the following line to the middle of the file, under the six
# characters:
######
export HUSKY_LOGITECH=1
Save the file and press CTRL + X to save and quit nano. Then restart ROS by running sudo systemctl restart ros or rebooting the robot.
When ROS restarts it will now use the Logitech controller as its teleoperation input device.
Setting up Husky's Network Configuration
Husky is normally equipped with a combination Wi-Fi + Bluetooth module. If this is your first unboxing, ensure that Husky's wireless antennae are firmly screwed on to the chassis. Some Husky robots may only be equipped with a single antenna, depending on the exact model of PC installed in the robot.
First Connection
By default, Husky's Wi-Fi is in client mode, looking for the wireless network at the Clearpath factory.
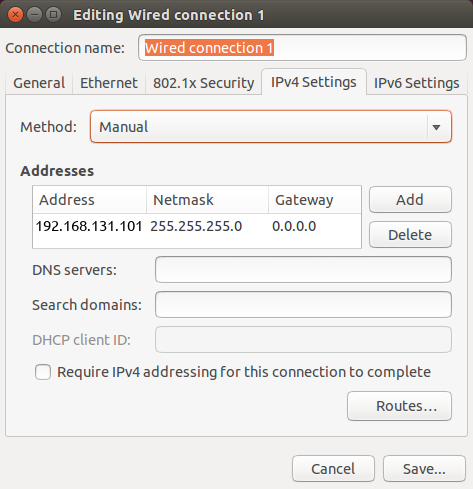
Set your laptop's ethernet port to a static IP such as 192.168.131.101. To do this in Ubuntu, follow the steps below:
- Click on the Wi-Fi icon in the upper-right corner of your screen, and select Edit Connections.
- In the Network Connections window, under Ethernet, select your wired connection and then click Edit.
- Select the IPv4 Settings tab and then change the Method to Manual.
- Click the Add button to add a new address.
- Enter a
192.168.131.101as the static IP under the Address column, and enter255.255.255.0under the Netmask column, and then select Save.
The next step is to connect to your robot via SSH. To do so execute the following in a terminal window:
ssh administrator@192.168.131.1
You will be promoted to enter a password. The default password is clearpath and you set a new password
on first connection.
Changing the Default Password
All Clearpath robots ship from the factory with their login password set to clearpath. Upon receipt of your
robot we recommend changing the password.
To change the password to log into your robot, run the following command:
passwd
This will prompt you to enter the current password, followed by the new password twice. While typing the
passwords in the passwd prompt there will be no visual feedback (e.g. "*" characters).
To further restrict access to your robot you can reconfigure the robot's SSH service to disallow logging in with a password and require SSH certificates to log in. This tutorial covers how to configure SSH to disable password-based login.
Wi-Fi Setup
Now that you are connected via SSH over a wired connection using the steps above, you can set up your robot's computer
(running Ubuntu 20.04) to connect to a local Wi-Fi network. (For legacy systems running Ubuntu 18.04, use
wicd-curses instead.)
Clearpath robots running Ubuntu 20.04 and later use netplan for configuration of their wired and wireless interfaces.
To connect your robot to your wireless network using netplan, create the file /etc/netplan/60-wireless.yaml and fill in the following:
network:
  wifis:
    # Replace WIRELESS_INTERFACE with the name of the wireless network device, e.g. wlan0 or wlp3s0
    # Fill in the SSID and PASSWORD fields as appropriate.  The password may be included as plain-text
    # or as a password hash.  To generate the hashed password, run
    #   echo -n 'WIFI_PASSWORD' | iconv -t UTF-16LE | openssl md4 -binary | xxd -p
    # If you have multiple wireless cards you may include a block for each device.
    # For more options, see https://netplan.io/reference/
    WIRELESS_INTERFACE:
      optional: true
      access-points:
        SSID_GOES_HERE:
          password: PASSWORD_GOES_HERE
      dhcp4: true
      dhcp4-overrides:
        send-hostname: true
Modify the following variables in the file:
- Replace
WIRELESS_INTERFACEwith the name of the robot's Wi-Fi interface (e.g. wlan0, wlp2s0, or wlp3s0). - Replace
SSID_GOES_HEREwith the name of the local Wi-Fi network. - Replace
PASSWORD_GOES_HEREwith the password of the local Wi-Fi network.
Once you are done modifying the file, save it by pressing CTRL + O, then ENTER.
Close the file by pressing CTRL + X.
Then, run the following to bring up the Wi-Fi connection:
sudo netplan apply
You can validate that the connection was successful and determine the IP address of the Wi-Fi interface by running:
ip a
A list of network connections will be displayed within the terminal. Locate the wireless network and make note of its IP address.
Now that you know robot's wireless IP address, you may now exit the Ethernet SSH session by executing
exit.
Remove the Ethernet cable and close up your robot. Now you can SSH into your robot over the wireless network. To do so, execute:
ssh administrator@<IP_OF_ROBOT>
SSH sessions allow you to control your robot's internal computer. You can do various things such as download packages, run updates, add/remove files, transfer files etc.
Installing Remote Computer Software
This step is optional.
It is often convenient to use a Remote Computer (eg. laptop) to command and observe your robot. To do this, your Remote Computer must be configured correctly.
-
Perform a basic ROS installation. See here for details.
-
Install the desktop packages:
- Husky
- Jackal
- Dingo
- Ridgeback
- Warthog
- Boxer
sudo apt-get install ros-noetic-husky-desktopsudo apt-get install ros-noetic-jackal-desktopsudo apt-get install ros-noetic-dingo-desktopsudo apt-get install ros-noetic-ridgeback-desktopsudo apt-get install ros-noetic-warthog-desktopsudo apt-get install ros-noetic-boxer-desktop -
Configure Remote ROS Connectivity.
Click to expand
To use ROS desktop tools, you will need the Remote Computer to be able to connect to your robot's ROS master. This will allow you to run ROS commands like
rostopic list,rostopic echo,rosnode list, and others, from the Remote Computer and the output will reflect the activity on your robot's ROS master, rather than on the Remote Computer. This can be a tricky process, but we have tried to make it as simple as possible.In order for the ROS tools on the Remote Computer to talk to your robot, they need to know two things:
- How to find the ROS master, which is set in the
ROS_MASTER_URIenvironment variable, and - How processes on the ROS master can find the Remote Computer, which is the
ROS_IPenvironment variable.
The suggested pattern is to create a file in your home directory called
remote-robot.shwith the following contents:export ROS_MASTER_URI=http://cpr-robot-0001:11311 # Your robot's hostname
export ROS_IP=10.25.0.102 # Your Remote Computer's wireless IP addressIf your network does not already resolve your robot's hostname to its wireless IP address, you may need to add a corresponding line to the Remote Computer's
/etc/hostsfile:10.25.0.101 cpr-robot-0001noteYou can verify the hostname and IP address of your robot using the following commands during an SSH session with the Onboard Computer.
hostname
hostname -i
Then, when you are ready to communicate remotely with your robot, you can source that script like so, thus defining those two key environment variables in the present context.
source remote-robot.shTo verify that everything is set up properly, try running a few ROS commands:
rosrun rqt_robot_monitor rqt_robot_monitor
rosrun rqt_console rqt_console
You can also run the RViz commands outlined in the Tutorials.
If the tools launch, then everything is setup properly. If you still need assistance in configuring remote access, please contact Clearpath Support. For more general details on how ROS works over TCP with multiple machines, please see: http://wiki.ros.org/ROS/Tutorials/MultipleMachines. For help troubleshooting a multiple machines connectivity issue, see: http://wiki.ros.org/ROS/NetworkSetup.
- How to find the ROS master, which is set in the
-
From your Remote Computer, try launching RViz, the standard ROS robot visualization tool:
- Husky
- Jackal
- Dingo
- Ridgeback
- Warthog
- Boxer
roslaunch husky_viz view_robot.launchroslaunch jackal_viz view_robot.launchroslaunch dingo_viz view_robot.launchroslaunch ridgeback_viz view_robot.launchroslaunch warthog_viz view_robot.launchroslaunch boxer_viz view_robot.launchFrom within RViz, you can use interactive markers to drive your robot, you can visualize its published localization estimate and you can visualize any attached sensors which have been added to its robot description XML URDF.
Customizing Husky Configuration
If upgrading from a prior ROS release, you should now re-examine your backed-up files from Performing a Backup to determine if there's any customizations that need to be configured on your platform.
Environment Variables
Husky can be customized and extended through the use of several environment variables. These are summarized in the README file.
Adding a Source Workspace
Configuring non-standard peripherals requires a source workspace on the robot computer.
The instructions below use cpr_noetic_ws as the workspace name. You can choose a different
workspace name and substitute it in the commands below.
-
Create a new workspace:
mkdir -p ~/cpr_noetic_ws/src -
Add any custom source packages to the
~/cpr_noetic_ws/srcdirectory. -
After adding your packages, make sure any necessary dependencies are installed:
cd ~/cpr_noetic_ws/
rosdep install --from-paths src --ignore-src --rosdistro noetic -y -
Build the workspace:
cd ~/cpr_noetic_ws/
catkin_make -
Modify your robot-wide setup file (
/etc/ros/setup.bash) to source your new workspace instead of the base noetic install:source /home/administrator/cpr_noetic_ws/devel/setup.bash -
Reinitialize your environment so that it picks up your new workspace:
source /etc/ros/setup.bash
Using Husky
Simulating Husky
Whether you actually have a Husky robot or not, the Husky simulator is a great way to get started with ROS robot development. In this tutorial, we will go through the basics of starting Gazebo and RViz and how to drive your Husky around.
Installation
To get started with the Husky simulation, make sure you have a working ROS installation set up on your Ubuntu desktop, and install the Husky-specific metapackages for desktop and simulation:
sudo apt-get install ros-noetic-husky-simulator ros-noetic-husky-desktop
Launching Gazebo
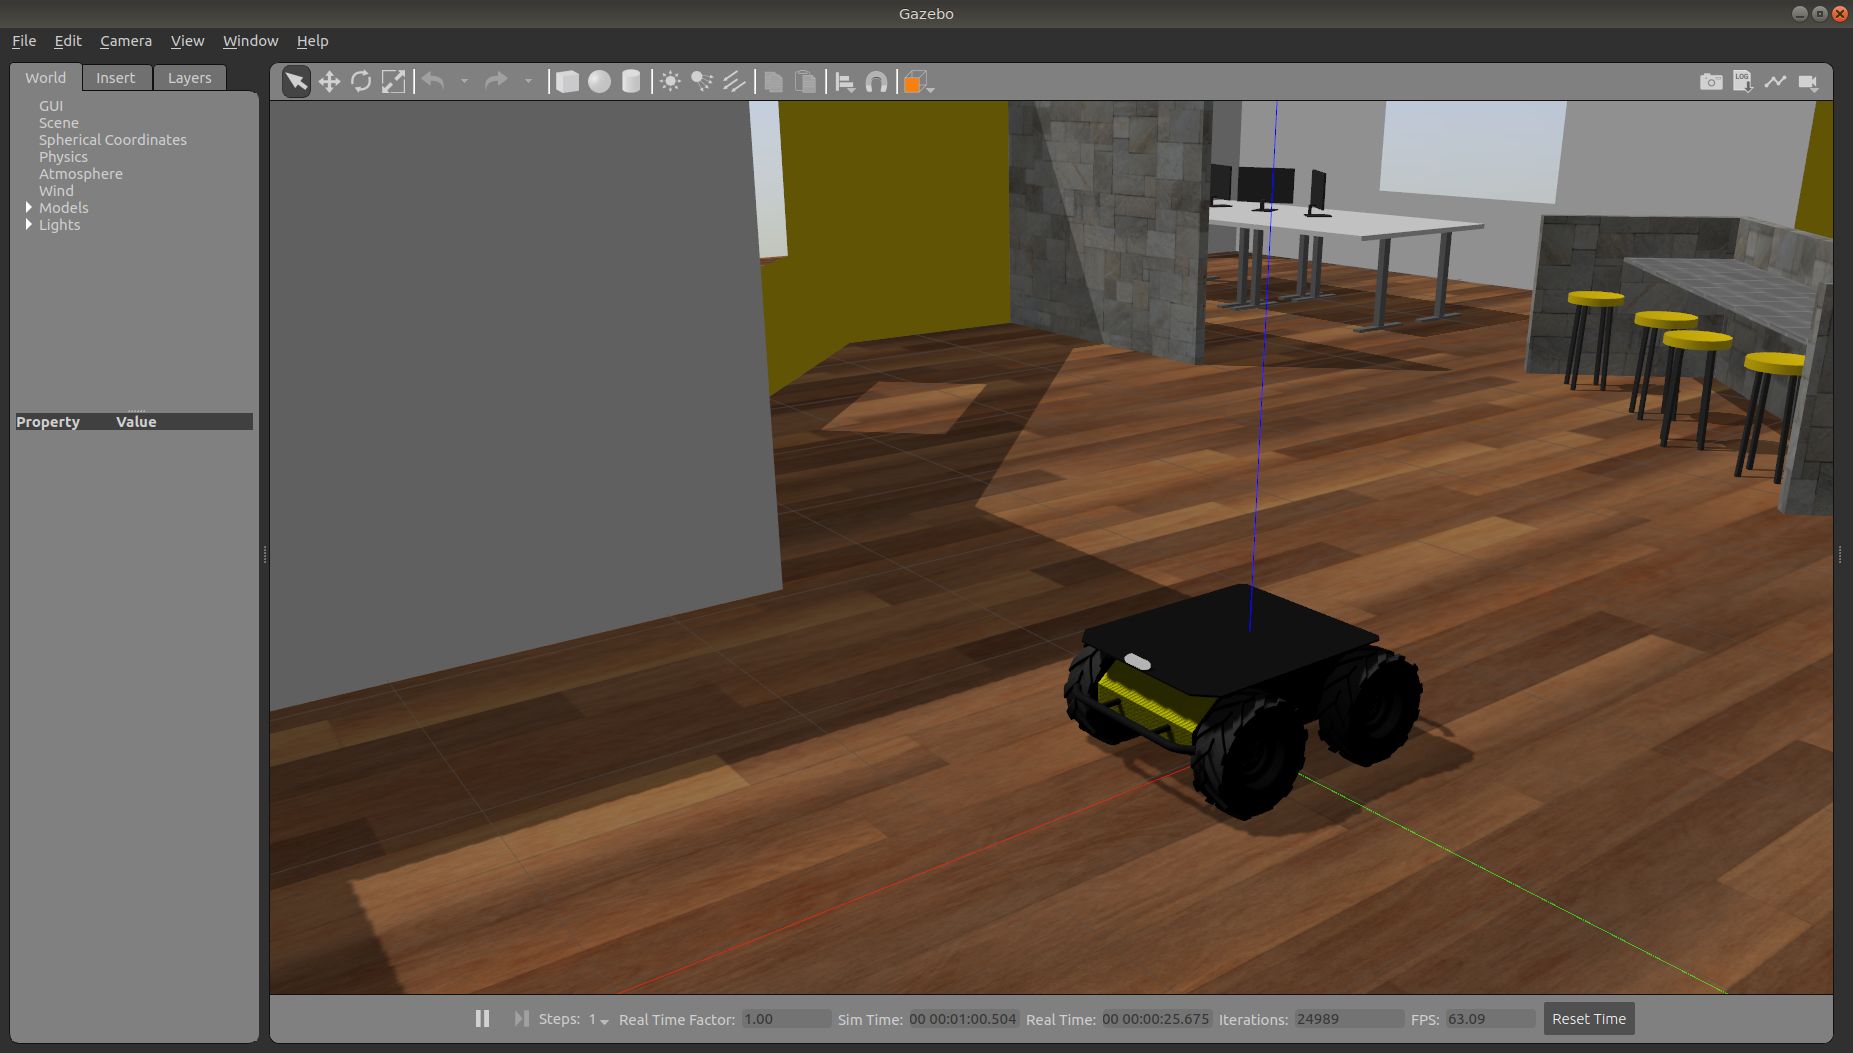
Gazebo is the most common simulation tool used in ROS. Husky's model in Gazebo include reasonable approximations of its dynamics, including wheel slippage, skidding, and inertia. To launch simulated Husky in a simple example world, run the following command:
roslaunch husky_gazebo husky_playpen.launch
You should see the following window appear, or something like it.
You can adjust the camera angle by clicking and dragging while holding CTRL, ALT, or the Shift key.
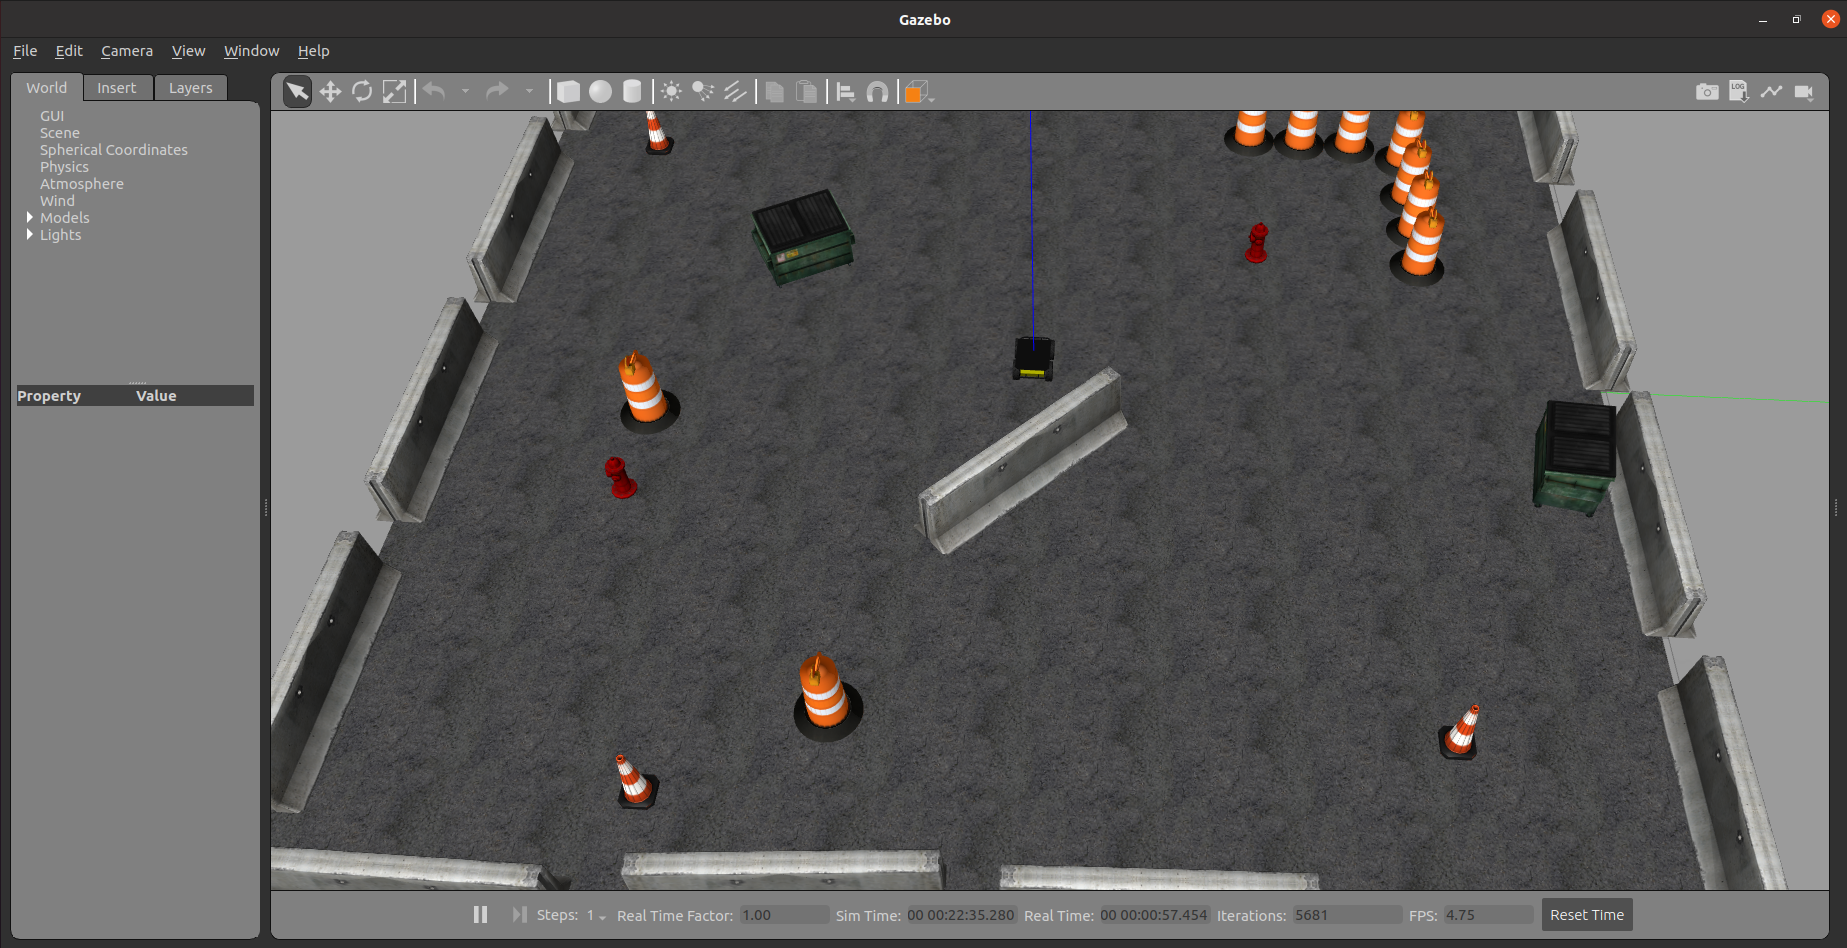
To stop the simulation, close the Gazebo window, and then CTRL-C out of the terminal process.
The window which you are looking at is the Gazebo Client. This window shows you the "true" state of the simulated world which the robot exists in. It communicates on the backend with the Gazebo Server, which is doing the heavy lifting of actually maintaining the simulated world. At the moment, you're running both the client and server locally on your own machine, but some advanced users may choose to run heavy duty simulations on separate hardware and connect to them over the network.
Note that like Husky itself, Husky can be customized for simulations. For example, to add a front laser, stop the previous simulation, enable the appropriate environment variable (see here for options) and re-launch the simulation.
export HUSKY_LMS1XX_ENABLED='1'
roslaunch husky_gazebo husky_playpen.launch
You should now see the simulator running with the simulated SICK LMS-111 laser present:
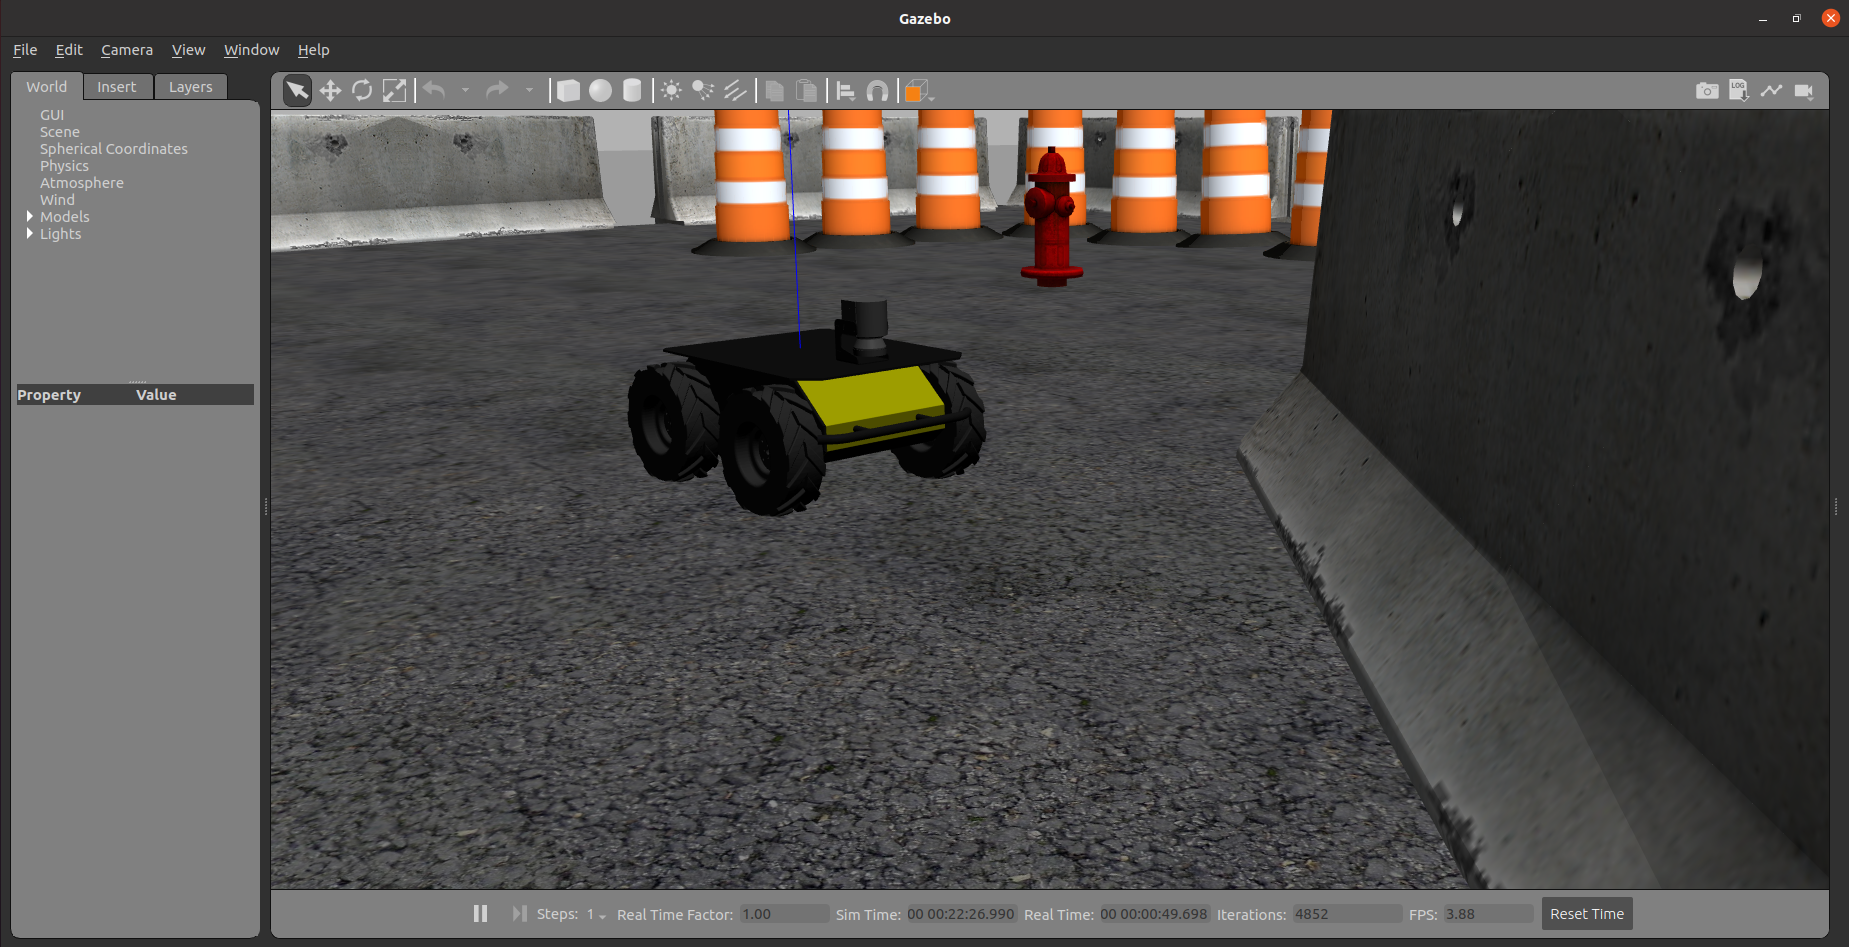
Gazebo not only simulates the physical presence of the laser scanner, it also provides simulated data which reflects the robot's surroundings in its simulated world. We will visualize the simulated laser scanner data shortly.
See also Additional Simulation Worlds.
Customizing Husky's Payload
To customize Husky's payload you must use the environment variables described in here. For example, to equip Husky with a Sick LMS-1xx lidar, as pictured in several of the images above, run
export HUSKY_LMS1XX_ENABLED=1
before launching the simulation world.
You can also add additional sensors by creating a customized URDF and setting the HUSKY_URDF_EXTRAS environment
variable to point to it.
For example, let's suppose you want to equip Husky with an Intel RealSense D435 camera.
First, install the realsense2_camera and realsense2_description packages, along with the gazebo plugins:
sudo apt-get install ros-$ROS_DISTRO-realsense2-camera ros-$ROS_DISTRO-realsense2-description ros-$ROS_DISTRO-gazebo-plugins
Then create your customized URDF file, for example $HOME/Desktop/realsense.urdf.xacro. Put the following in it:
<?xml version="1.0"?>
<robot xmlns:xacro="http://ros.org/wiki/xacro">

  <link name="front_realsense" />

  <!--
    The gazebo plugin aligns the depth data with the Z axis, with X=left and Y=up
    ROS expects the depth data along the X axis, with Y=left and Z=up
    This link only exists to give the gazebo plugin the correctly-oriented frame
  -->
  <link name="front_realsense_gazebo" />
  <joint name="front_realsense_gazebo_joint" type="fixed">
    <parent link="front_realsense"/>
    <child link="front_realsense_gazebo"/>
    <origin xyz="0.0 0 0" rpy="-1.5707963267948966 0 -1.5707963267948966"/>
  </joint>

  <gazebo reference="front_realsense">
    <turnGravityOff>true</turnGravityOff>
    <sensor type="depth" name="front_realsense_depth">
      <update_rate>30</update_rate>
      <camera>
        <!-- 75x65 degree FOV for the depth sensor -->
        <horizontal_fov>1.5184351666666667</horizontal_fov>
        <vertical_fov>1.0122901111111111</vertical_fov>

        <image>
          <width>640</width>
          <height>480</height>
          <format>RGB8</format>
        </image>
        <clip>
          <!-- give the colour sensor a maximum range of 50m so that the simulation renders nicely -->
          <near>0.01</near>
          <far>50.0</far>
        </clip>
      </camera>
      <plugin name="kinect_controller" filename="libgazebo_ros_openni_kinect.so">
        <baseline>0.2</baseline>
        <alwaysOn>true</alwaysOn>
        <updateRate>30</updateRate>
        <cameraName>realsense</cameraName>
        <imageTopicName>color/image_raw</imageTopicName>
        <cameraInfoTopicName>color/camera_info</cameraInfoTopicName>
        <depthImageTopicName>depth/image_rect_raw</depthImageTopicName>
        <depthImageInfoTopicName>depth/camera_info</depthImageInfoTopicName>
        <pointCloudTopicName>depth/color/points</pointCloudTopicName>
        <frameName>front_realsense_gazebo</frameName>
        <pointCloudCutoff>0.105</pointCloudCutoff>
        <pointCloudCutoffMax>8.0</pointCloudCutoffMax>
        <distortionK1>0.00000001</distortionK1>
        <distortionK2>0.00000001</distortionK2>
        <distortionK3>0.00000001</distortionK3>
        <distortionT1>0.00000001</distortionT1>
        <distortionT2>0.00000001</distortionT2>
        <CxPrime>0</CxPrime>
        <Cx>0</Cx>
        <Cy>0</Cy>
        <focalLength>0</focalLength>
        <hackBaseline>0</hackBaseline>
      </plugin>
    </sensor>
  </gazebo>

  <link name="front_realsense_lens">
    <visual>
      <origin xyz="0.02 0 0" rpy="${pi/2} 0 ${pi/2}" />
      <geometry>
        <mesh filename="package://realsense2_description/meshes/d435.dae" />
      </geometry>
      <material name="white" />
    </visual>
  </link>

  <joint type="fixed" name="front_realsense_lens_joint">
    <!-- Offset the camera 2cm backwards and 1cm up -->
    <origin xyz="-0.02 0 0.01" rpy="0 0 0" />
    <parent link="top_plate_front_link" />
    <child link="front_realsense_lens" />
  </joint>
  <joint type="fixed" name="front_realsense_joint">
    <origin xyz="0.025 0 0" rpy="0 0 0" />
    <parent link="front_realsense_lens" />
    <child link="front_realsense" />
  </joint>
</robot>
This file defines the additional links for adding a RealSense camera to the robot, as well as
configuring the openni_kinect plugin for Gazebo to simulate data from a depth camera. The
camera itself will be connected to the Husky's top_plate_front_link link. This places the
camera at the very front edge of the robot's top cover-plate.
Now, set the HUSKY_URDF_EXTRAS environment variable and try viewing the Husky model:
export HUSKY_URDF_EXTRAS=$HOME/Desktop/realsense.urdf.xacro
roslaunch husky_viz view_model.launch
You should see the Husky model in RViz, with the RealSense camera mounted to it:
To launch the customized Husky in any of the new simulation environments, similarly run:
export HUSKY_URDF_EXTRAS=$HOME/Desktop/realsense.urdf.xacro
roslaunch cpr_office_gazebo office_world.launch platform:=husky
You should see Husky spawn in the office world with the RealSense camera:
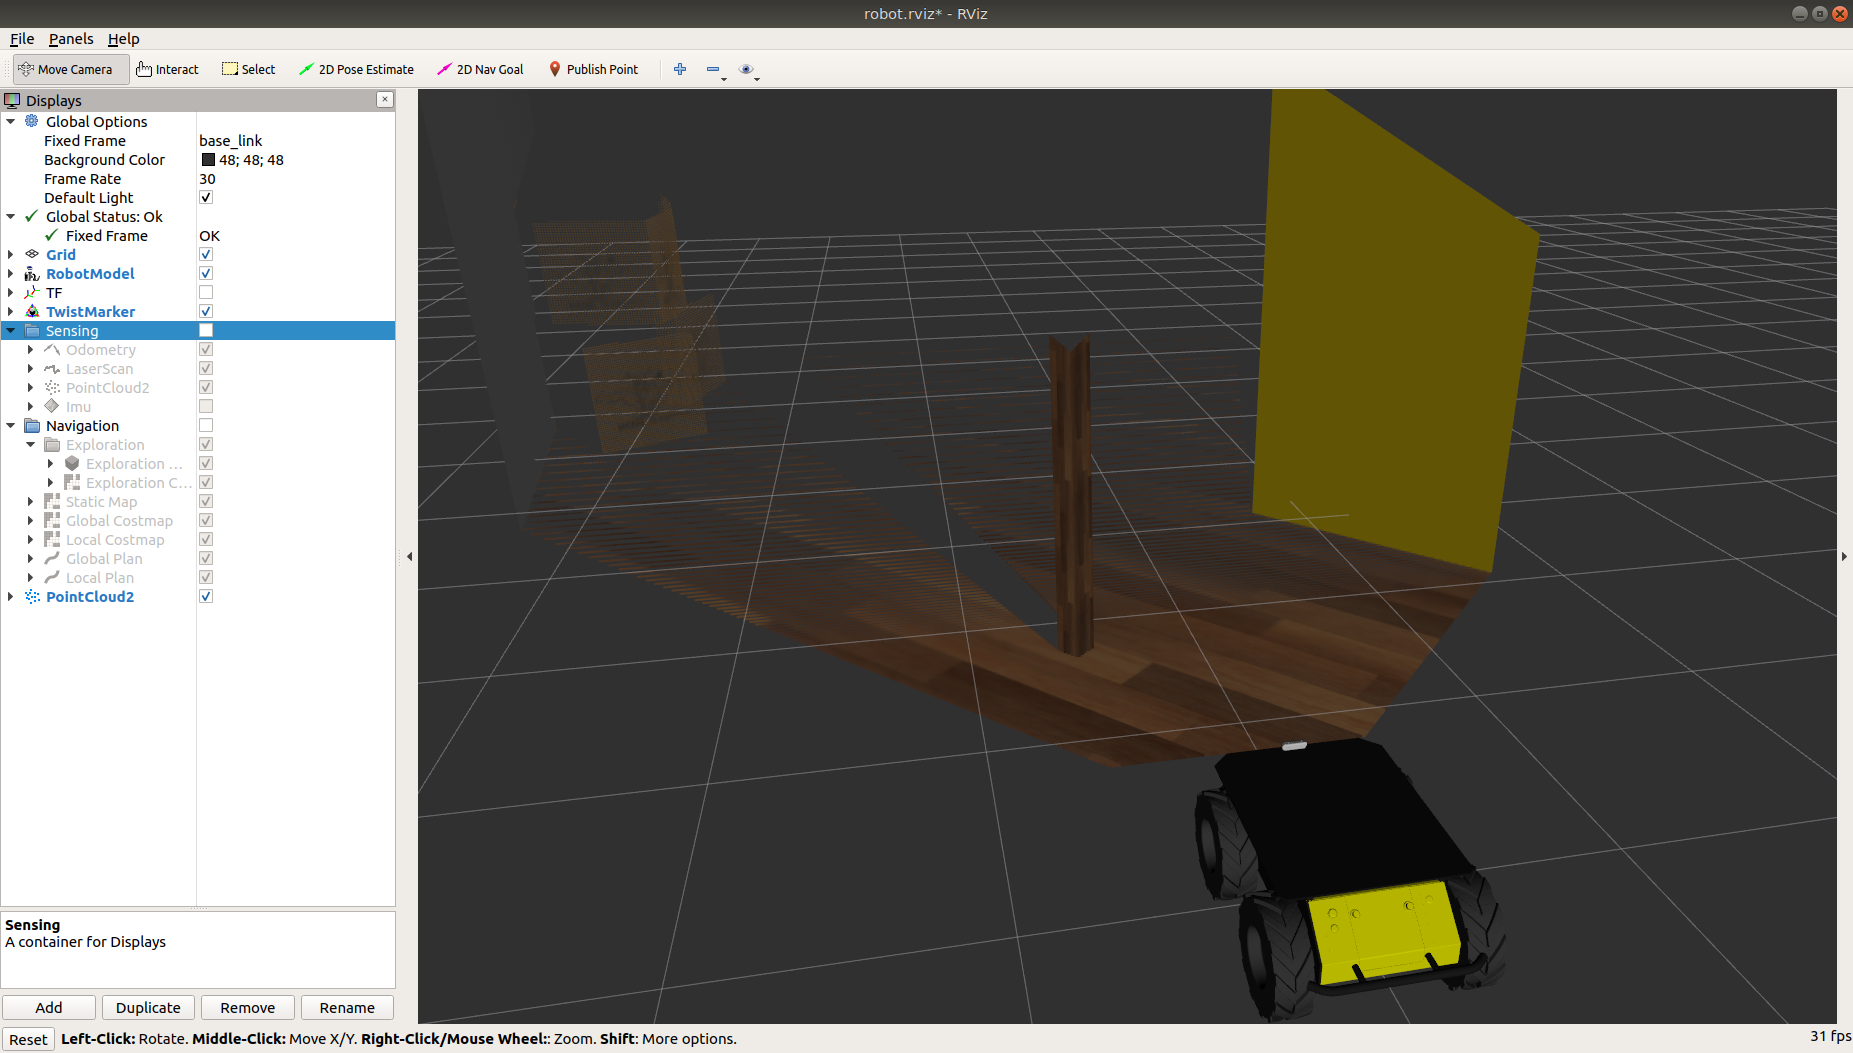
You can view the sensor data from the RealSense camera by running
roslaunch husky_viz view_robot.launch
and adding the camera and pointcloud from the /realsense/color/image_raw and
/realsense/depth/color/points topics:
Interfacing with Husky
Both simulated and real Husky robots expose the same ROS interface, and can be interacted with in the same way.
Please make sure that the desktop packages for Husky are installed:
sudo apt-get install ros-noetic-husky-desktop
Visualization
You may start a preconfigured RViz instance using the following command:
roslaunch husky_viz view_robot.launch
Control
There are three ways to send your Husky control commands:
-
Using the provided PS4 or Logitech controller. Refer to the User Manual details on how to use the controller.
-
Using the RViz instance above. If you select the Interact option in the top toolbar, an interactive marker will appear around the Husky and can be used to control speed.
-
The rqt_robot_steering plugin. Run the
rqtcommand, and select Plugins→Robot Tools→Robot Steering from the top menu.
Husky uses twist_mux to mix four separate
geometry_msgs\Twist control channels
into the husky_velocity_controller/cmd_vel topic. See Motion Topics for
the priority levels for the different inputs.
Additional velocity channels can be defined in
twist_mux.yaml,
or can be piped into the lowest-priority cmd_vel topic.
Odometry
Husky publishes odometry information on the odometry/filtered topic, as
nav_msgs/Odometry messages.
These are generated by ekf_localization_node,
which processes data from several sensor sources using an Extended Kalman filter (EKF).
This includes data from the wheel encoders and IMU (if available).
| Topic | Sources | Description |
|---|---|---|
husky_velocity_controller/odom | husky_node | Receives motion commands from twist_mux based off their priority |
imu/data | imu_filter_madgwick | Joystick teleop input |
odometry/filtered | ekf_localization_node | Interactive marker teleop input |
Additional odometry information sources can be added to the EKF in localization.yaml.
Diagnostics
Diagnostics are only applicable to real Husky robots, not simulation.
Husky provides hardware and software system diagnostics on the ROS standard
/diagnostics topic. The best way to view these messages is using the
rqt_runtime_monitor plugin. Run the rqt command, and select
Plugins→Robot Tools→Runtime Monitor from the top menu.
The same information is also published as a husky_msgs\HuskyStatus message on the status topic.
Driving Husky
There are four ways to drive Husky and each way will work on a physical Husky robot as well as on a simulated Husky.
- Using the interactive remote controller in RViz. See Simulating Husky.
- Using autonomous navigation. See Navigating Husky.
- Using the controller for teleoperation. See below.
- Publishing ROS messages. See below.
Husky is a heavy, robot capable of reaching high speeds. Careless driving can cause harm to the operator, bystanders, the robot, or other property. Always remain vigilant, ensure you have a clear line of sight to the robot, and operate the robot at safe speeds.
Driving with Remote Controller�
For instructions on controller pairing, Pairing the Controller.
When familiarizing yourself with your robot's operation, always hold the left button (L1/LB). Once you are comfortable with how it operates and you are in a large area with plenty of open room, then you can use R1/RB to enable turbo mode.
Differential Drive Robots (Husky, Jackal, Dingo-D, Warthog, Boxer)
To drive your differential drive robot, Axis 0 controls the robot's steering, Axis 1 controls the forward/backward velocity, Button 4 acts as enable, and Button 5 acts as enable-turbo. On common controllers these correspond to the following physical controls:
| Axis/Button | Physical Input | PS4 | F710 | Xbox One | Action |
|---|---|---|---|---|---|
| Axis 0 | Left thumb stick vertical | LJ | LJ | LJ | Drive forward/backward |
| Axis 1 | Left thumb stick horizontal | LJ | LJ | LJ | Rotate/turn |
| Button 4 | Left shoulder button or trigger | L1 | LB | LB | Enable normal speed |
| Button 5 | Right shoulder button or trigger | R1 | RB | RB | Enable turbo speed |
You must hold either Button 4 or Button 5 at all times to drive the robot.
Omnidirectional Robots (Dingo-O, Ridgeback)
To drive your omnidirectional robot, Axis 0 controls the robot's steering, Axis 1 controls the robot's left/right translation, and Axis 2 controls the forward/backward velocity. Button 4 acts as enable, and Button 5 acts as enable-turbo. On common controllers these correspond to the following physical controls:
| Axis/Button | Physical Input | PS4 | F710 | Xbox One | Action |
|---|---|---|---|---|---|
| Axis 0 | Left thumb stick vertical | LJ | LJ | LJ | Drive forward/backward |
| Axis 1 | Left thumb stick horizontal | LJ | LJ | LJ | Translate left/right |
| Axis 2 | Right thumb stick horizontal | RJ | RJ | RJ | Rotate/turn |
| Button 4 | Left shoulder button or trigger | L1 | LB | LB | Enable normal speed |
| Button 5 | Right shoulder button or trigger | R1 | RB | RB | Enable turbo speed (Dingo-O only; not supported on Ridgeback) |
You must hold either Button 4 or Button 5 at all times to drive the robot.
Using Remote Control with Gazebo
You can also use a remote controller to drive your robot in Gazebo. To set up your computer for teleop using the remote controller follow these steps:
-
Connect the controller to your PC.
-
Set the
HUSKY_JOY_DEVICEenvironment variable to point to your game controller device Normally this will be/dev/input/js0. -
Launch Gazebo as described in Simulation.
Driving with ROS Messages
You can manually publish geometry_msgs/Twist ROS messages to either the
/husky_velocity_controller/cmd_vel or the /cmd_vel ROS topics to drive Husky.
For example, in terminal, run:
rostopic pub /husky_velocity_controller/cmd_vel geometry_msgs/Twist '{linear: {x: 0.5, y: 0.0, z: 0.0}, angular: {x: 0.0, y: 0.0, z: 0.0}}'
The command above makes Husky drive forward momentarily at 0.5 m/s without any rotation. To
have Husky move forward continually, add -r 10 to the end of the command above.
Using rqt_graph
We can also see the structure of how topics are passed around the system. Leave the publishing window running
from the example above (using the -r 10 option), then open a second terminal window and run:
rosrun rqt_graph rqt_graph
This command generates a representation of how the nodes and topics running on the current ROS Master are related. You should get something similar to the following:
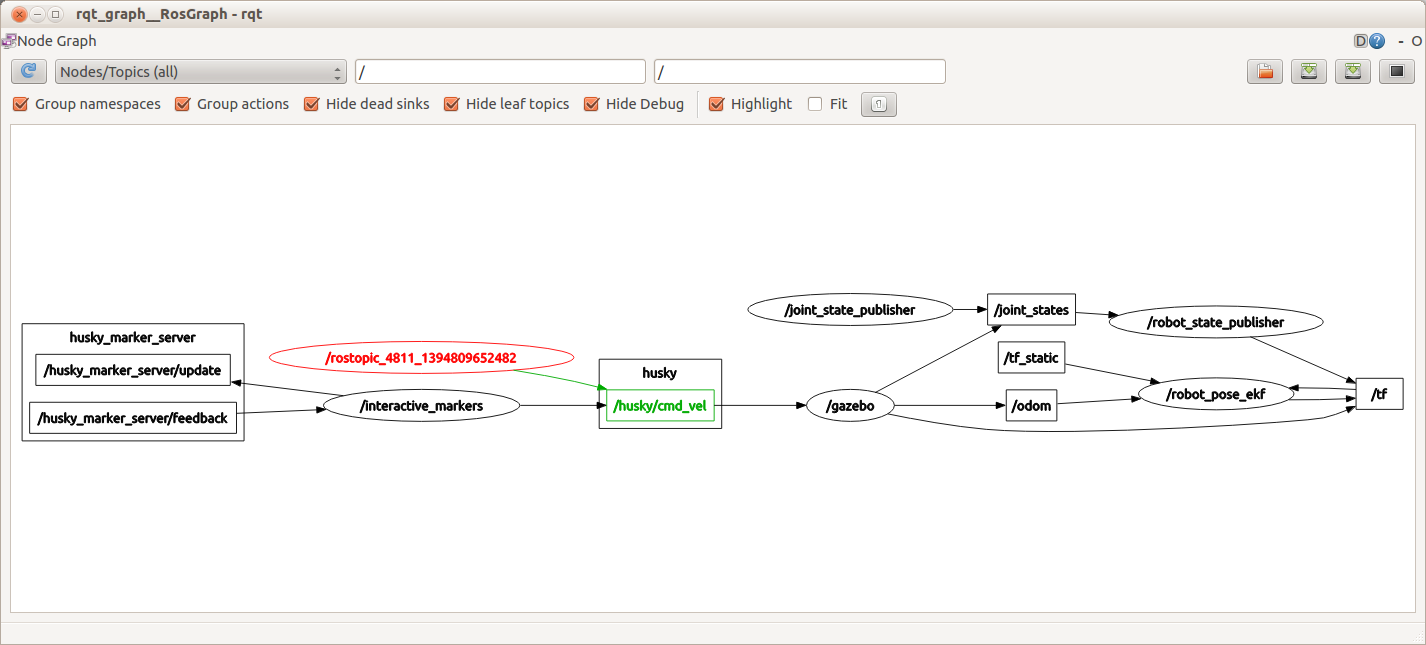
The highlighted node and arrow show the topic that you are publishing to the simulated Husky. This Husky then goes on to update the gazebo virtual environment,
which takes care of movement of the joints (wheels) and the physics of the robot.
The rqt_graph command is very handy to use, when you are unsure who is publishing to what in ROS.
Once you figure out what topic you are interested in, you can see the content of the topic using rostopic echo.
Using tf
In ROS, tf is a special topic that keeps track of coordinate frames, and how they relate to each other.
The simulated Husky starts at (0,0,0) in the world coordinate frame. When the Husky moves, its own coordinate
frame changes. Each wheel has a coordinate frame that tracks how it is rotating, and where it is. Generally,
anything on the robot that is not fixed in space, will have a tf describing it.
In the rqt_graph section above, you can see that the /tf topic is published to and subscribed from by many
different nodes.
One intuitive way to see how the tf topic is structured for a robot is to use the view_frames tool
provided by ROS. Open a terminal window and run:
rosrun tf view_frames
Wait for this to complete, and then run:
evince frames.pdf
This will bring up something similar to the following image.
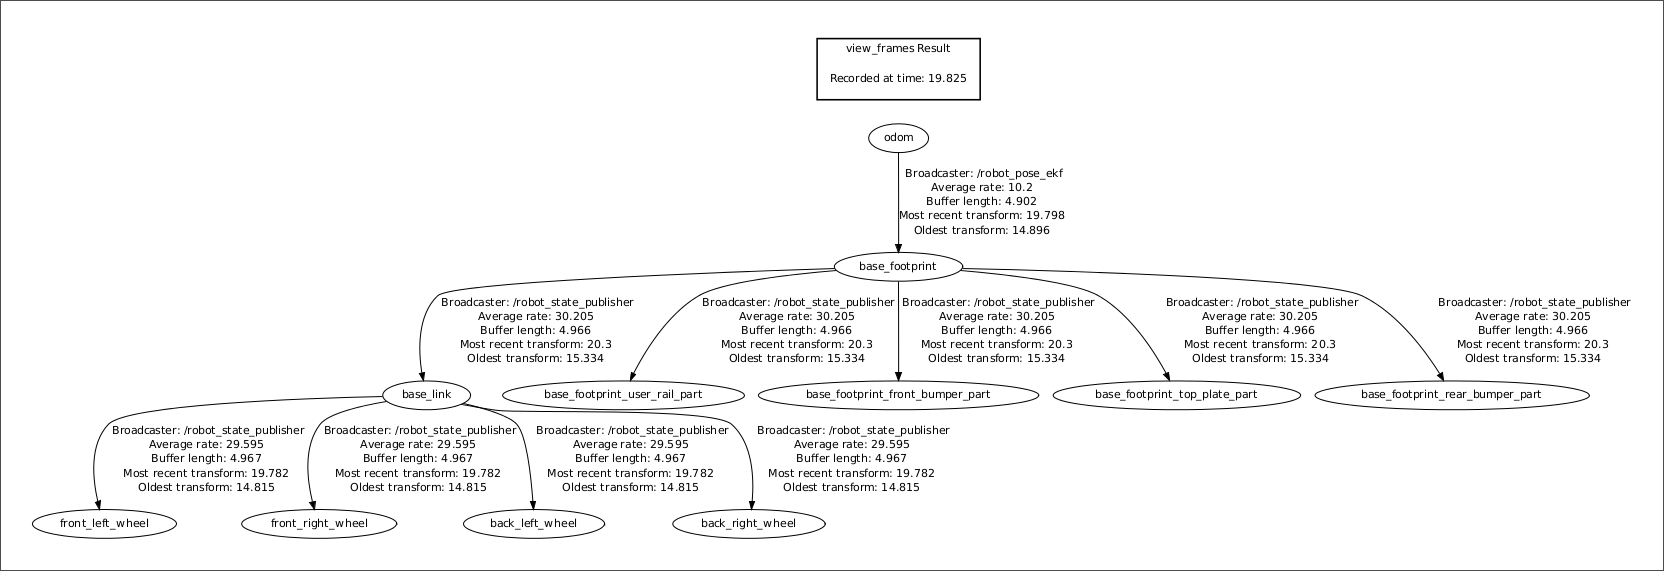
Here we can see that all four wheel are referenced to the base_link. We also see that the odom topic
is driving the reference of the whole robot. This means that if you write to the odom topic,
such as when you publish to the /cmd_vel topic, then the whole robot will move.
Keeping Husky Updated
For details on updating Husky software or firmware, refer to Software Maintenance.
Navigating Husky
There are several options for autonomous navigation for Husky. These are outlined in the sections that follow.
Husky Move Base Demo
This tutorial shows you how to use move_base to perform basic
autonomous planning and movement on a simulated Husky, or a factory-standard Husky with a laser
scanner publishing on the /front/scan topic.
To adapt this demo to your own Husky, you may need to clone the husky_navigation repository, and modify the relevant parameters. To learn about move_base and the navigation stack, see the ROS Navigation Tutorials.
Instructions:
-
Ensure that the Husky navigation demo package is installed:
sudo apt-get install ros-noetic-husky-navigation -
Open window #1 and start the Clearpath-configured Husky simulation environment:
roslaunch husky_gazebo husky_playpen.launch -
Open window #2 and start the Clearpath-configured RViz visualizer:
roslaunch husky_viz view_robot.launch -
Open window #3 and start the move_base demo:
roslaunch husky_navigation move_base_mapless_demo.launch -
In the RViz visualizer, make sure the visualizers in the Navigation group are enabled.
-
Use the 2D Nav Goal tool in the top toolbar to select a movement goal in the visualizer. Make sure to select an unoccupied (dark grey) or unexplored (light grey) location.
-
Note that in this example, the robot has no absolute localization source, and the position estimate will drift relative to the world. See the next tutorial for a demo with localization.
Husky AMCL Demo
This tutorial shows you how to use move_base with
amcl to perform autonomous planning and movement with localization
on a simulated Husky, or a factory-standard Husky with a laser scanner publishing on the /front/scan topic.
To adapt this demo to your own Husky, you may need to clone the husky_navigation repository, and modify the relevant parameters. To learn about move_base, amcl, and the navigation stack, see the ROS Navigation Tutorials.
Instructions:
-
Ensure that the Husky navigation demo package is installed:
sudo apt-get install ros-noetic-husky-navigation -
Open window #1 and start the Clearpath-configured Husky simulation environment:
export HUSKY_LMS1XX_ENABLED=1; roslaunch husky_gazebo husky_playpen.launch -
Open window #2 and start the Clearpath-configured RViz visualizer:
roslaunch husky_viz view_robot.launch -
Open window #3 and start the move_base demo:
roslaunch husky_navigation amcl_demo.launch -
In the RViz visualizer, make sure the visualizers in the Navigation group are enabled.
-
Use the 2D Pose Estimate tool in the top toolbar to give amcl an initial pose estimate. Without an initial estimate, the Monte Carlo localization approach is unlikely to converge the correct pose.
-
Use the 2D Nav Goal tool in the top toolbar to select a movement goal in the visualizer. Make sure to select an unoccupied (dark grey) or unexplored (light grey) location.
-
Note that in this example, the robot uses data from the laser scanner to correct the fused odometry estimate, and mitigate drift. The amcl node uses a pregenerated map of this environment to compare against incoming scans. See the next tutorial for a demo with localization and mapping.
Husky Gmapping Demo
This tutorial shows you how to use move_base with
gmapping to perform autonomous planning and movement with simultaneous
localization and mapping (SLAM), on a simulated Husky, or a factory-standard Husky with a laser scanner
publishing on the /front/scan topic.
To adapt this demo to your own Husky, you may need to clone the husky_navigation repository, and modify the relevant parameters. To learn about move_base, gmapping, and the navigation stack, see the ROS Navigation Tutorials.
Instructions:
-
Ensure that the Husky navigation demo package is installed:
sudo apt-get install ros-noetic-husky-navigation -
Open window #1 and start the Clearpath-configured Husky simulation environment:
export HUSKY_LMS1XX_ENABLED=1; roslaunch husky_gazebo husky_playpen.launch -
Open window #2 and start the Clearpath-configured RViz visualizer:
roslaunch husky_viz view_robot.launch -
Open window #3 and start the move_base demo:
roslaunch husky_navigation gmapping_demo.launch -
In the RViz visualizer, make sure the visualizers in the Navigation group are enabled.
-
Use the 2D Nav Goal tool in the top toolbar to select a movement goal in the visualizer. Make sure to select an unoccupied (dark grey) or unexplored (light grey) location.
-
As the robot moves, you should see the grey static map (map topic) grow. Occasionally, the Gmapping algorithm will relocalize the robot, causing a discrete jump in the map→odom transform.
-
To save the generated map, you can run the map_saver utility:
rosrun map_server map_saver -f <filename>
Husky Frontier Exploration Demo
The frontier_exploration package is no longer officially supported in ROS Noetic. These instructions
require building the package from source. Because the package is no longer officially supported support for
any issues you encounter will be limited.
This tutorial shows you how to use move_base
with gmapping and
frontier_exploration to perform autonomous planning
movement, and exploration with simultaneous localization and mapping (SLAM), on a simulated Husky,
or a factory-standard Husky with a laser scanner publishing on the /front/scan topic.
To adapt this demo to your own Husky, you may need to clone the husky_navigation repository, and modify the relevant parameters. To learn about move_base, gmapping, frontier_exploration and the navigation stack, see the ROS Navigation Tutorials.
Preparation
First, you must build the frontier_exploration package from source. Create a catkin workspace and
cd into it (or cd into an existing workspace if you already have one) and clone the code from GitHub:
cd ~/catkin_ws/src
git clone https://github.com/paulbovbel/frontier_exploration.git
Install any additional dependencies:
cd ~/catkin_ws
rosdep install --from-paths src --ignore-src -r -y
Then make the exploration_msgs package:
catkin_make --pkg exploration_msgs
Once that package is built, source your workspace and build the rest of the package:
source devel/setup.bash
catkin_make
Make sure you have the husky_navigation package installed by running
sudo apt-get install ros-noetic-husky-navigation
Because frontier_exploration is not officially supported by ROS Noetic you will need to modify the following
launch files inside the husky_navigation package:
launch/exploration.launchlaunch/exploration_demo.launch
Remove the commented-out sections so that the files look like this:
exploration.launch:
<launch>

  <node pkg="frontier_exploration" type="explore_client" name="explore_client" output="screen"/>
  <node pkg="frontier_exploration" type="explore_server" name="explore_server" output="screen">
    <param name="frequency" value="1.0"/>

    <!-- Should be less than sensor range -->
    <param name="goal_aliasing" value="2.0"/>
    <rosparam file="$(find husky_navigation)/config/costmap_common.yaml" command="load" ns="explore_costmap" />
    <rosparam file="$(find husky_navigation)/config/costmap_exploration.yaml" command="load" ns="explore_costmap" />
  </node>
</launch>
exploration_demo.launch:
<launch>
  <!--- Run gmapping -->
  <include file="$(find husky_navigation)/launch/gmapping.launch" />

  <!--- Run Move Base -->
  <include file="$(find husky_navigation)/launch/move_base.launch" />

  <!-- Run Frontier Exploration -->
  <include file="$(find husky_navigation)/launch/exploration.launch" />
</launch>
Running the demo
In each terminal window, make sure to source the catkin workspace where you built frontier_exploration.
-
Ensure that the Husky navigation demo package is installed:
sudo apt-get install ros-noetic-husky-navigation -
Open window #1 and start the Clearpath-configured Husky simulation environment:
export HUSKY_LMS1XX_ENABLED=1; roslaunch husky_gazebo husky_playpen.launch -
Open window #2 and start the Clearpath-configured RViz visualizer:
roslaunch husky_viz view_robot.launch -
Open window #3 and start the move_base demo:
roslaunch husky_navigation exploration_demo.launch -
In the RViz visualizer, make sure the visualizers in the Navigation group are enabled.
-
Use the Point tool in the top toolbar to draw a closed polygon on the map that the Husky should explore. Watch the terminal window for instructions.
-
As the robot moves, you should see the grey static map (map topic) grow. Occasionally, the Gmapping algorithm will relocalize the robot, causing a discrete jump in the map→odom transform.
-
When the exploration goal is complete, you will see a feedback message in the terminal window. You can now issue a new exploration goal if you wish.
-
To save the generated map, you can run the map_saver utility:
rosrun map_server map_saver -f <filename>
Testing Husky
Husky robots come preinstalled with a set of test scripts as part of the husky_tests ROS package, which can be run to verify robot functionality at the component and system levels.
If your Husky does not have the husky_tests ROS package installed already, you can manually install it by opening terminal and running:
sudo apt-get install ros-noetic-husky-tests
Running ROS Tests
The ros_tests script exposes a set of interactive tests to verify the functionality of core features.
These tests run at the ROS-level via ROS topics, and serve as a useful robot-level diagnostic tool for
identifying the root cause of problems, or at the very least, narrowing down on where the root cause(s) may be.
To run ros_tests on a Husky robot, open terminal and run:
rosrun husky_tests ros_tests
Upon running ros_tests, a list of available tests will be shown in a menu. From the menu, you can choose
individual tests to run, or simply choose the option to automatically run all the tests.
The details of each test are shown below.
-
Motion Stop Test
Checks that the robot's motion-stop is working properly.
This test subscribes to the
/statusROS topic and checks that when the motion-stop is manually engaged by the user, the motion-stop state is correctly reported on the/statusROS topic. -
ADC Test
Checks that the robot's voltage and current values across its internal hardware components are within expected tolerances.
This test subscribes to the
/statusROS topic and checks that the voltage and current values across the internal hardware are within expected tolerances. -
Rotate Test (Optional test; only applies to Husky's with an IMU)
Rotates the robot counter clockwise 2 full revolutions and checks that the motors, IMU, and EKF odometry are working properly.
This test:
- Subscribes to the
/imu/dataROS topic to receive angular velocity measurements from the IMU's Gyroscope. These measurements are converted into angular displacement estimations, and the robot will rotate until 2 full revolutions are estimated. - Subscribes to the
/odometry/filteredROS topic to receive angular velocity estimations from the EKF odometry. These measurements are converted into angular displacement estimations, and are output as comparison to the angular displacement estimations from the IMU's Gyroscope. - Publishes to the
/cmd_velROS topic to send drive commands to rotate the robot. - The user will be asked to verify that the robot rotates 2 full revolutions.
noteThe Rotate Test rotates the robot using the IMU's Gyroscope data, which inherently will not be 100% accurate. Therefore, some undershoot/overshoot is to be expected.
- Subscribes to the
-
Drive Test
Drives the robot forward 1 metre and checks that the motors, encoders, and encoder-fused odometry are working properly.
This test:
- Subscribes to the
/husky_velocity_controller/odomROS topic to receive linear displacement estimations from the encoder-fused odometry. The robot will drive forward until 1 metre is estimated. - Subscribes to the
/joint_stateROS topic to receive linear displacement measurements from individual the encoders. These measurements are output as comparison to the linear displacement estimations from the encoder-fused odometry. - Publishes to the
/cmd_velROS topic to send drive commands to drive the robot. - The user will be asked to verify that the robot drives forward 1 metre.
noteThe Drive Test drives the robot using the Odometry data, which inherently will not be 100% accurate. Therefore, some undershoot/overshoot is to be expected.
- Subscribes to the
Advanced Topics
Calibrating the Magnetometer (UM6 IMU only)
Husky will rotate autonomously during calibration. Make sure all external cables are unplugged, and Husky has unobstructed room to move in a 1 metre radius.
If your Husky has a UM6 IMU installed, you must calibrate the magnetometer for magnetic deviation before it will be used for pose estimation.
-
Make sure the ros service is running.
-
Execute the calibration script on the Husky computer remotely via SSH:
rosrun husky_bringup calibrate_compass -
Follow the onscreen instructions. To drive Husky using the included game controller, you must hold down either the left or right shoulder buttons (L1 or R2 on a PS4 controller, LB or RB on the Logitech F710). Holding the left button will enable normal operation while holding the right button will enable turbo speed.
When familiarizing yourself with Husky operation, always hold the left button (L1). Once you are comfortable with how Husky operates, and you are in a large area with plenty of open room, then you can use the right button (R1) to enable turbo mode.
With either shoulder button held down, and the controller turned on and properly paired, you can use the left joystick on the controller to drive the robot. The vertical axis controls the robot's forward/backward speed and the horizontal axis controls the robot's rotation.
Configuring the Network Bridge
Your computer is configured to bridge its physical network ports together. This allows any network port to be used
as a connection to the internal 192.168.131.1/24 network for connecting sensors, diagnostic equipment, or
manipulators, or for connecting the your robot to the internet for the purposes of installing updates.
In the unlikely event you must modify your robot's Ethernet bridge, you can do so by editing the configuration
file found at /etc/netplan/50-clearpath-bridge.yaml:
# Configure the wired ports to form a single bridge
# We assume wired ports are en* or eth*
# This host will have address 192.168.131.1

network:
version: 2
renderer: networkd
ethernets:
bridge_eth:
  dhcp4: no
  dhcp6: no
  match:
    name: eth*
bridge_en:
  dhcp4: no
  dhcp6: no
  match:
    name: en*
bridges:
br0:
  dhcp4: yes
  dhcp6: no
  interfaces: [bridge_en, bridge_eth]
  addresses:
    - 192.168.131.1/24
This file will create a bridged interface called br0 that will have a static address of 192.168.131.1,
but will also be able to accept a DHCP lease when connected to a wired router. By default, all network
ports named en* and eth* are added to the bridge. This includes all common wired port names, such as:
eth0, eno1, enx0123456789ab, enp3s0, etc.
To include/exclude additional ports from the bridge, edit the match fields, or add additional bridge_*
sections with their own match fields, and add those interfaces to the interfaces: [bridge_en, bridge_eth]
line near the bottom of the file.
We do not recommend changing the static address of the bridge to be anything other than 192.168.131.1;
changing this may cause sensors that communicate over Ethernet (e.g. lidars, cameras, GPS arrays) from
working properly.
See also Network IP Addresses for common IP addresses on Clearpath robots.
Jetson Installation
Refer to the Jetson page for details on installing a Jetson in Husky.
Additional Simulation Worlds
In addtion to the default husky_playpen.launch file, husky_gazebo contains two additional launch files of use:
empty_world.launch, which spawns Husky in a featureless, infinite plane; andspawn_husky.launch, which is intended to be included in any custom world to add a Husky simulation to it.
To add a Husky to any of your own worlds, simply include the spawn_husky.launch file in your own world's launch:
<include file="$(find husky_gazebo)/launch/spawn_husky.launch">
  <!-- Optionally configure the spawn position -->
  <arg name="x" value="$(arg x)"/>
  <arg name="y" value="$(arg y)"/>
  <arg name="z" value="$(arg z)"/>
  <arg name="yaw" value="$(arg yaw)"/>
</include>
Finally, Clearpath provides an additional suite of simulation environments that can be downloaded separately and used with Husky, as described below.
Clearpath Gazebo Worlds
The Clearpath Gazebo Worlds collection contains four different simulation worlds, representative of different environments our robots are designed to operate in:
- Inspection World: a hilly outdoor world with water and a cave
- Agriculture World: a flat outdoor world with a barn, fences, and solar farm
- Office World: a flat indoor world with enclosed rooms and furniture
- Construction World: office world, under construction with small piles of debris and partial walls
Husky is supported in all four environments.
Installation
To download the Clearpath Gazebo Worlds, clone the repository from GitHub into the same workspace as your Husky:
cd ~/catkin_ws/src
git clone https://github.com/clearpathrobotics/cpr_gazebo.git
Before you can build the package, make sure to install dependencies. Because Clearpath Gazebo Worlds depends on
all of our robots' simulation packages, and some of these are currently only available as source code, installing
dependencies with rosdep install --from-paths [...] will likely fail.
All four simulation environments need the gazebo_ros package. The Inspection World also needs the
uuv_gazebo_worlds package, which can be installed by running:
sudo apt-get install ros-$ROS_DISTRO-uuv-gazebo-worlds
Once the dependencies are installed, you can build the package:
cd ~/catkin_ws
catkin_make
source devel/setup.bash
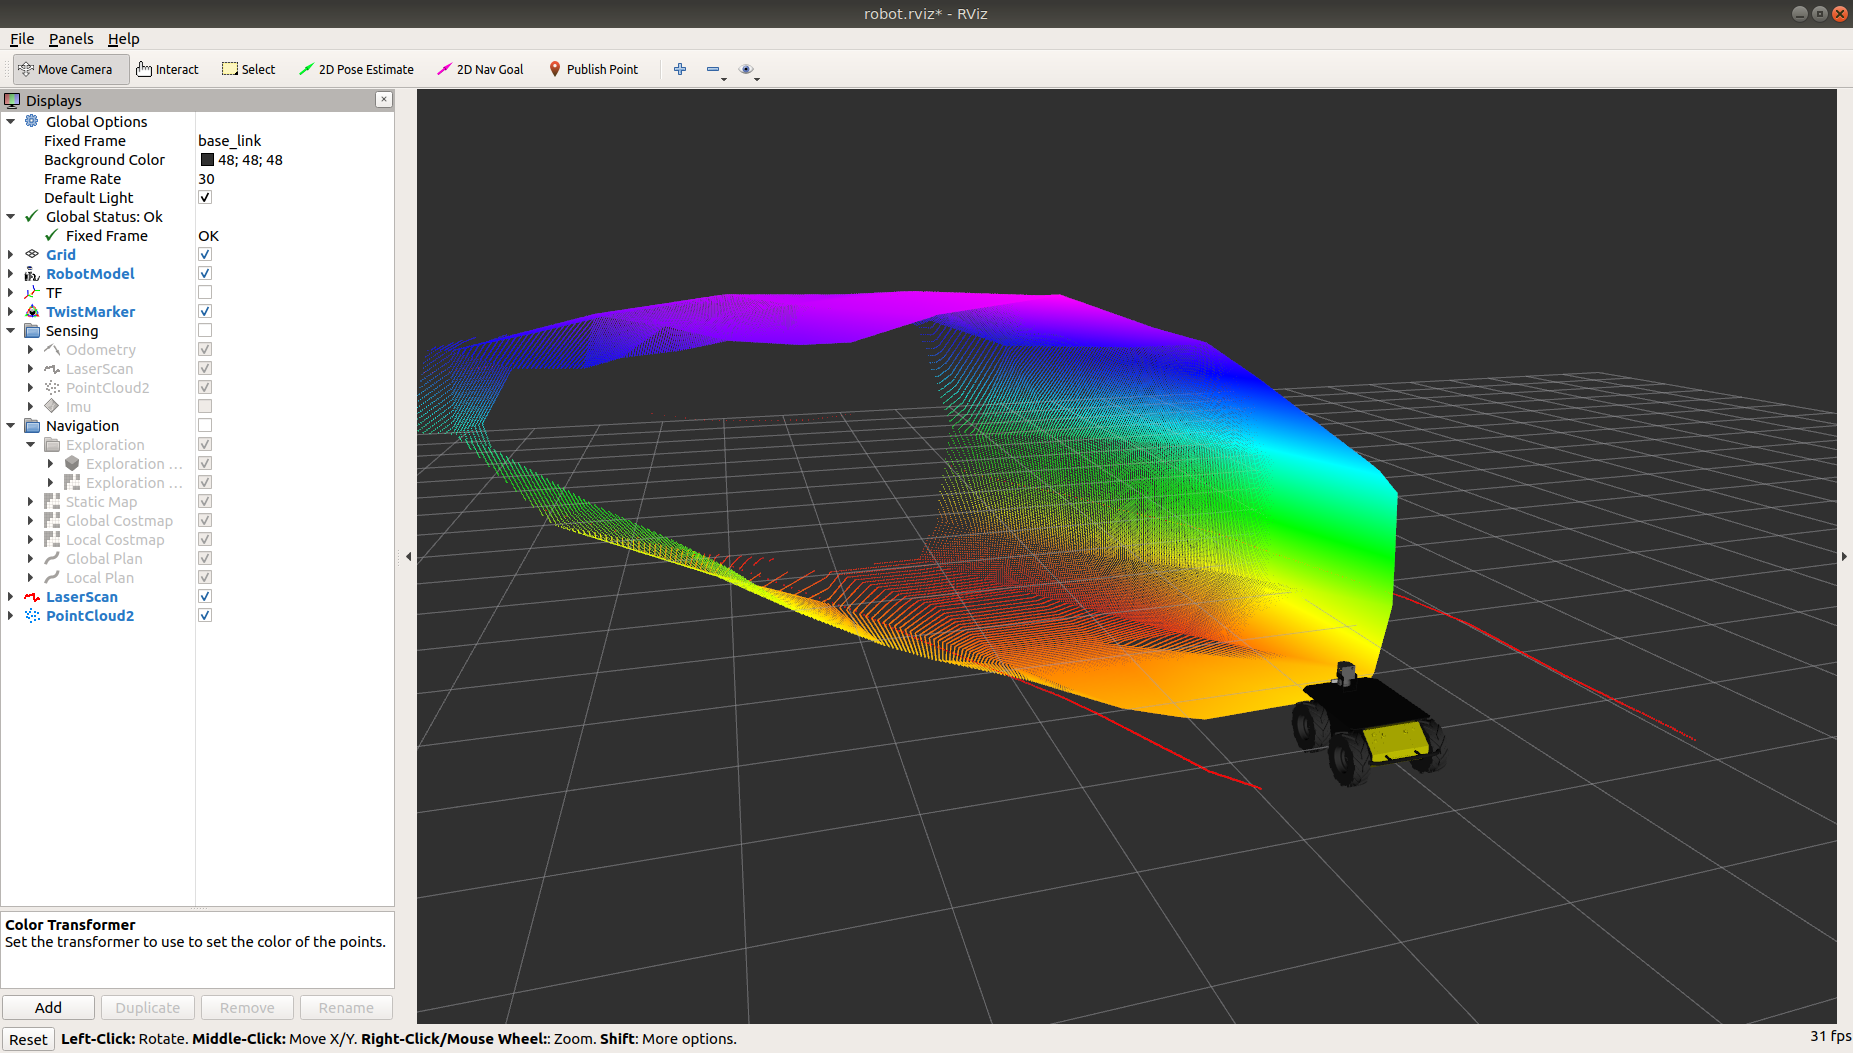
Running the Inspection Simulation
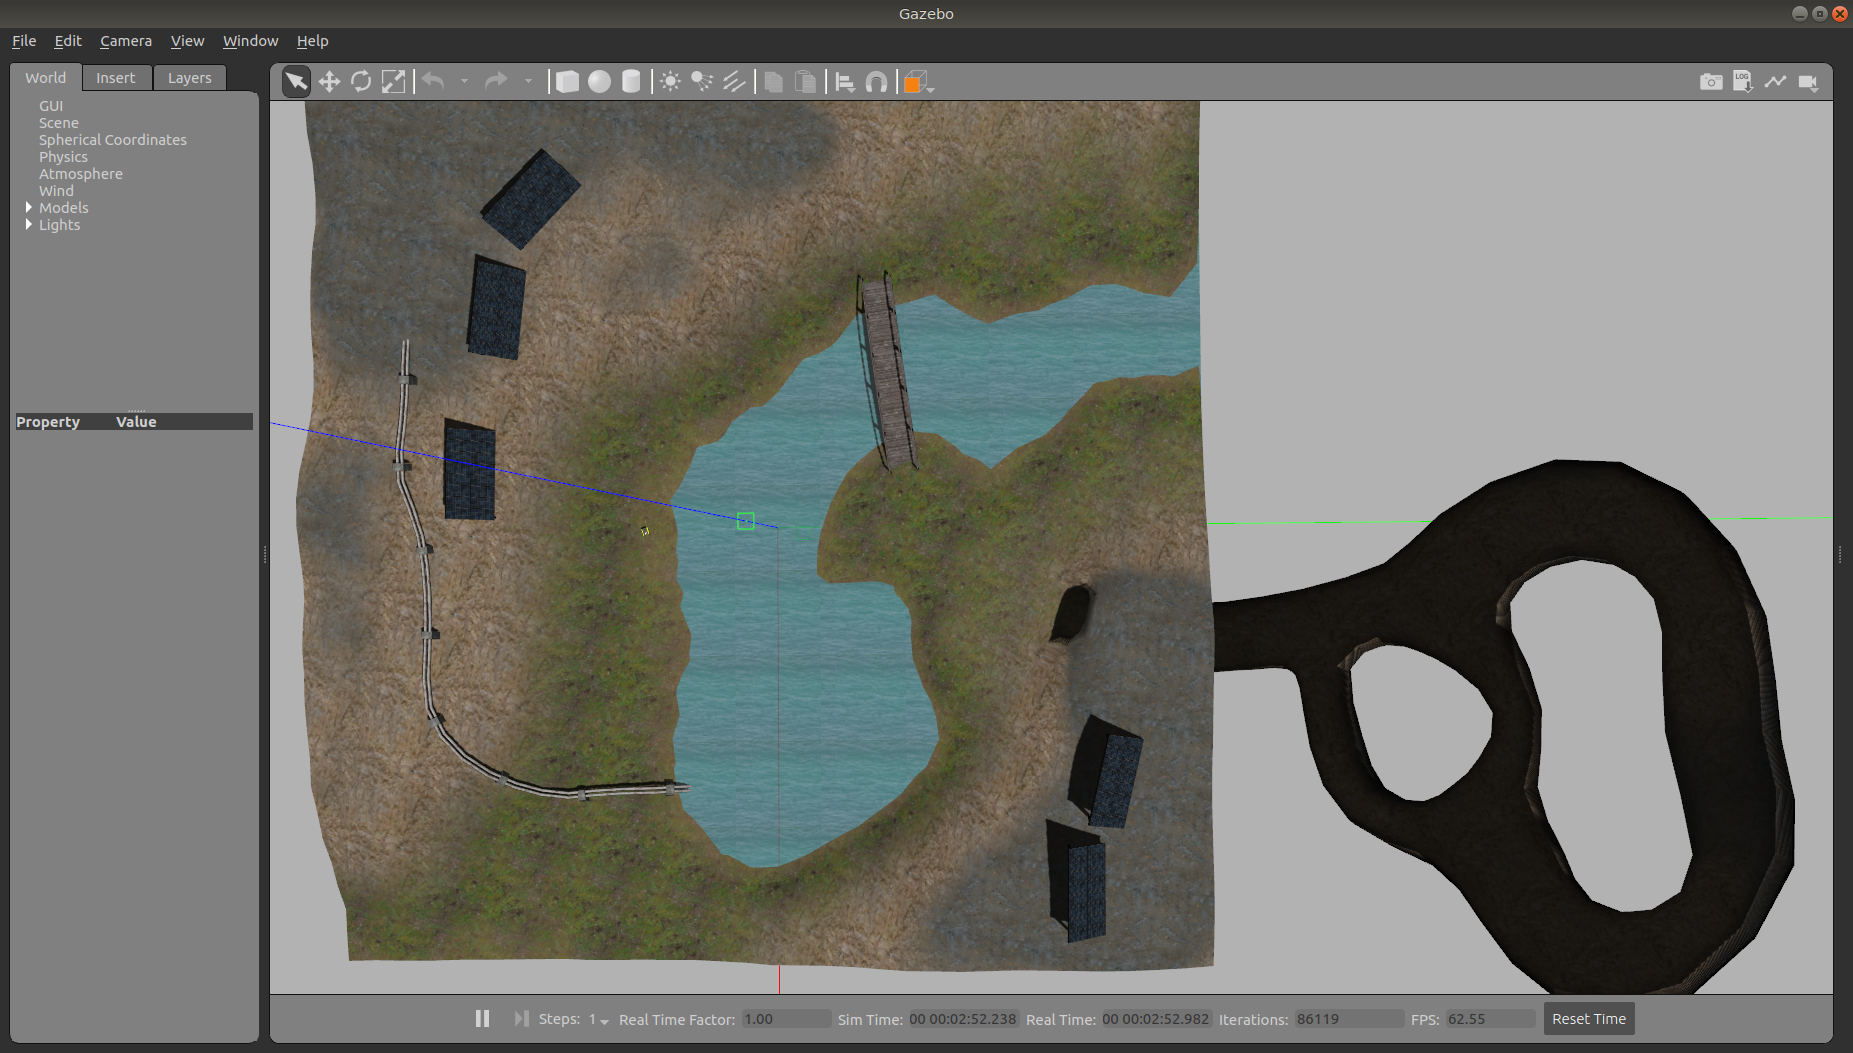
Inspection World is a hilly, outdoor world that includes a water feature, bridge, pipeline, small cave/mine, and a small solar farm. It is intended to simulate a variety of missions, including pipeline inspection, cave/underground navigation, and localization on non-planar terrain.
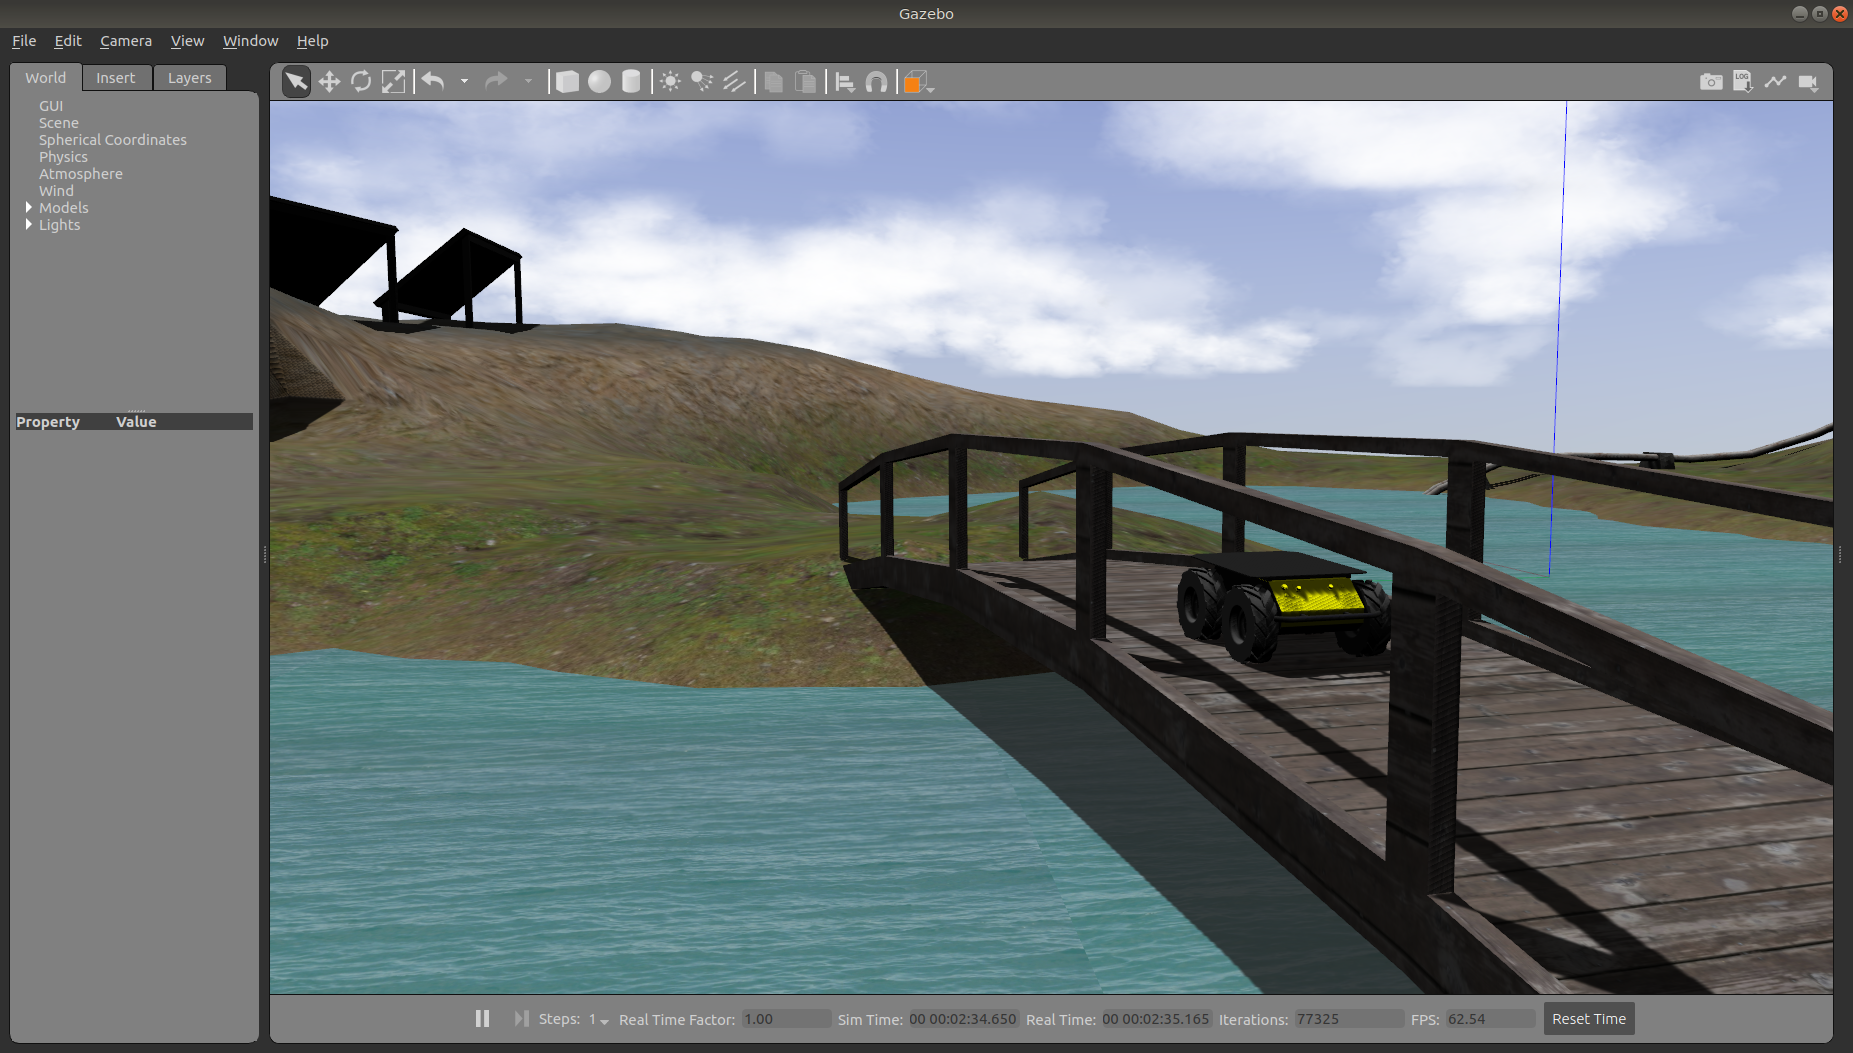
To launch the inspection simulation, run
roslaunch cpr_inspection_gazebo inspection_world.launch platform:=husky
To customize Husky's payload, for example to add additional sensors, see here.
Once the simulation is running you can use RViz and other tools as described in the Gmapping and AMCL demos to control and monitor the robot.
For example, below we can see Husky exploring the cave:
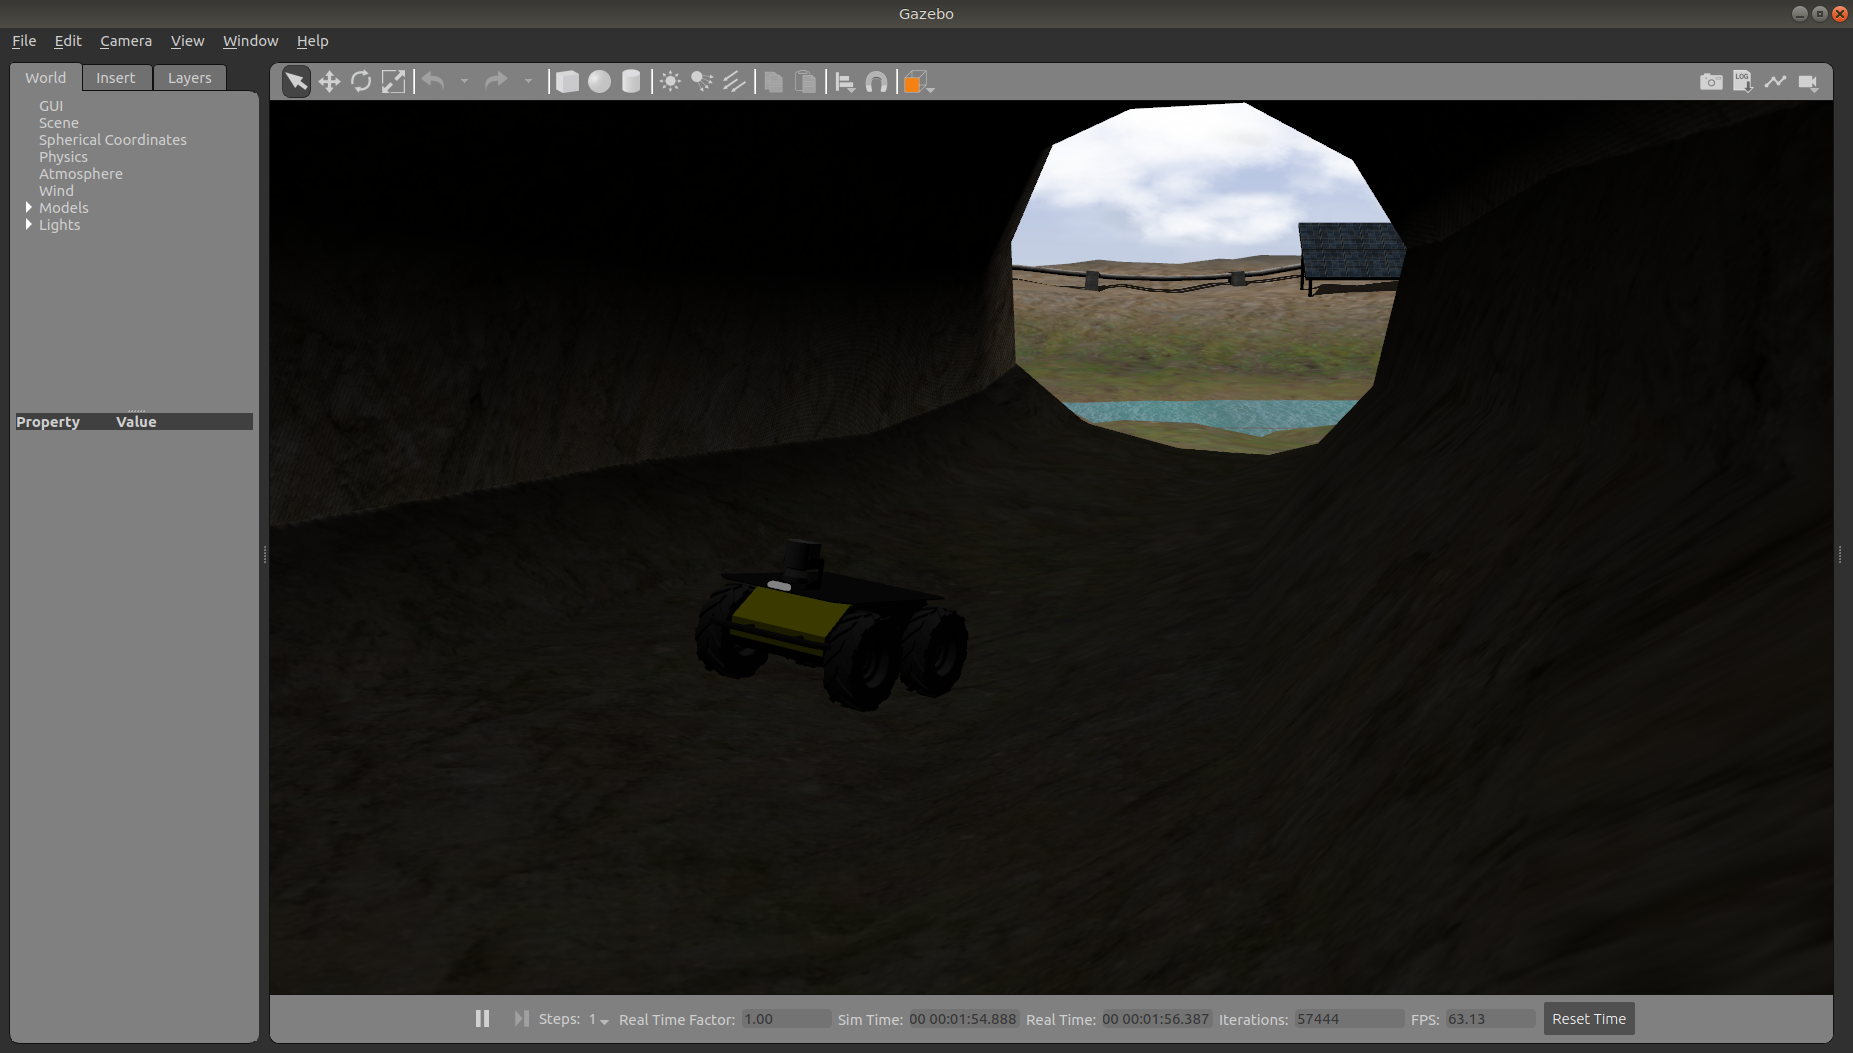
Husky's perception of the inside of the cave as a 3D pointcloud in RViz:
You can see the complete layout of the Inspection World below:
Running the Agriculture Simulation
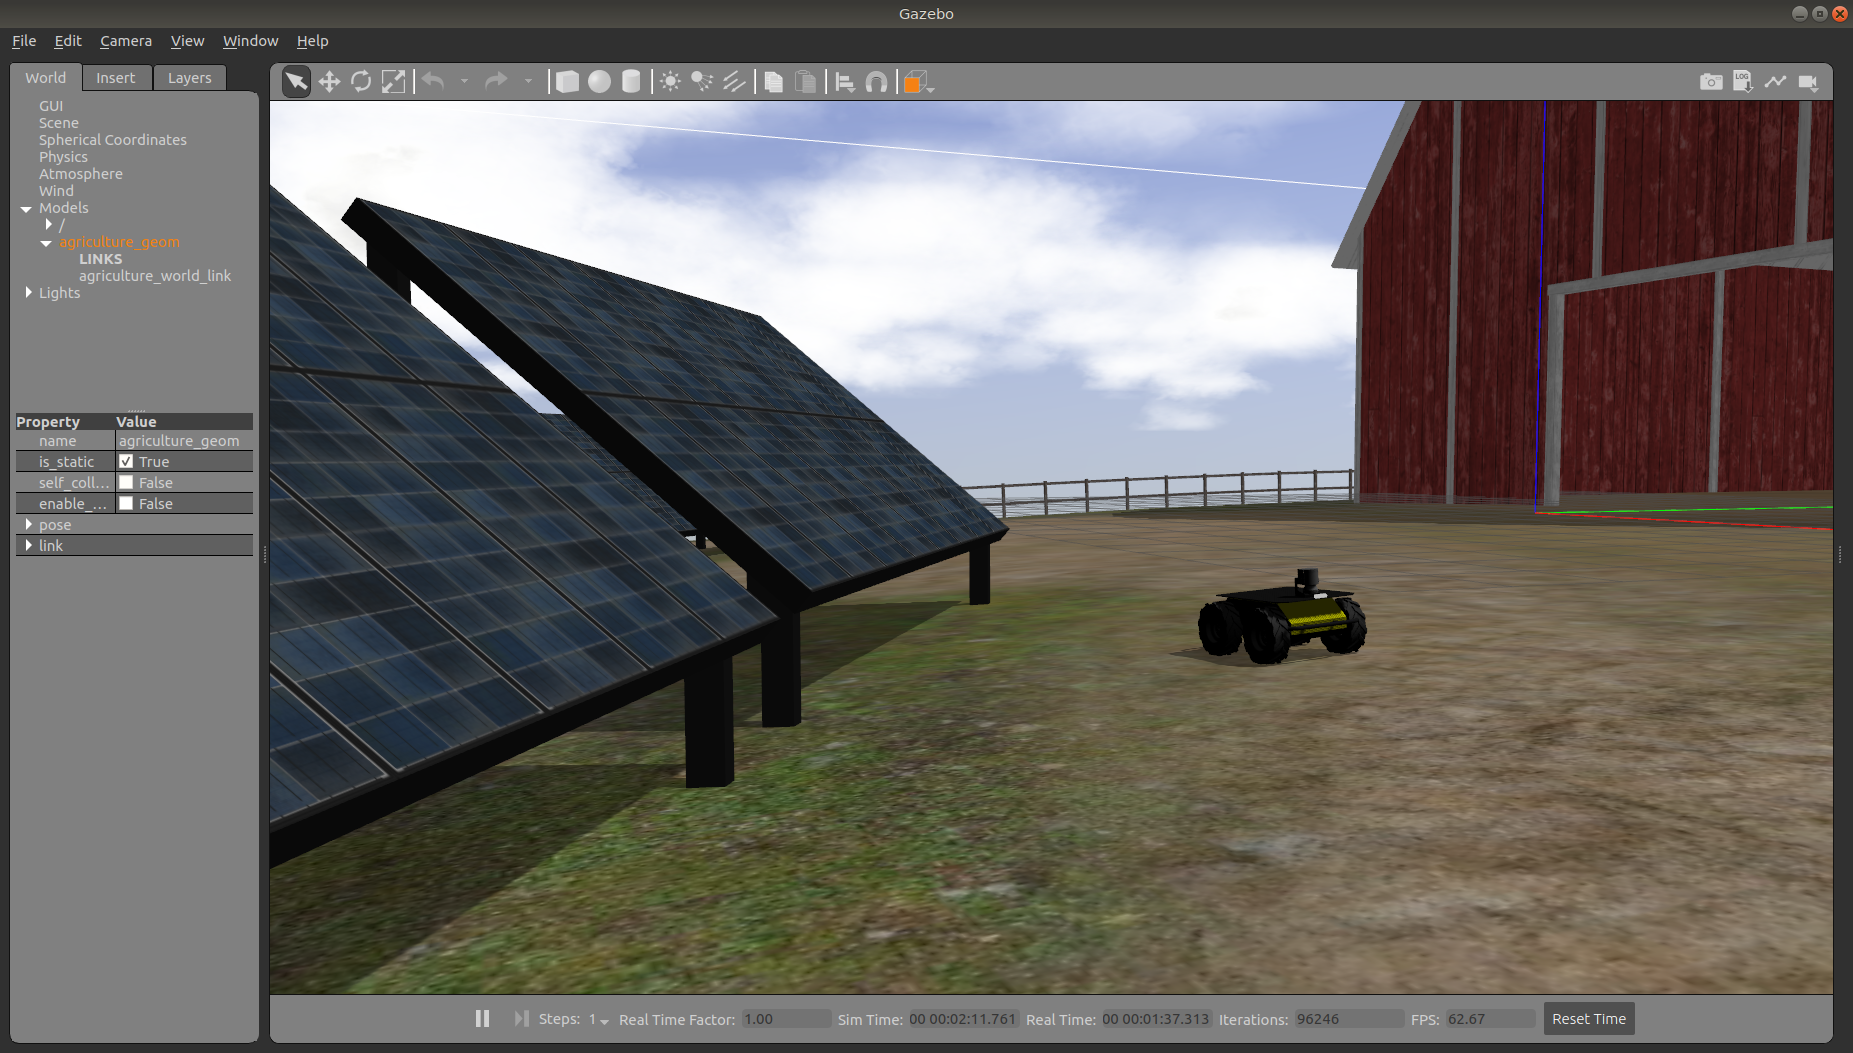
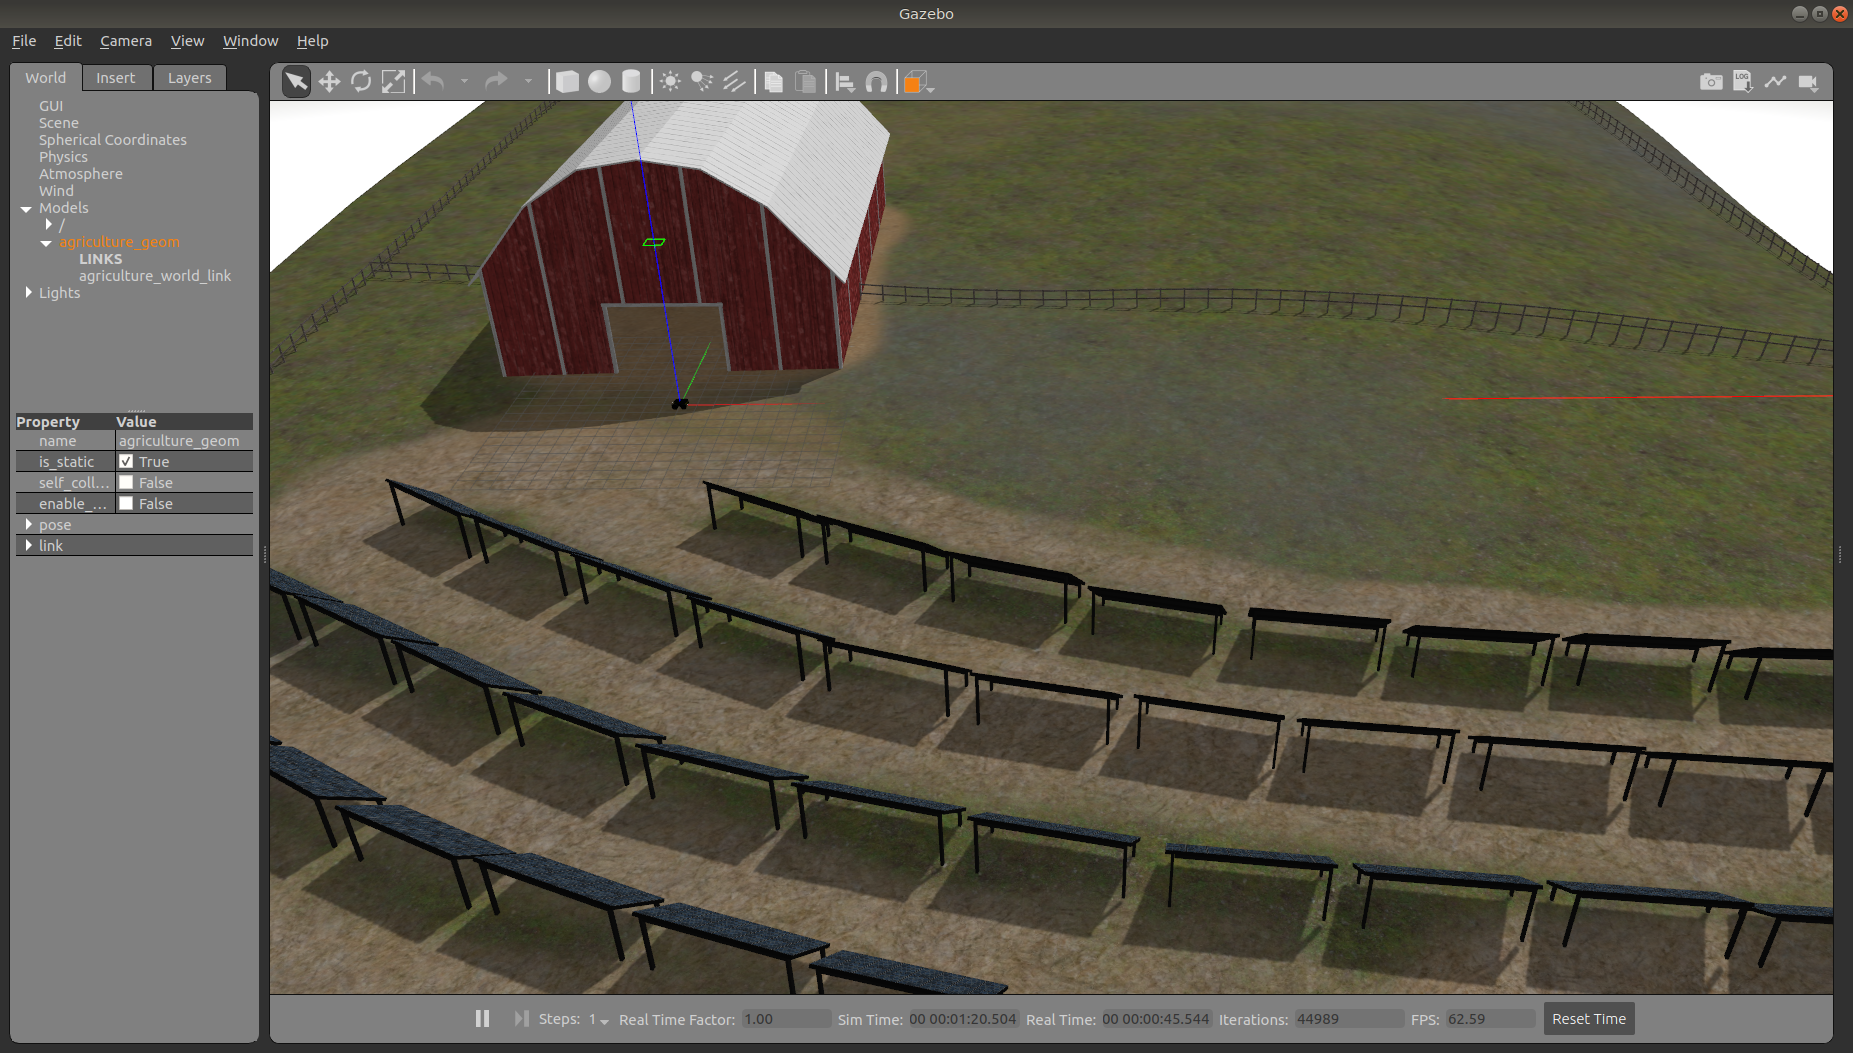
Agriculture World is a flat, mixed indoor/outdoor world that include a large barn, open fields surrounded by fences, and a large solar farm. It is intended to simulate missions such as solar panel inspection and area coverage.
To launch the agriculture simulation, run
roslaunch cpr_agriculture_gazebo agriculture_world.launch platform:=husky
To customize Husky's payload, for example to add additional sensors, see here.
Once the simulation is running you can use RViz and other tools as described in the Gmapping and AMCL demos to control and monitor the robot.
Running the Office Simulation
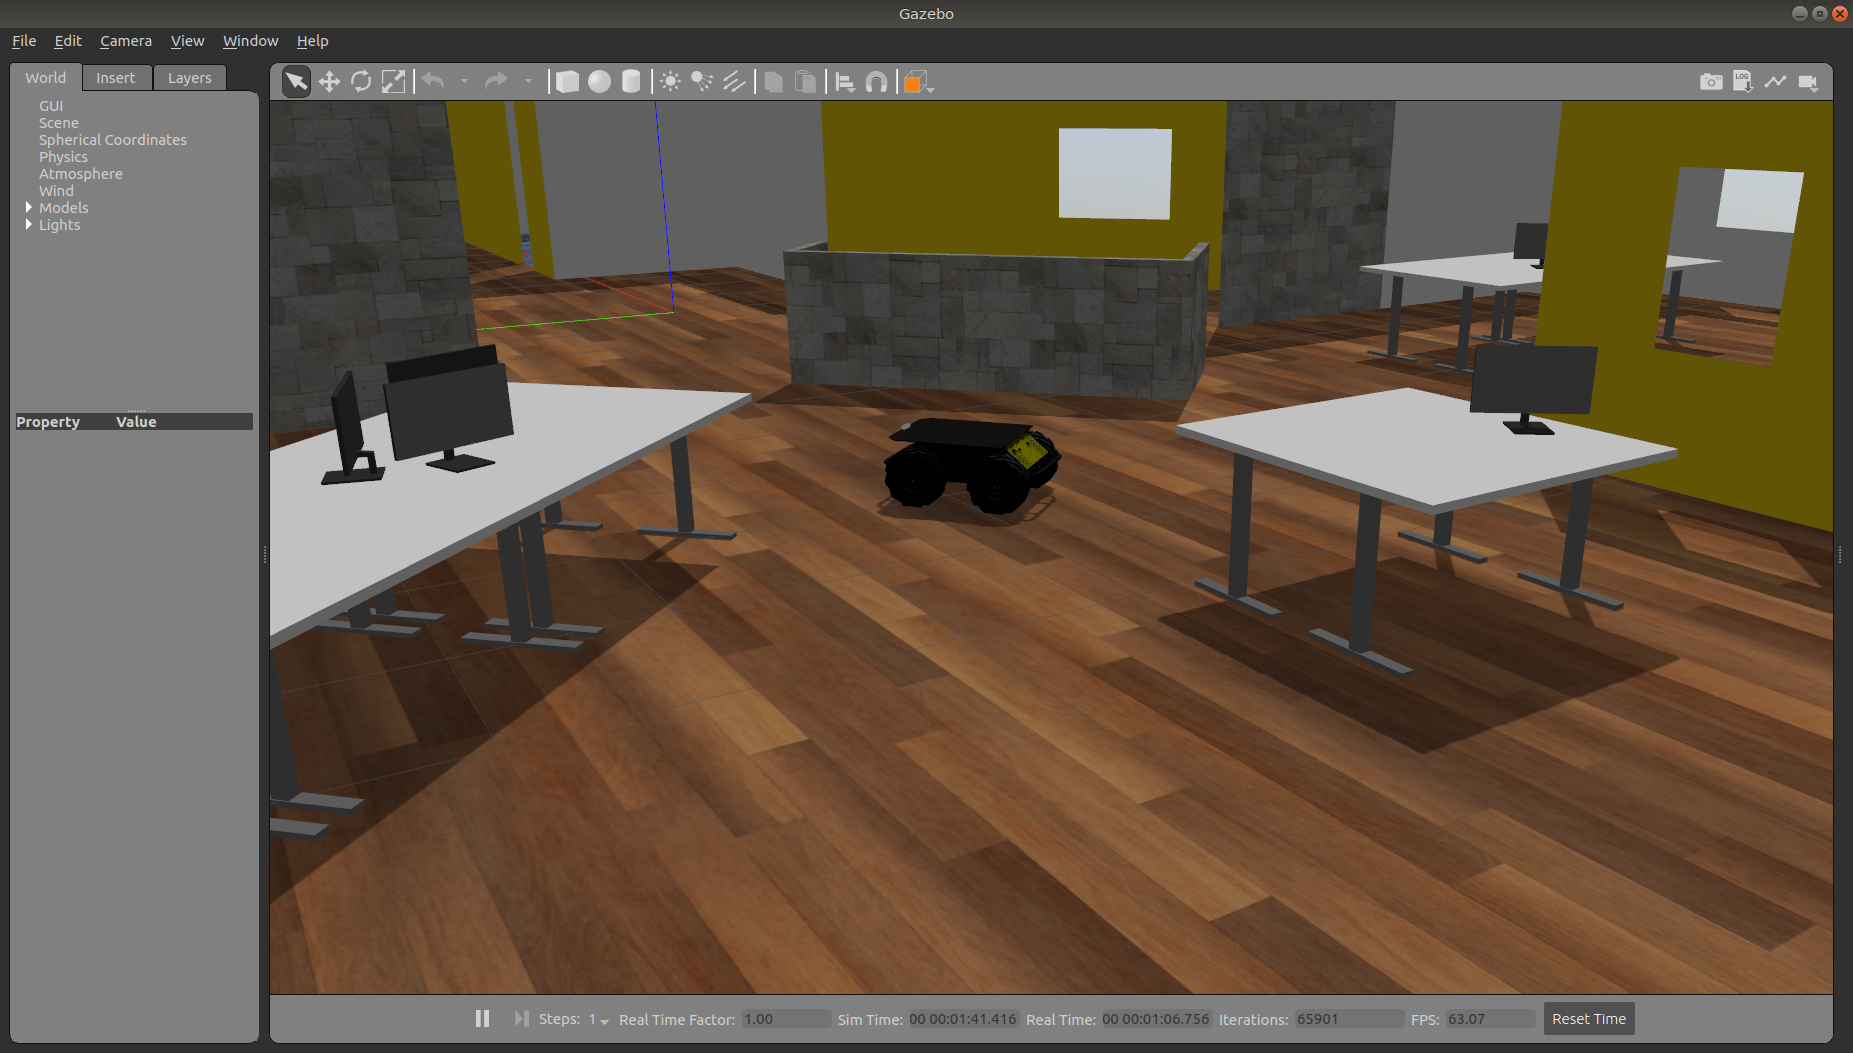
Office World is a small indoor environment representing a commercial office space. It features several large, open areas with furniture, as well as a narrow hallway with smaller offices and meeting rooms. It is intended to simulate missions in commercial spaces, such as facilitating deliveries, security monitoring, and inspecting equipment.
To launch Office World with a Husky, run the following command:
roslaunch cpr_office_gazebo office_world.launch platform:=husky
To customize Husky's payload, for example to add additional sensors, see here.
Once the simulation is running you can use RViz and other tools as described in
the Gmapping and AMCL demos
to control and monitor the robot. For example, below we can see the gmapping_demo from husky_navigation being
used to build a map of the Office World:
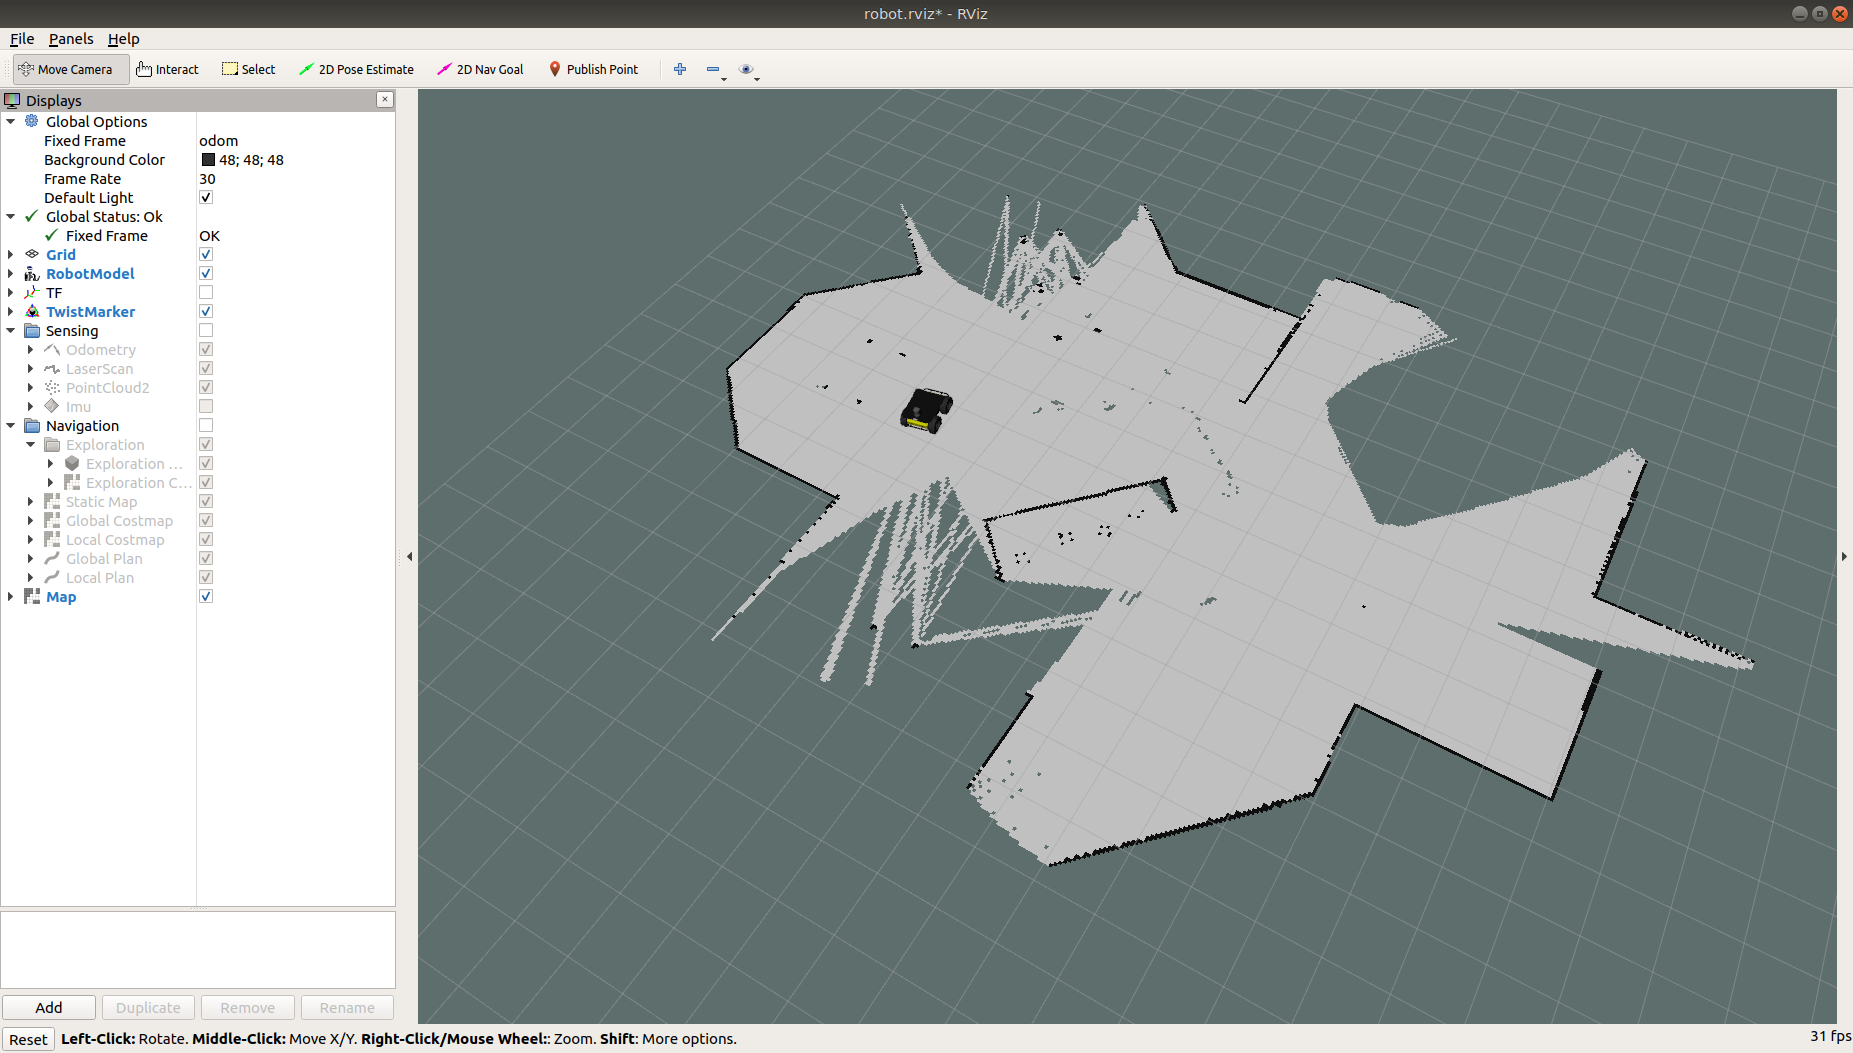
You can see the complete layout of the office world below:

Running the Construction Simulation
Construction World is the same basic layout as Office World, representing the same office space under construction/renovation. It is an indoor environment with small hills of debris/rubble, partial walls, and piles of construction supplies. It is designed to simulate missions in any sort of construction site.
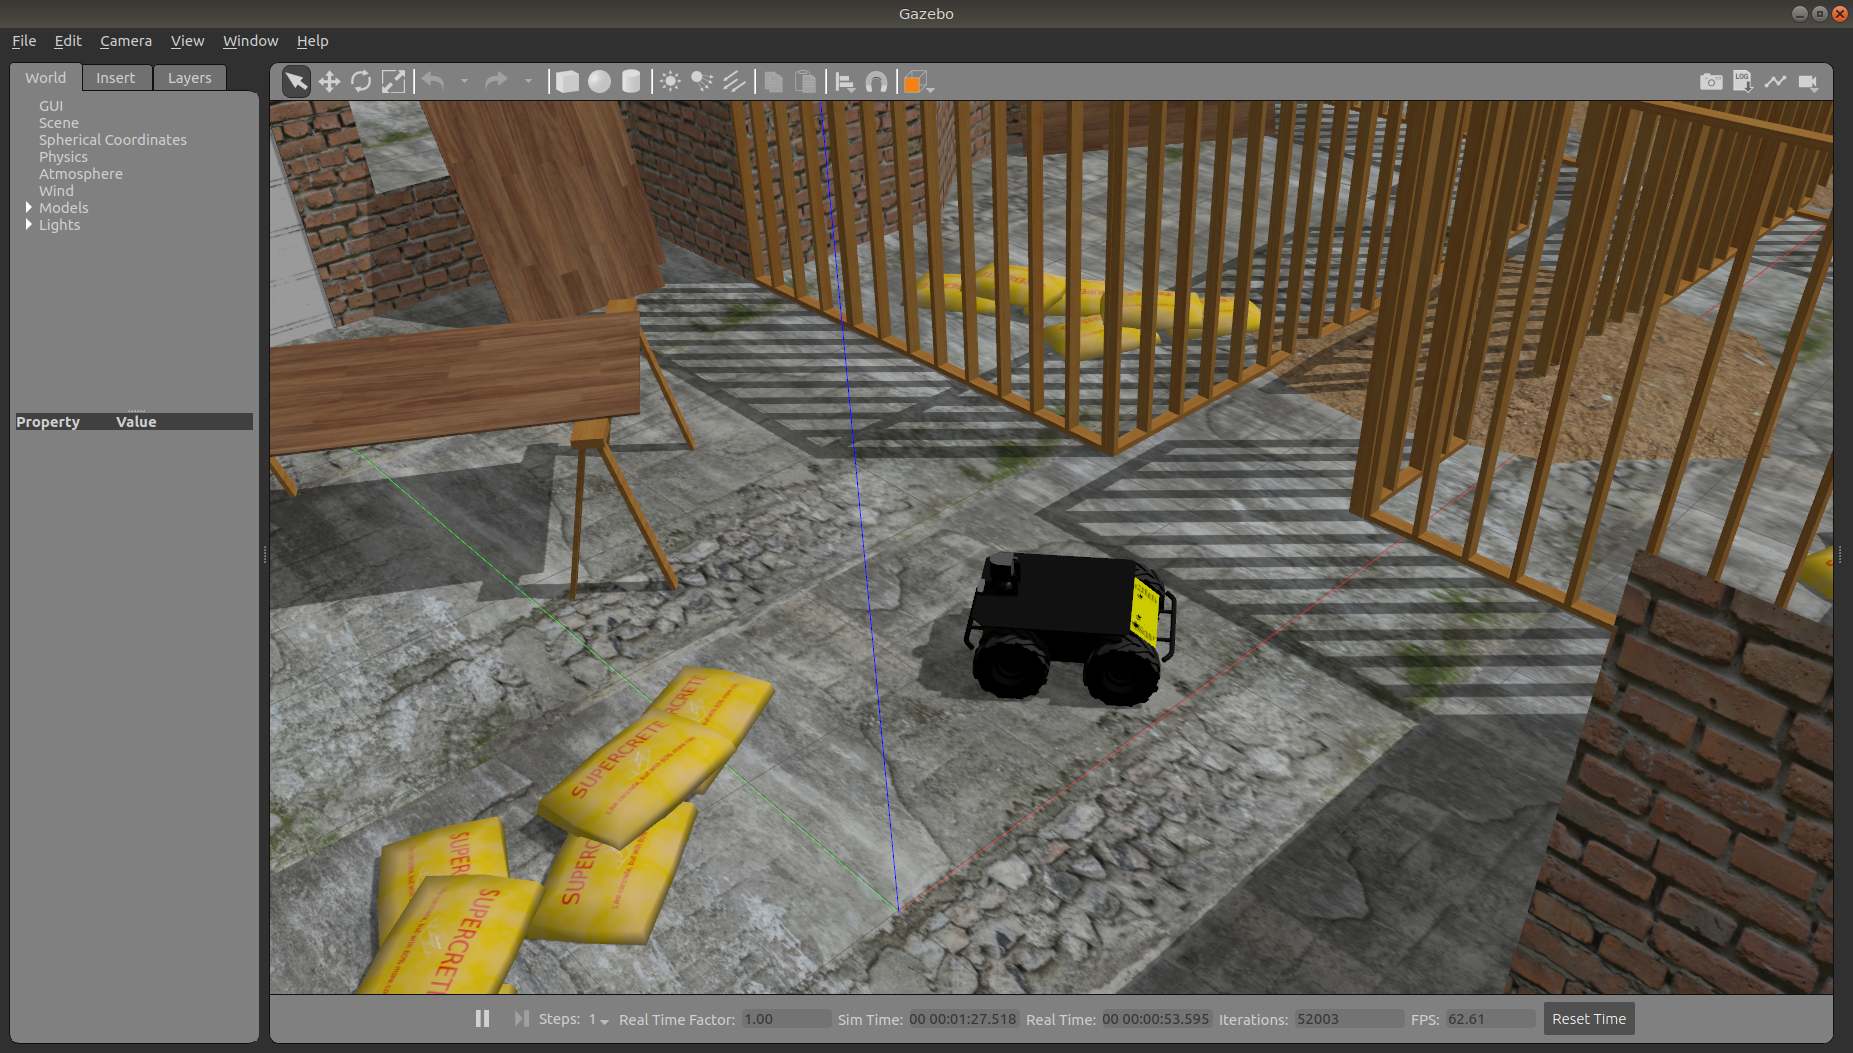
To launch Construction World with a Husky, run the following command:
roslaunch cpr_office_gazebo office_construction_world.launch platform:=husky
To customize Husky's payload, for example to add additional sensors, see here.
Once the simulation is running you can use RViz and other tools as described in the Gmapping and AMCL demos to control and monitor the robot.
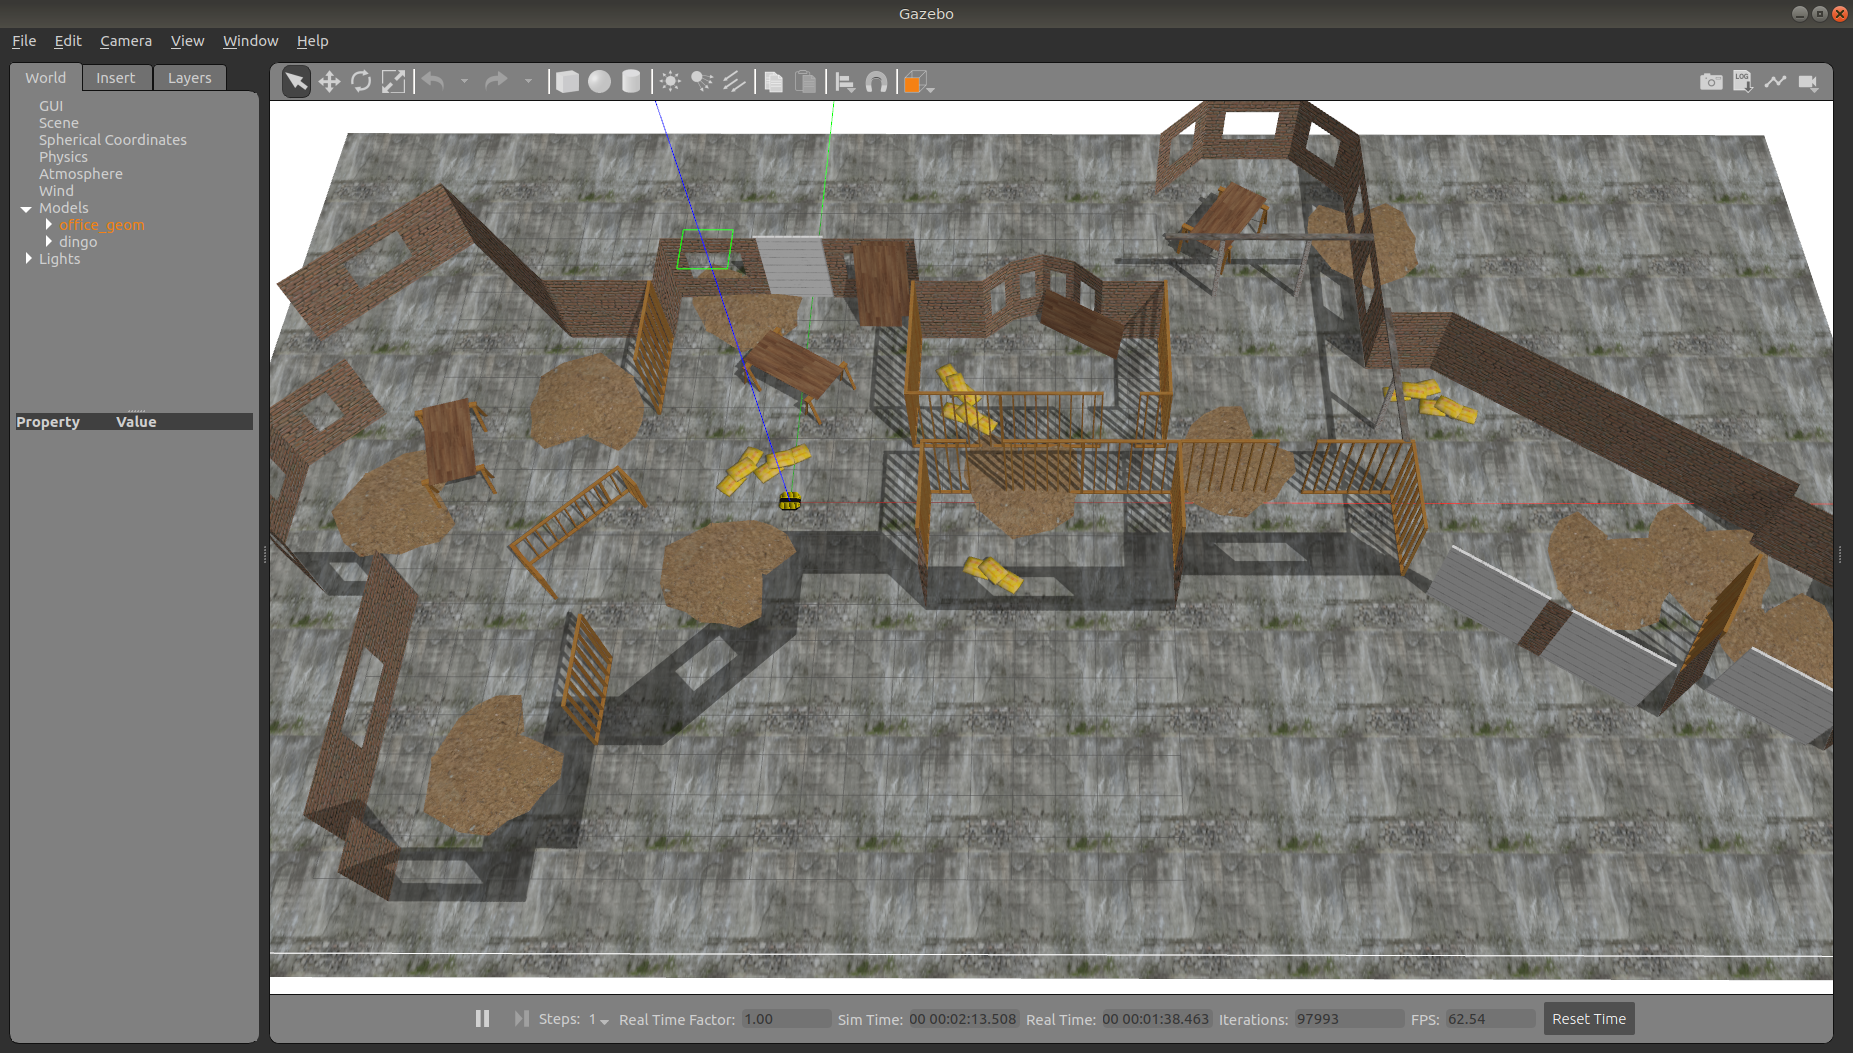
You can see the complete layout of the office below:
Support
Clearpath is committed to your success. Please get in touch with us and we will do our best to get you rolling again quickly: <support@clearpathrobotics.com>.
To get in touch with a salesperson regarding Clearpath Robotics products, please email <research-sales@clearpathrobotics.com>.
If you have an issue that is specifically about ROS and is something which may be of interest to the broader community, consider asking it on Robotics Stack Exchange. If you do not get a satisfactory response, please ping us and include a link to your question as posted there. If appropriate, we will answer on Robotics Stack Exchange for the benefit of the community.