Dingo Maintenance
Battery Care
Lead-Acid Battery Care
Dingo's default power supply is a sealed 12 V lead-acid battery pack (VRLA), providing 20 Ah of charge. These tips are intended to help keep your Dingo Lead-Acid Battery in tip-top shape. With proper maintenance, the battery should maintain the majority of its capacity for hundreds of cycles.
The most damaging thing to a lead-acid battery is a phenomenon called sulfation. When a lead-acid battery is left in an uncharged state for long periods of time, sulfate crystals solidify on the electrodes of the battery. This effect can be permanent, and it causes premature reduction in capacity. Therefore, it is important to fully charge the battery as soon as you are finished using it, regardless of how much capacity remains.
Your robot's battery charger works in 3 stages:
- Constant current charging or bulk charge (9 to 14.6 V @ 6 A): indicator LED is red
- Constant voltage charging or topping charge (14.6 V @ 6 A down to 2 A): indicator LED is red
- Trickle or Float charge (14.6 V @ 2 A down to 0 A): indicator LED is green
The bulk of the capacity (70%) is regained during the first stage.
It is important to let the charger complete all 3 stages whenever possible, to help maintain the life of the battery. The initial stage will take 3 - 5 hours, and a complete charge may take up to 10 hours, depending on the depth of discharge.
In general, following these tips will help maximize the life of the battery:
- Always fully charge the battery as soon as you are finished using it.
- Charge batteries at room temperature. Never charge lead-acid batteries at temperatures above 35°C.
- Charge batteries in a well-ventilated area.
- Do not allow the battery to freeze. A low battery will freeze sooner than a fully charged one. Never charge a frozen battery.
- Stored batteries should be topped up every month. Completely cycle batteries every 4 - 6 months.
- At a discharge rate of 50% DOD (depth of discharge), the lifecycle of the battery is 450 - 550 cycles. After this point, reduced capacity will be apparent.
- Regularly discharging the battery below 50% DOD will reduce the lifecycle of the battery, sometimes to less than 300 cycles.
Your robot's battery charger works in 3 stages:
- Constant current charging or bulk charge (9 to 14.6 V @ 6 A): indicator LED is red
- Constant voltage charging or topping charge (14.6 V @ 6 A down to 2 A): indicator LED is red
- Trickle or Float charge (14.6 V @ 2 A down to 0 A): indicator LED is green
The initial stage will take 5 - 7 hours, and a complete charge may take up to 14 hours.
LiFEPO4 Battery Care
LiFEPO4 are not available for Dingo 1.0. They are only available for Dingo 1.5 and newer.
Dingo's optional power supply is a Lithium Iron Phosphate battery pack (LiFEPO4), providing minimum 20 Ah of charge. These tips are intended to help keep your Dingo LiFEPO4 Battery in tip-top shape. With proper maintenance, the battery should maintain the majority of its capacity for thousands of cycles, typically a 10x increase over SLA batteries.
The LiFEPO4 battery charger works in 3 stages:
- Constant current charging or bulk charge (9 to 14.6 V @ 7 A): indicator LED is red
- Constant voltage charging or topping charge (14.6 V @ 7 A down to 0.7 A): indicator LED is red
- Balancing or Float charge (14.6 V @ 0.7 A down to 0 A): indicator LED is green
The bulk of the capacity (70%) is regained during the first stage.
It is important to let the charger complete all 3 stages whenever possible, to help maintain the life of the battery. The initial stage will take 2 - 4 hours, and a complete charge may take up to 8 hours, depending on the depth of discharge.
In general, following these tips will help maximize the life of the battery:
- Always fully charge the battery as soon as you are finished using it.
- Charge batteries at room temperature. Never charge LiFEPO4 batteries at temperatures above 45°C or below 0°C.
- Charge batteries in a well-ventilated area.
- Do not allow the battery to freeze. Never charge a frozen battery.
- Stored batteries should be charged and balanced every 4 -6 months.
- At a discharge rate of 50% DOD (depth of discharge), the lifecycle of the battery can be greater than 8000 cycles with an apparent capacity remaining of 70% at that time.
- Regularly discharging the battery to 80% DOD will reduce the lifecycle of the battery, sometimes to less than 3000 cycles with the same apparent capacity remaining.
Software Maintenance
Getting New Packages
If you are upgrading your robot from an older version of ROS, please refer to our upgrade instructions for upgrading to Melodic, Noetic and ROS 2 Humble.
Clearpath Robotics robots are always being improved, both its own software and the many community ROS packages upon which it depends!
You can use the apt package management system to receive new versions all software running on the platform.
Each robot leaves the factory already configured to pull packages from http://packages.ros.org as well as http://packages.clearpathrobotics.com. To update your package and download new package versions, simply run:
sudo apt-get update
sudo apt-get dist-upgrade
MCU Firmware Update
Before flashing firmware, place your robot up on blocks or disengage the drivetrain. Firmware loading does not usually result in unintended motion, but it is safest when off the ground.
- J100
- W200
- R100
- DX100
- DX150
1. Download the Clearpath Firmware package from the Clearpath package server
On the robot computer, run the following commands:
sudo apt-get update
sudo apt-get install ros-humble-clearpath-firmware
2. Prepare the Robot
The J100 MCU does not have an ethernet interface, and therefore cannot be flashed using the eternet bootloader. You must follow the subsequent steps to flash the J100 MCU over mini-USB.
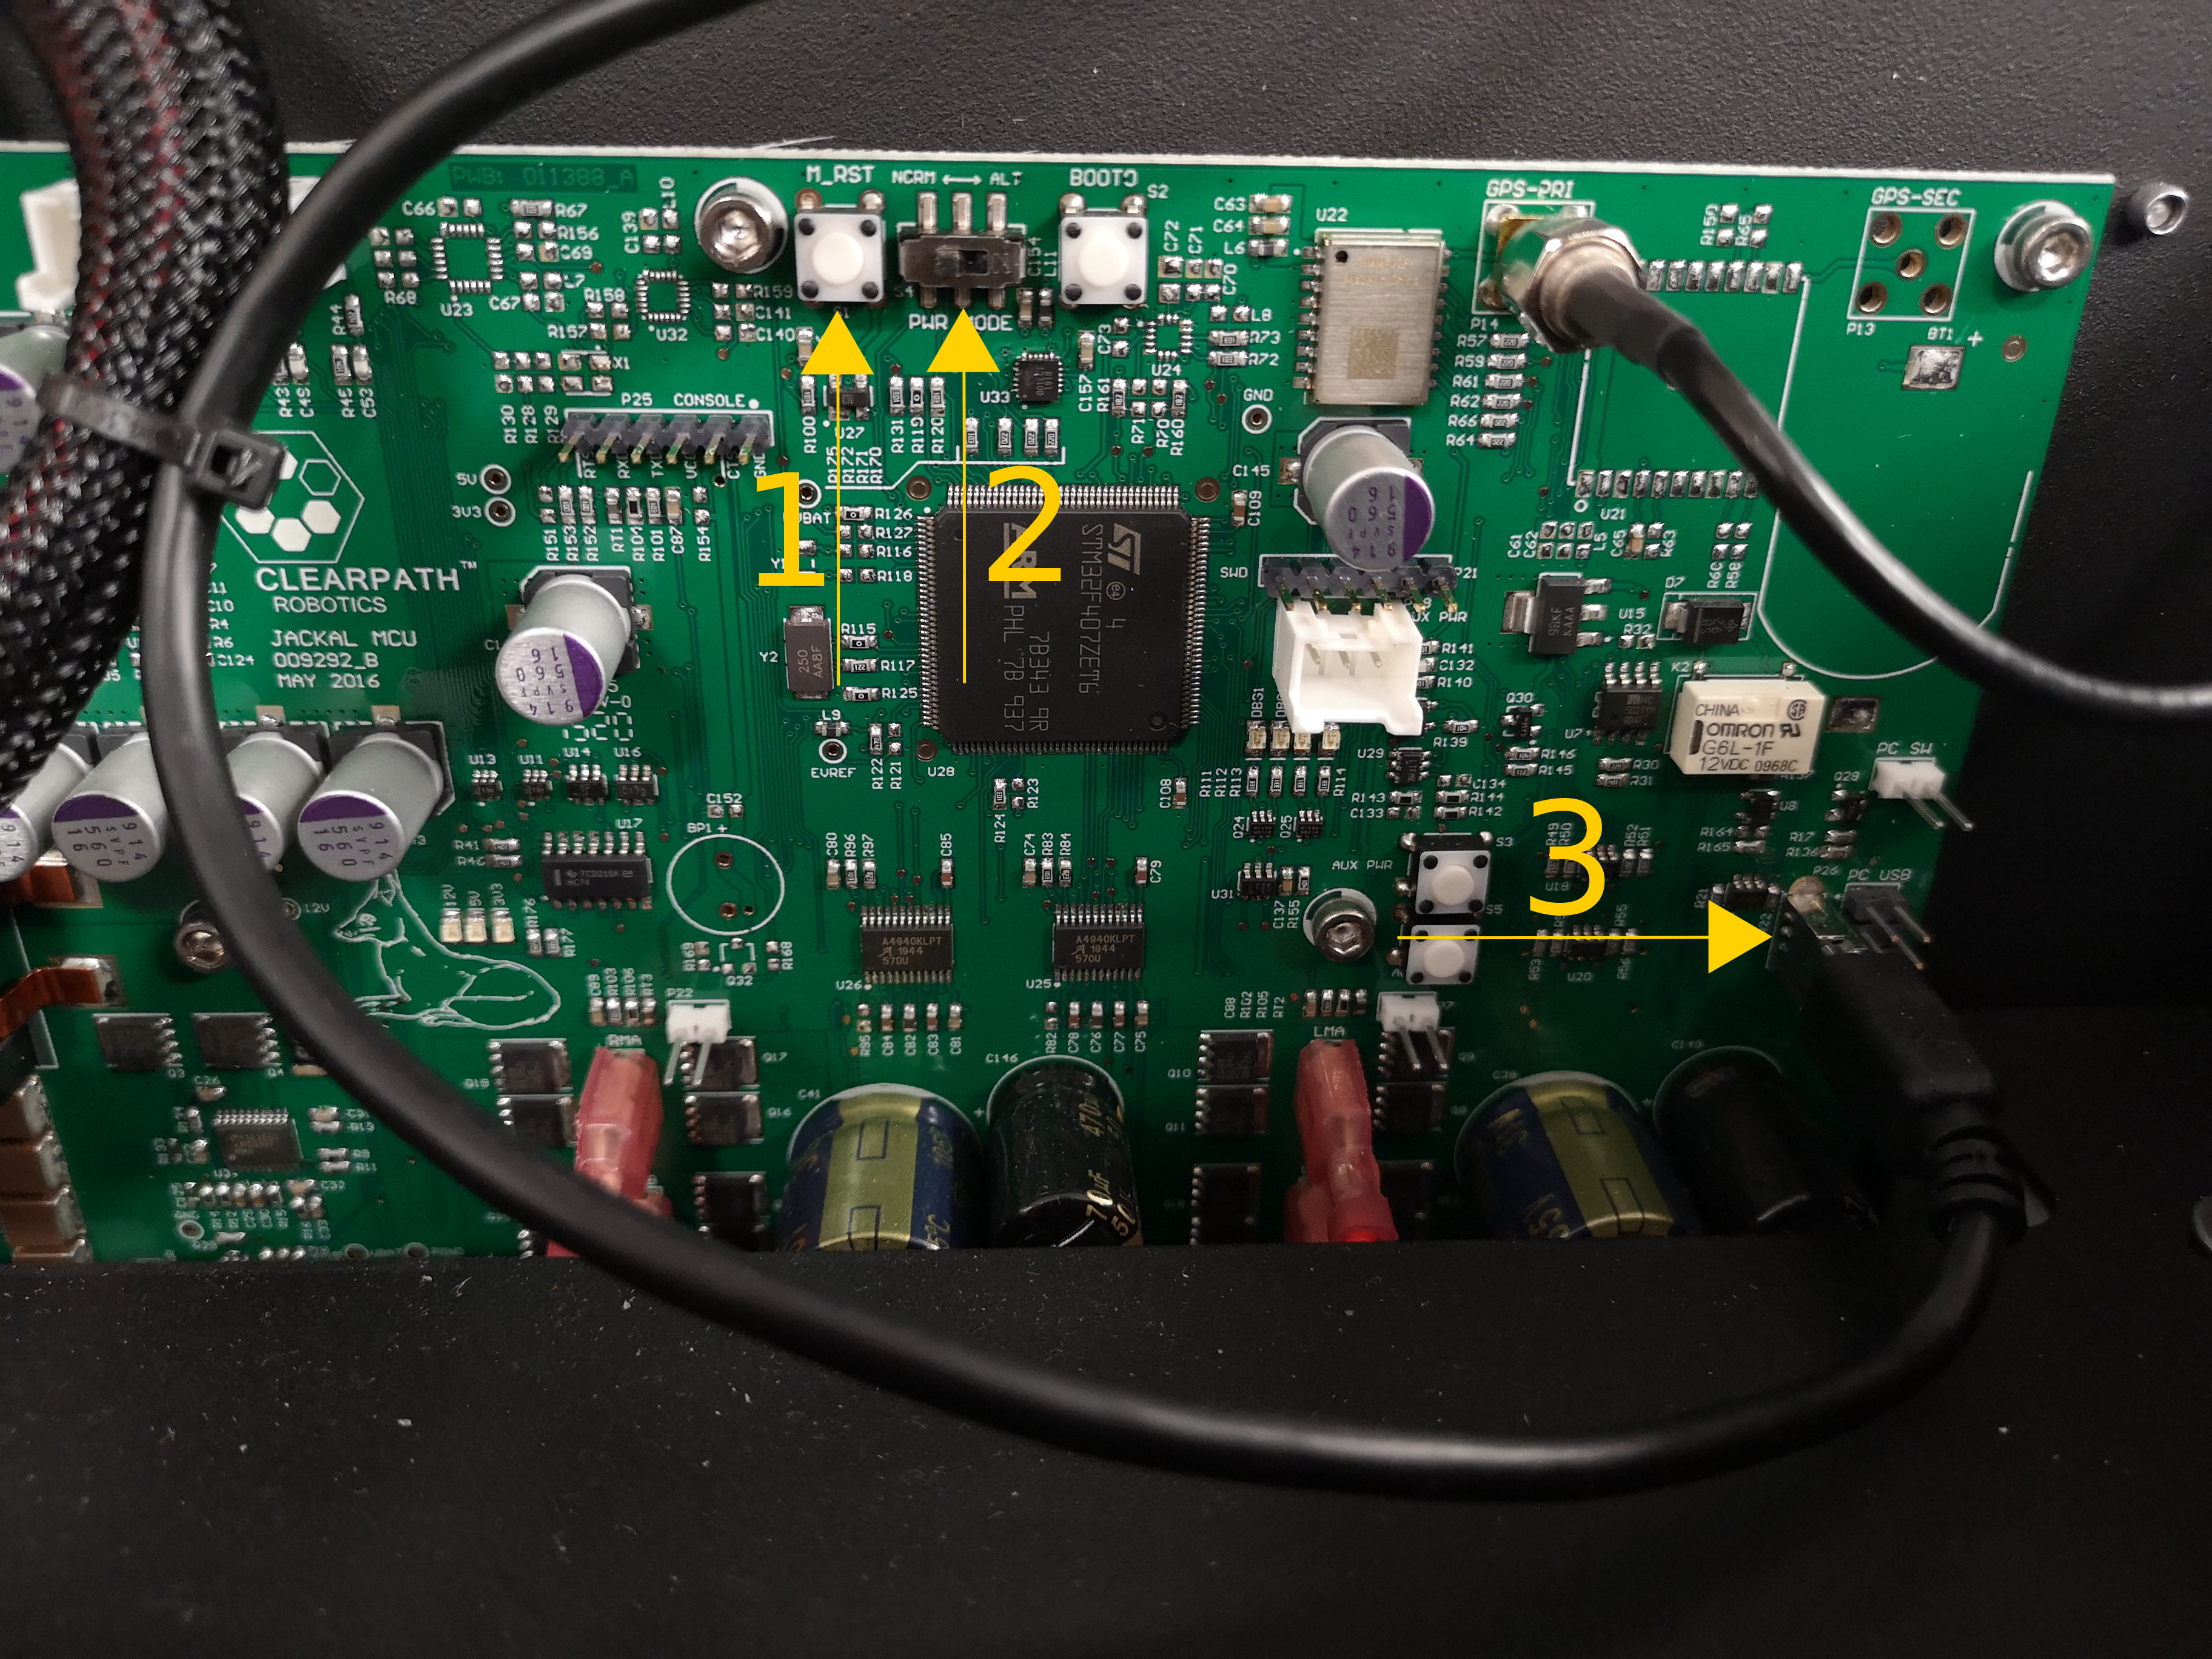
The J100 MCU is mounted to the rear inside wall of the robot. To access it, open the lid, keeping the computer tray secured to the underside of the lid.
The
M_RSTbutton, used to reset the MCU.The
PWR_MODEswitch. Left isNORMor normal mode, right isALTor bootloader mode. This is used for flashing the firmware.The mini-USB port used for transmitting data. This should be connected to J100's computer for both normal operation and firmware flashing.
Place the J100 MCU into bootloader mode
Open the lid of the robot to expose the MCU and make sure the mini-USB cable is connected to the robot computer.
Switch the PWR_MODE switch from NORM to ALT. If the robot is on, press the M_RST button. Otherwise, turn the robot on with the power button.
1. Download the Clearpath Firmware package from the Clearpath package server
On an external computer, run the following commands:
sudo apt-get update
sudo apt-get install ros-humble-clearpath-firmware
2. Prepare the Robot
Platforms with an Ethernet connection to the MCU have the option of flashing over USB or Ethernet. If you are updating to ROS 2 Humble for the first time, you must use USB. If you are updating ROS 2 Humble firmware to a newer version, using Ethernet is recommended. Skip this step if flashing over Ethernet.
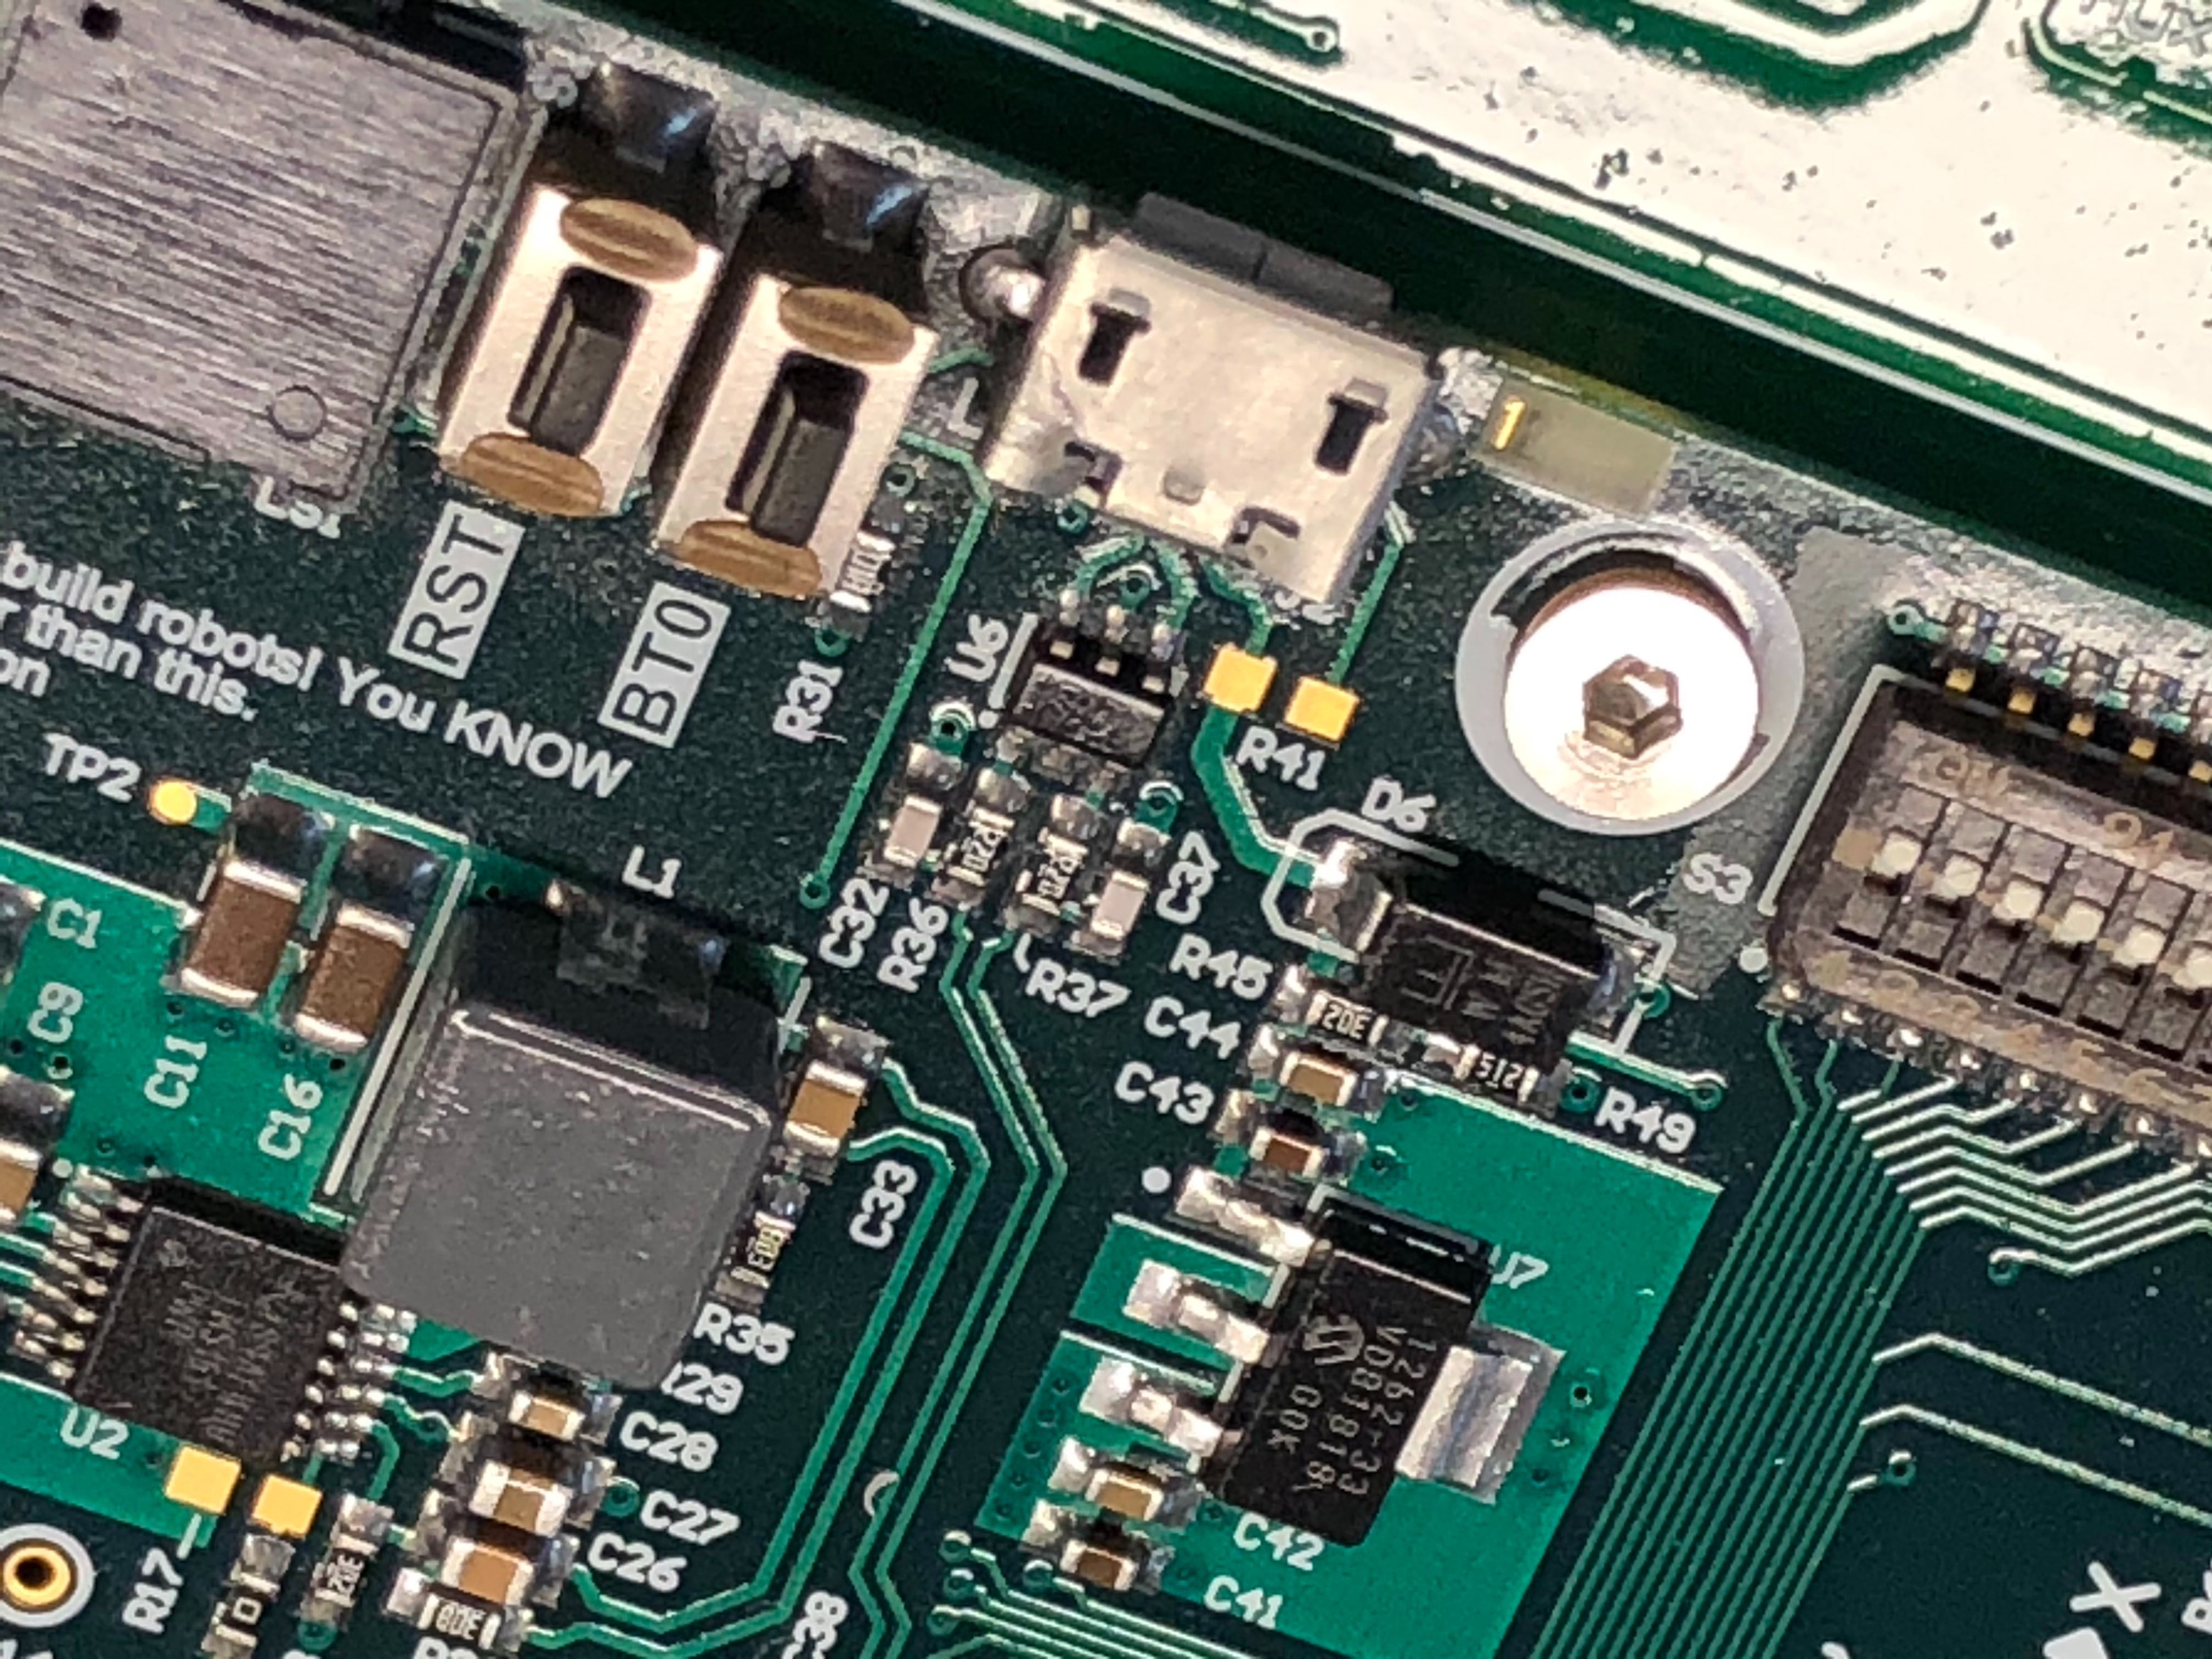
The W200 MCU is located on the underside of the metal frame over the top of the computer.
The
RSTbutton, used to reset the MCU.The
BT0button, used to enter the USB bootloader mode.
Place the W200 MCU into bootloader mode
While pressing BT0 on the MCU, connect the external computer to Warthog's MCU using a USB cable.
1. Download the Clearpath Firmware package from the Clearpath package server
On the robot computer, run the following commands:
sudo apt-get update
sudo apt-get install ros-humble-clearpath-firmware
2. Prepare the Robot
Platforms with an Ethernet connection to the MCU have the option of flashing over USB or Ethernet. If you are updating to ROS 2 Humble for the first time, you must use USB. If you are updating ROS 2 Humble firmware to a newer version, using Ethernet is recommended. Skip this step if flashing over Ethernet.
Place the R100 Ridgeback up on blocks. Firmware loading does not usually result in unintended motion, but it's safest when off the ground.
Remove the side panels to access the robot computer and MCU.
Connect the MCU to the R100 Ridgeback's onboard computer using a mini-USB cable connected to the port shown below:
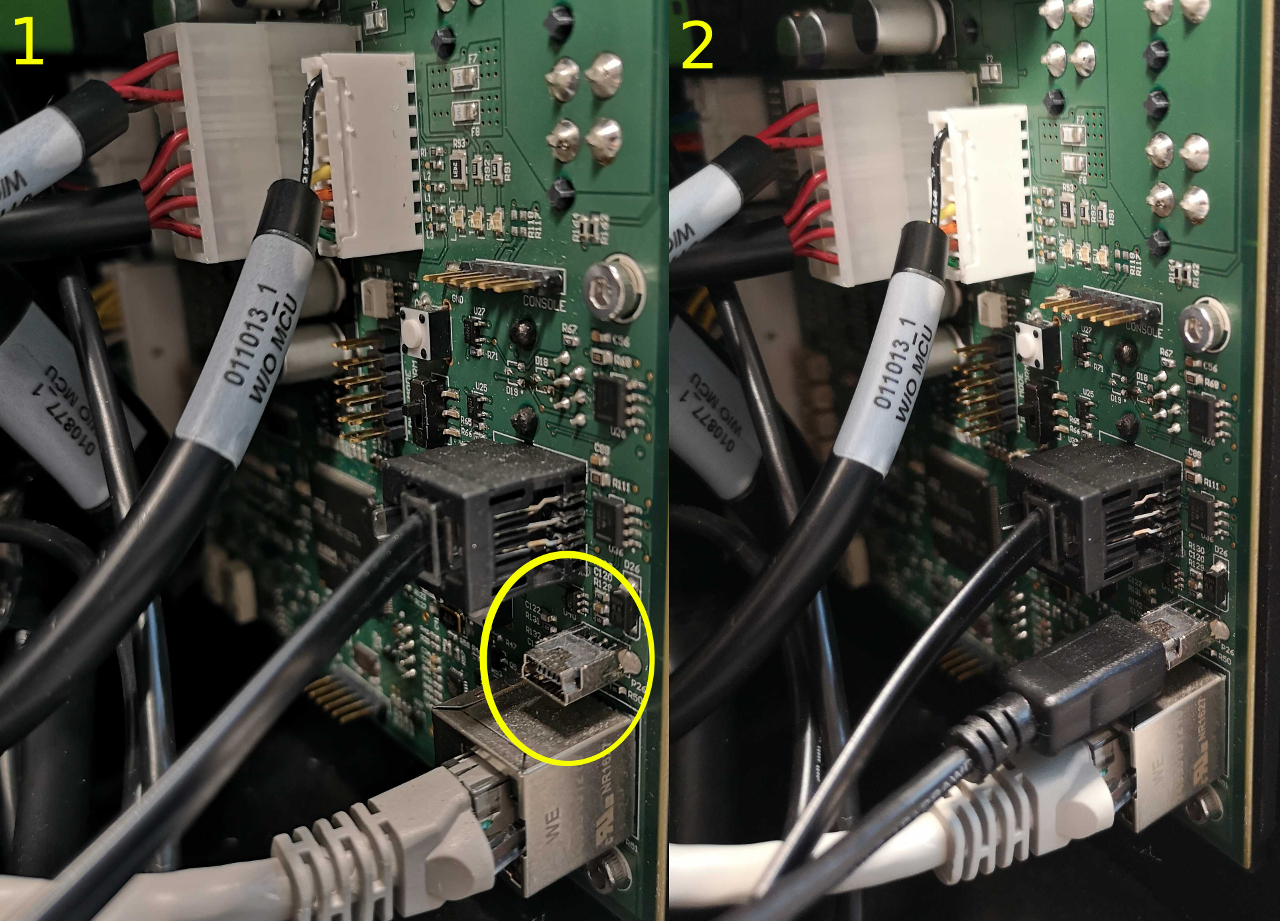
In the middle of the MCU, there is a two-position switch labelled PWR_MODE. Move the switch from the default NORM position to the AUX position.
Press the M_RST to restart the MCU. Now, the MCU is in boot-loader mode, ready to receive new firmware.
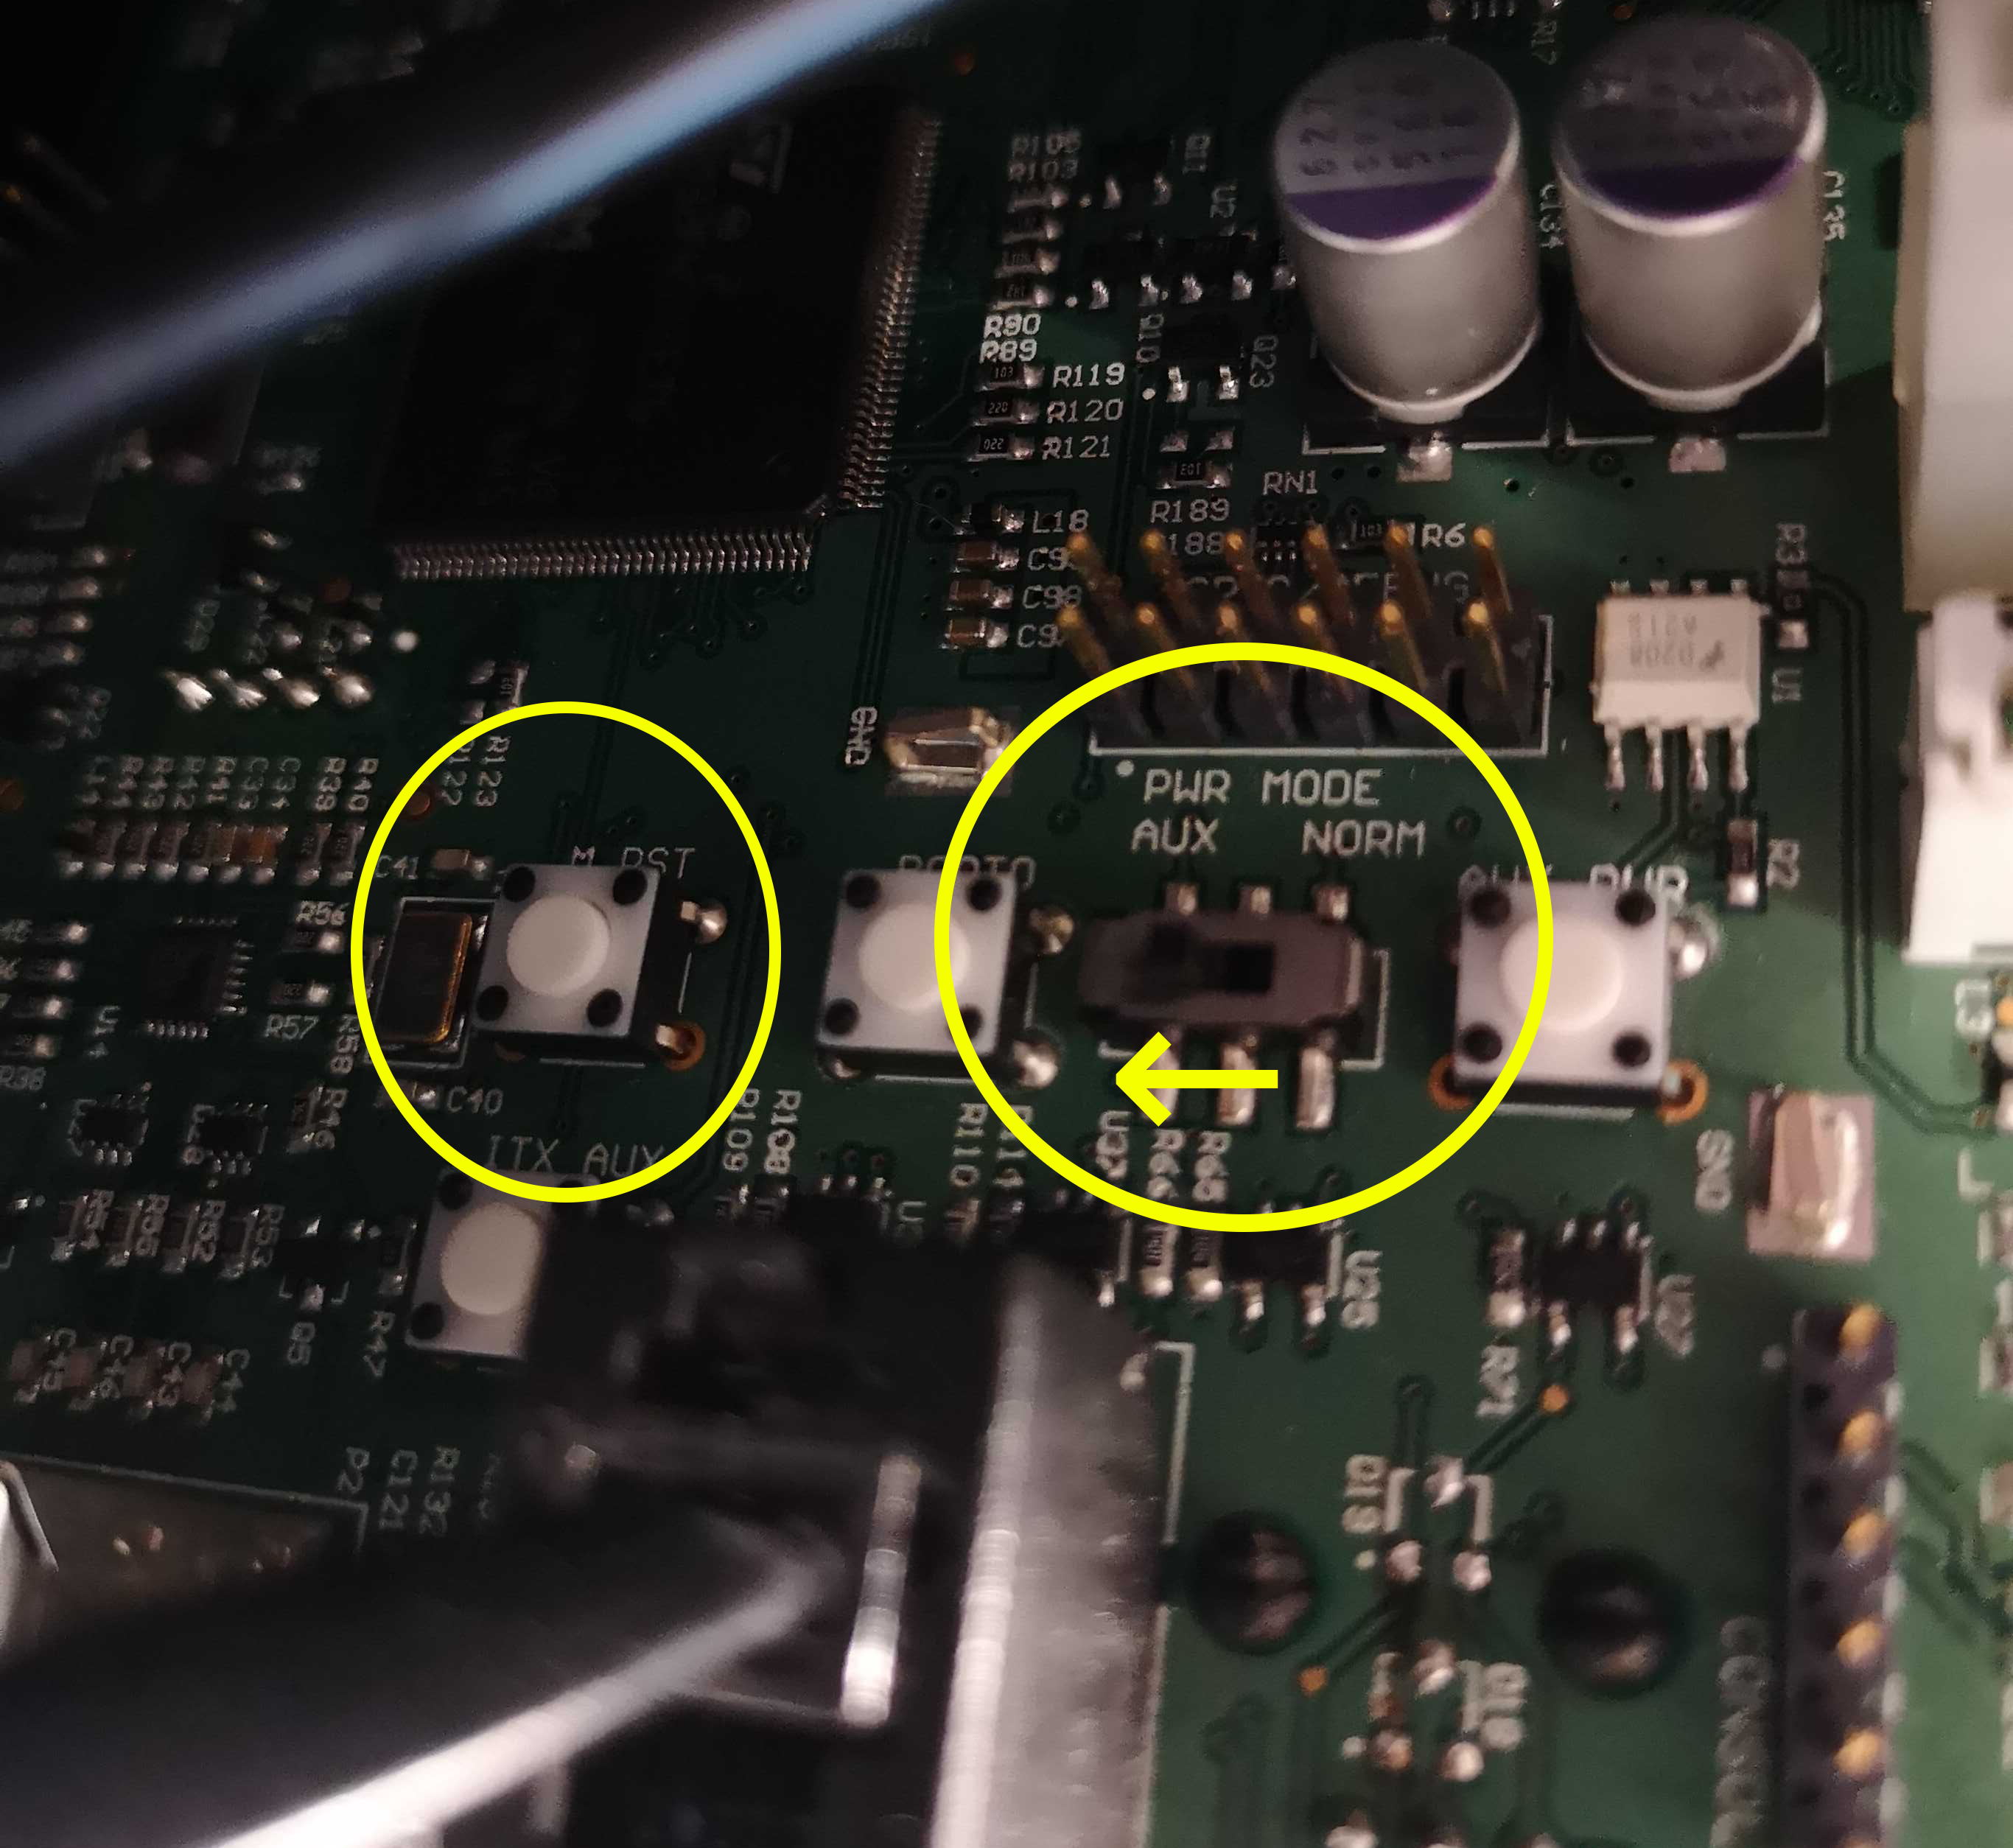
The Ridgeback's MCU is normally rotated 90 degrees when it is installed in the robot; the NORM position is typically towards the top of the robot's chassis and the AUX position is normally towards the bottom.
1. Download the Clearpath Firmware package from the Clearpath package server
On the robot computer, run the following commands:
sudo apt-get update
sudo apt-get install ros-humble-clearpath-firmware
2. Prepare the Robot
Platforms with an Ethernet connection to the MCU have the option of flashing over USB or Ethernet. If you are updating to ROS 2 Humble for the first time, you must use USB. If you are updating ROS 2 Humble firmware to a newer version, using Ethernet is recommended. Skip this step if flashing over Ethernet.
The DX100 MCU is mounted near the HMI panel towards the rear of the robot. To access it, remove the antennas and the center channel panel.
Connect the MCU to the onboard computer using a mini-USB cable connected to the port as shown below:
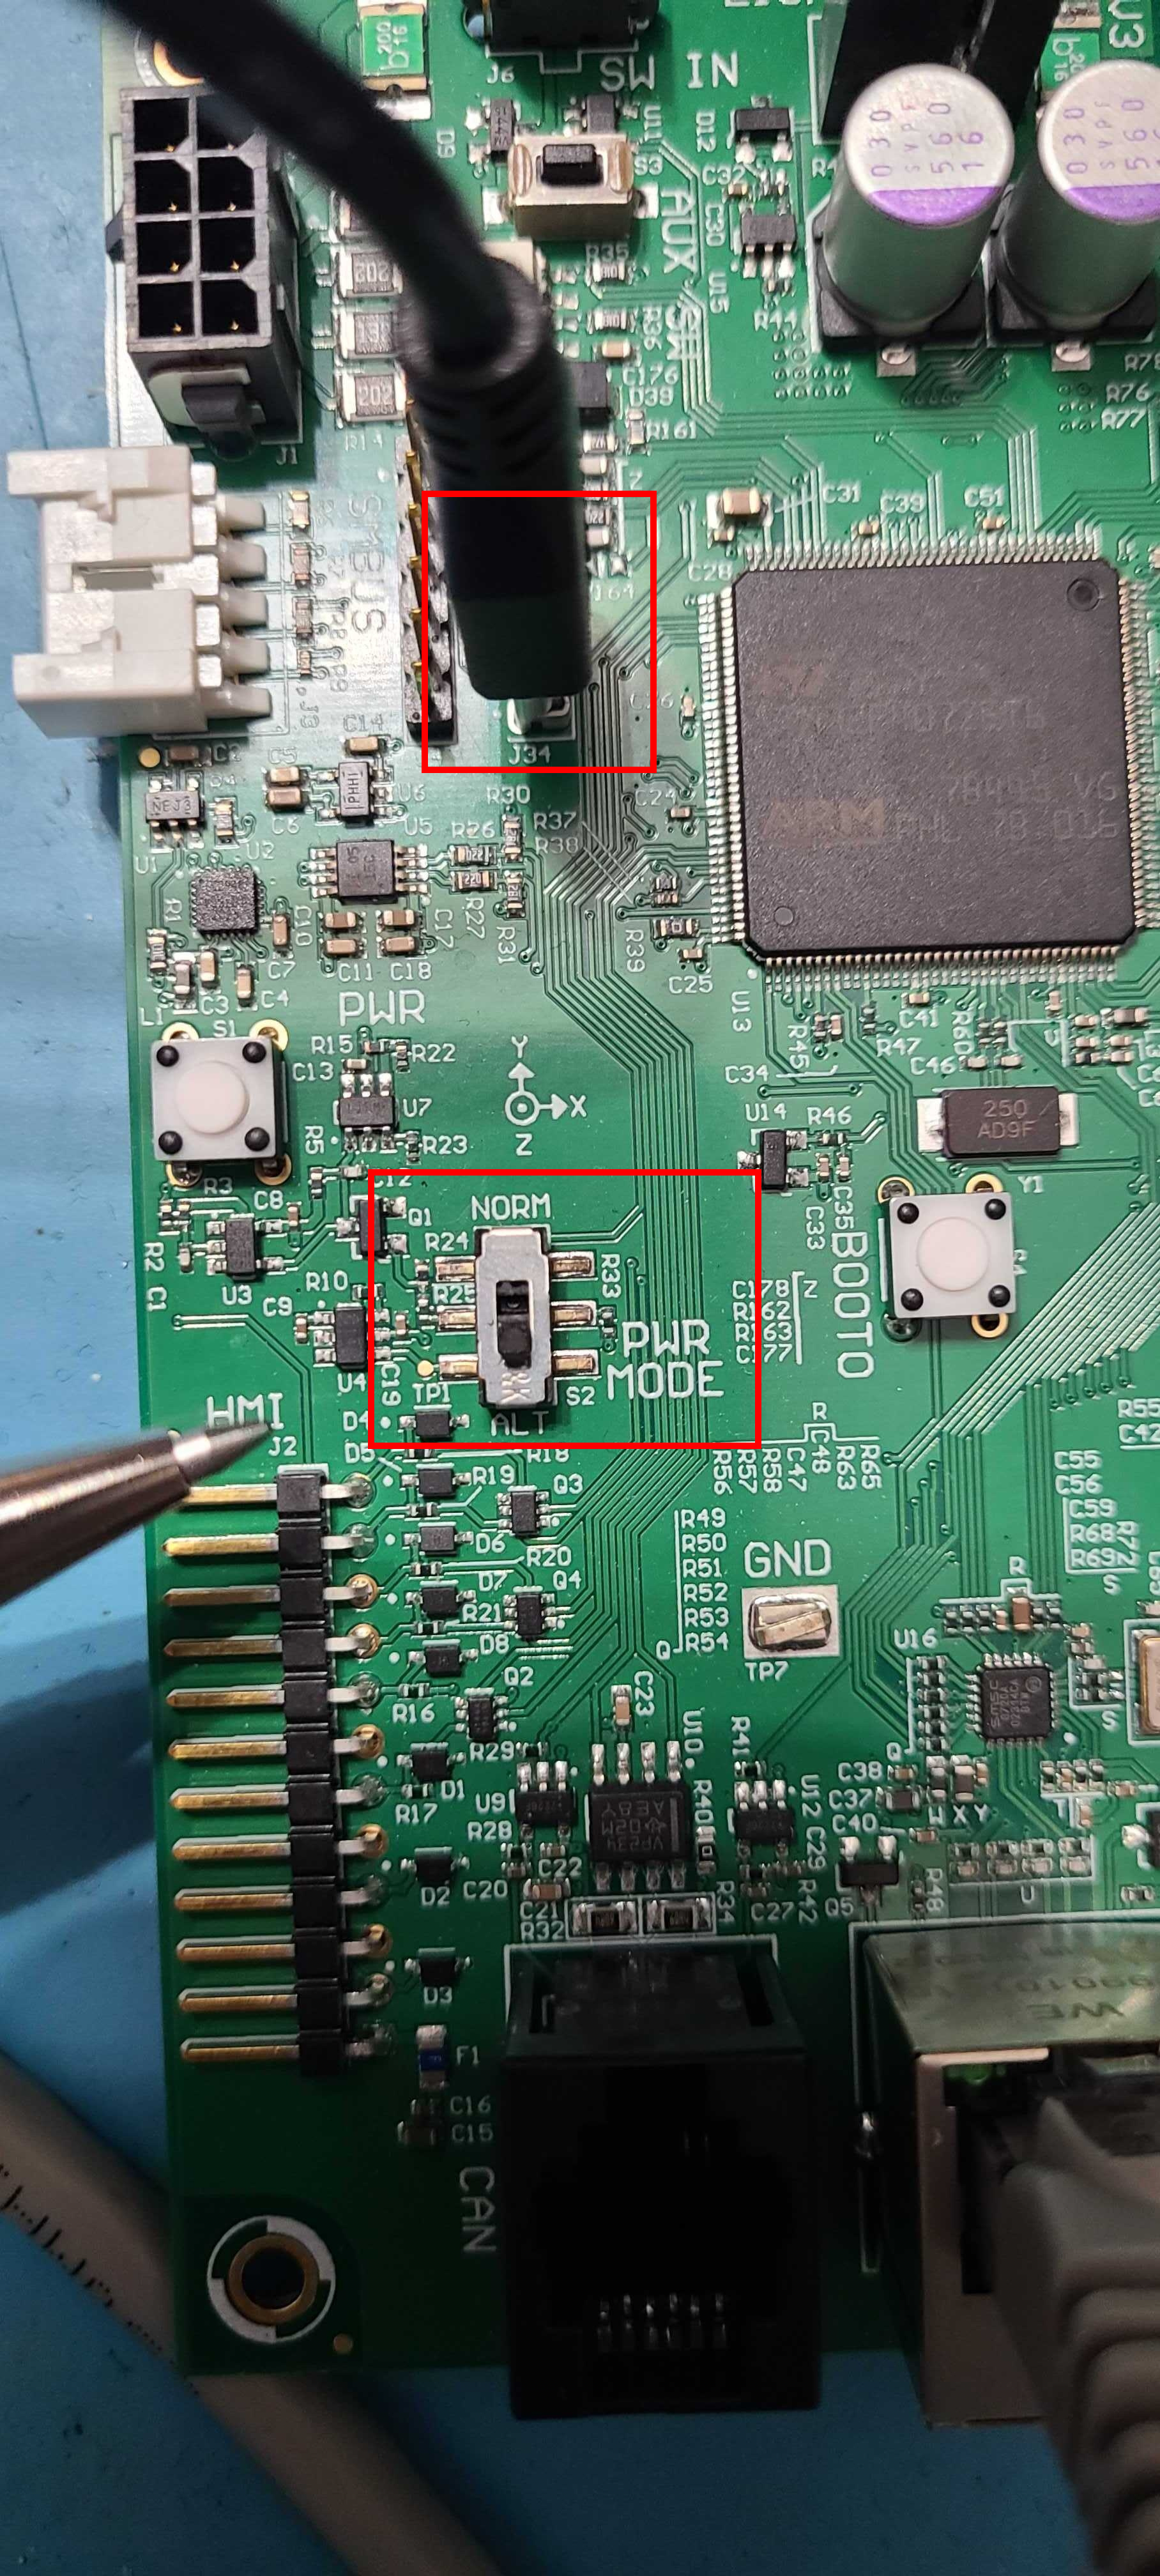
As is shown in the image above, set the PWR_MODE switch to the ALT position.
Press the M_RST or restart the robot using the HMI panel. Now, the MCU is in boot-loader mode, ready to receive new firmware.
1. Download the Clearpath Firmware package from the Clearpath package server
On the robot computer, run the following commands:
sudo apt-get update
sudo apt-get install ros-humble-clearpath-firmware
2. Prepare the Robot
Platforms with an Ethernet connection to the MCU have the option of flashing over USB or Ethernet. If you are updating to ROS 2 Humble for the first time, you must use USB. If you are updating ROS 2 Humble firmware to a newer version, using Ethernet is recommended. Skip this step if flashing over Ethernet.
The DX150 MCU is mounted near the HMI panel towards the rear of the robot. To access it, remove the antennas and the center channel panel.
Connect the MCU to the onboard computer using a mini-USB cable connected to the port as shown below:
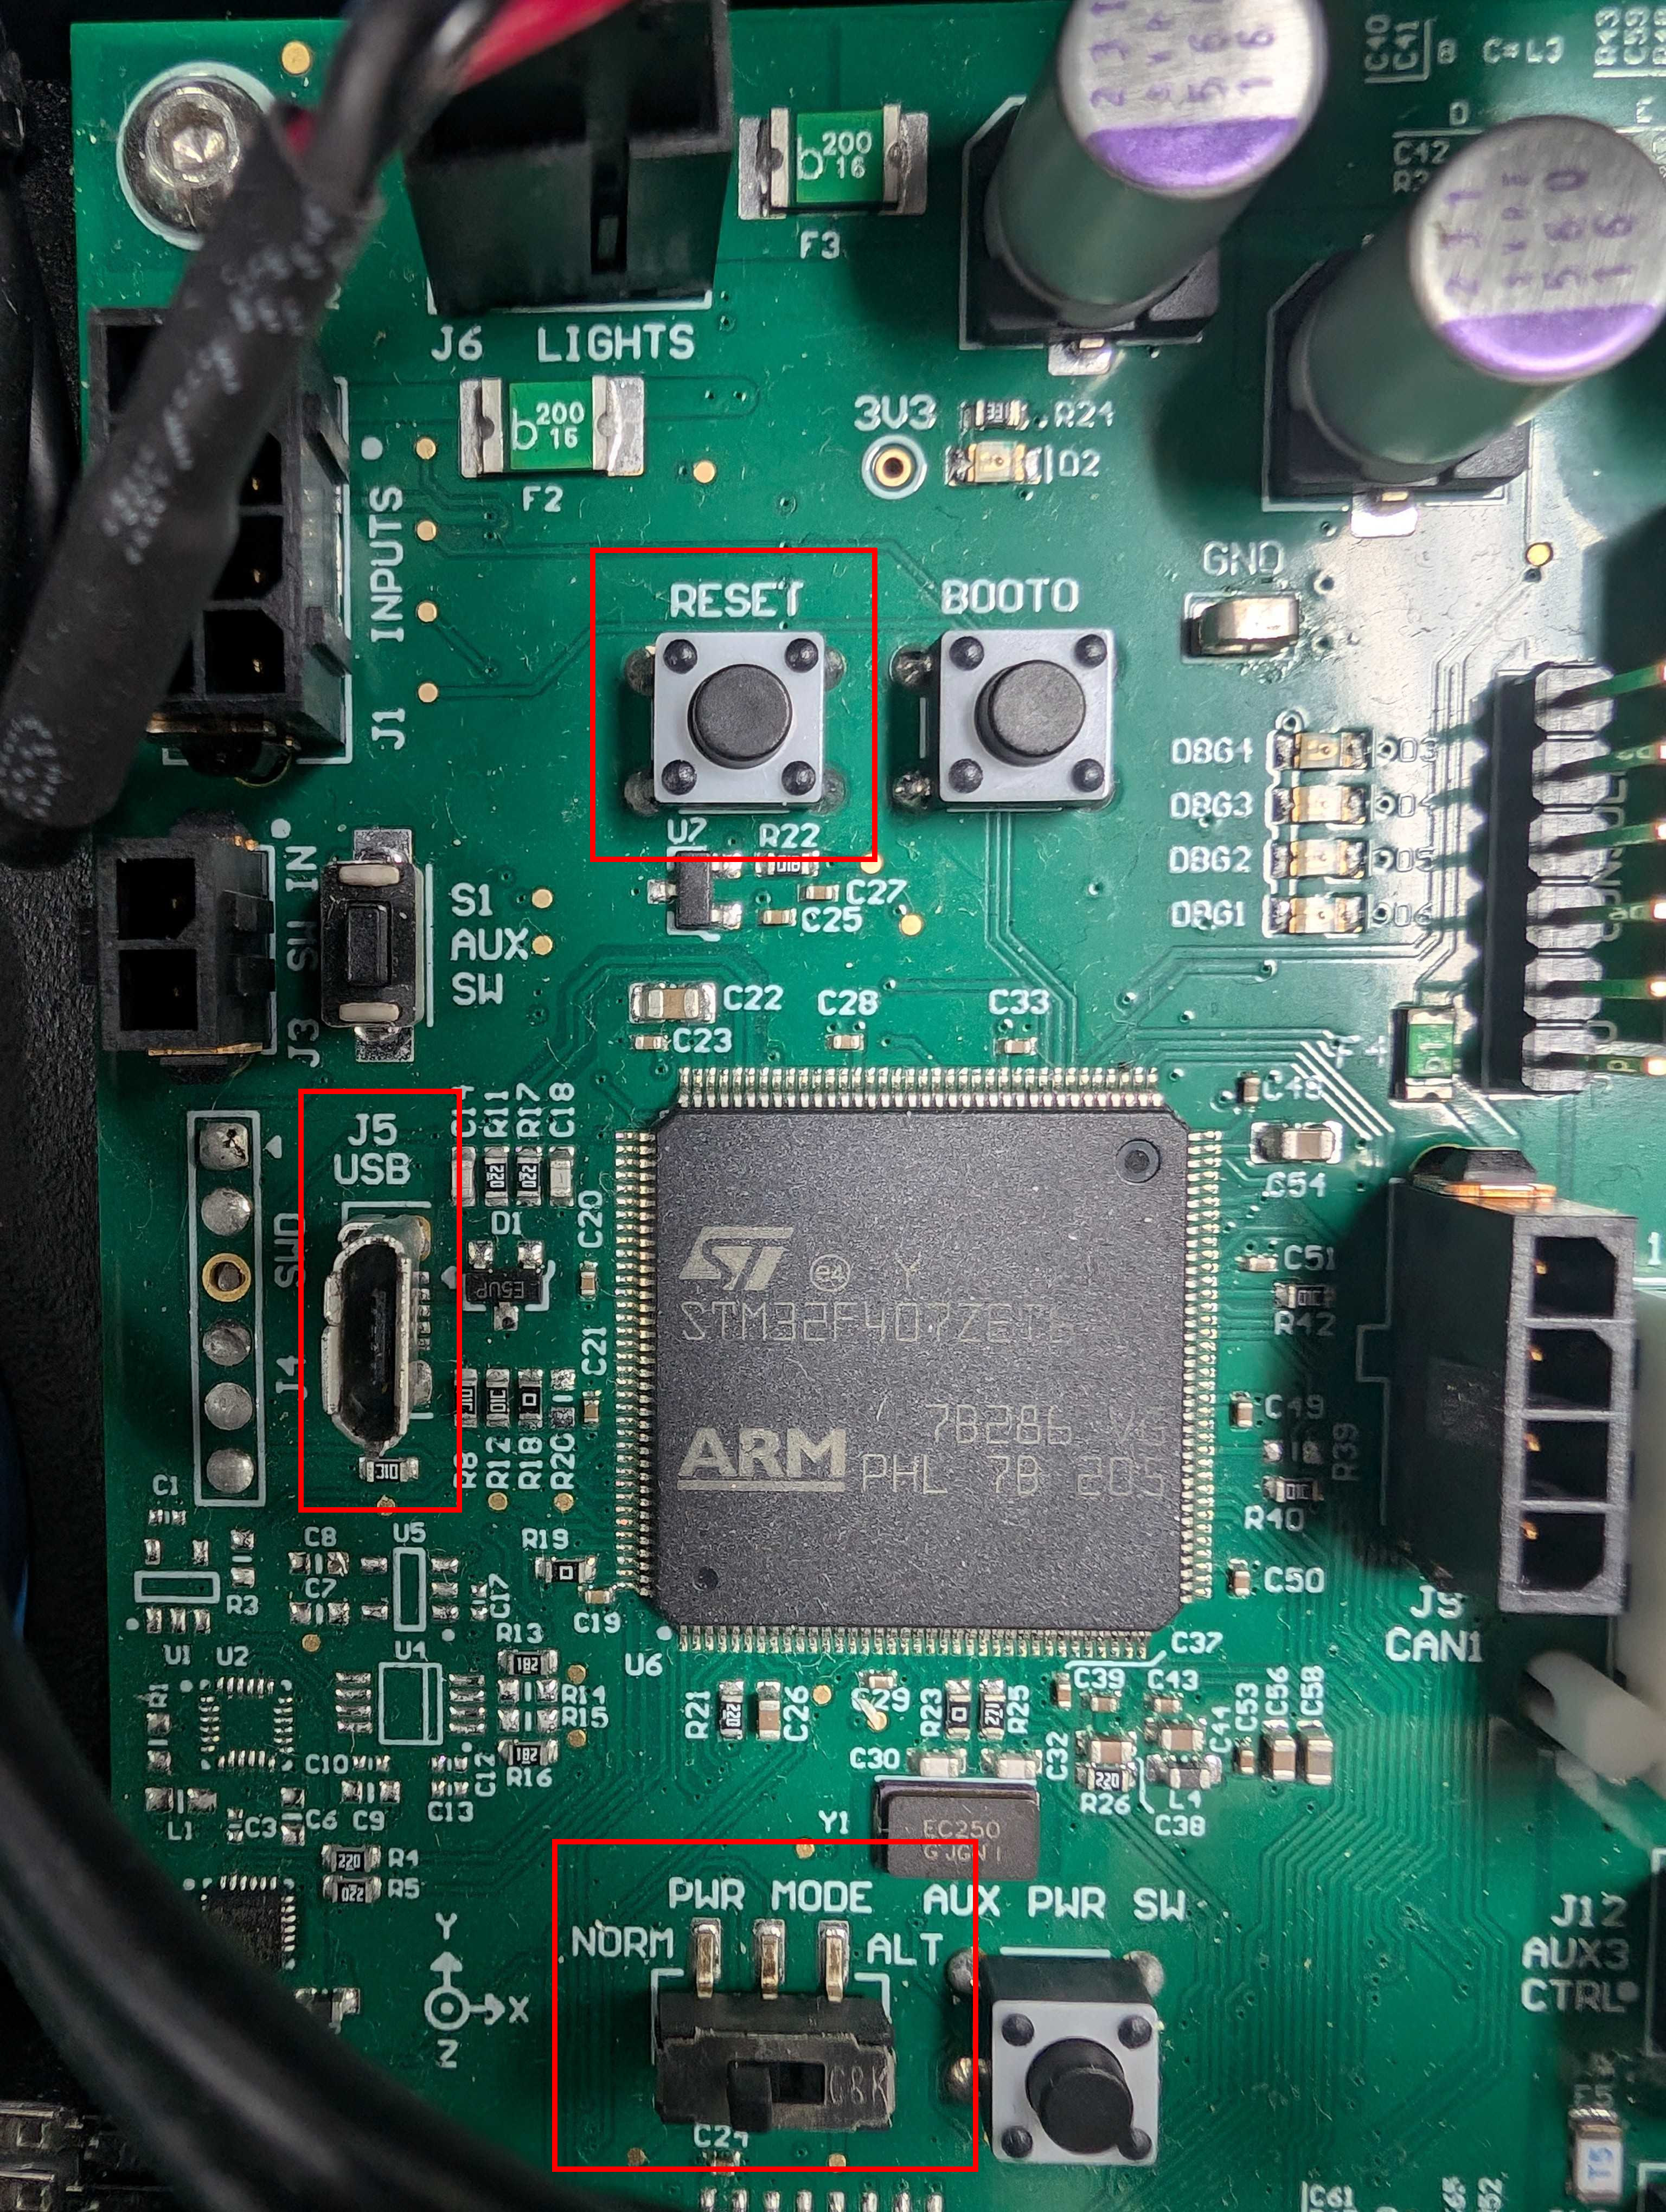
As is shown in the image above, set the PWR_MODE switch to the ALT position.
Press the M_RST or restart the robot using the HMI panel. Now, the MCU is in boot-loader mode, ready to receive new firmware.
3. Flash the firmware
Run the Clearpath firmware flash tool:
source /opt/ros/humble/setup.bash
ros2 run clearpath_firmware flash
Select your platform, then select which method of flashing you would like to use.
Do not turn the robot off or unplug the cable while flashing firmware. If an error occurs while flashing, you can attempt to flash again over USB.
4. Place the robot back into normal operating mode
If you flashed over Ethernet, skip this step.
- J100
- W200
- R100
- DX100
- DX150
Switch the PWR_MODE switch from ALT back to NORM. The robot will turn off.
Power it back on with the power button.
Press the RST button. The MCU should enter regular operation.
Switch the PWR_MODE switch from ALT back to NORM. The robot will turn off.
Power it back on with the power button.
Switch the PWR_MODE switch from ALT back to NORM. The robot will turn off.
Power it back on with the power button.
Switch the PWR_MODE switch from ALT back to NORM. The robot will turn off.
Power it back on with the power button.
WD Blue SA510 SATA SSD Critical Firmware Update
Some computers shipped with a WD Blue SA510 SATA SSD, for which the manufacturer has posted a critical firmware update notice.
Failure to perform the firmware update could result in permanent failure of the SSD.
See these instructions to check if your SSD is affected and to perform the update.
Support
Clearpath is committed to your success. Please get in touch with us and we will do our best to get you rolling again quickly: <support@clearpathrobotics.com>.
To get in touch with a salesperson regarding Clearpath Robotics products, please email <research-sales@clearpathrobotics.com>.
If you have an issue that is specifically about ROS and is something which may be of interest to the broader community, consider asking it on Robotics Stack Exchange. If you do not get a satisfactory response, please ping us and include a link to your question as posted there. If appropriate, we will answer on Robotics Stack Exchange for the benefit of the community.