Boxer User Manual
Introduction
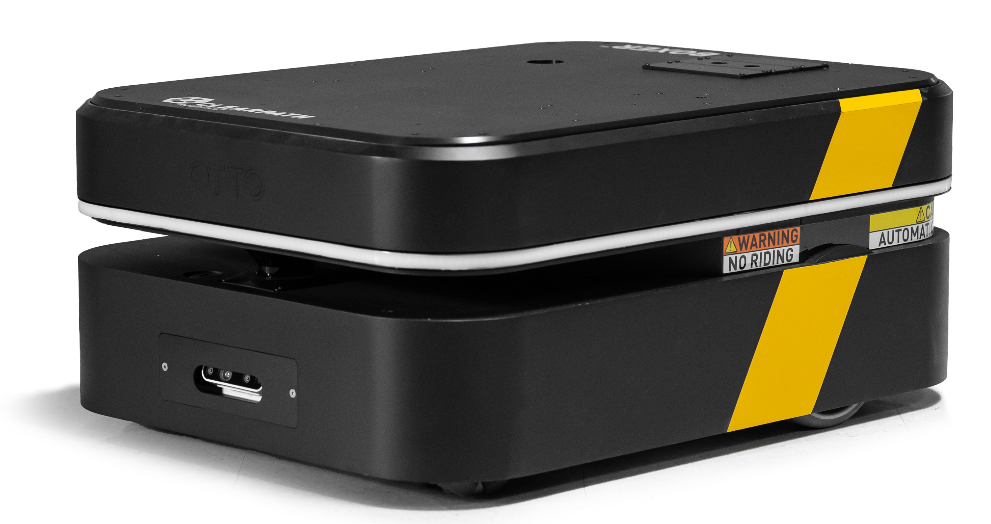
Boxer is a large indoor mobile robot for prototyping and development of industrial applications. Adapted from the OTTO Motors OTTO 100 autonomous mobile robot (AMR), Boxer is programmable and easily extensible with additional hardware.
Current Boxer shipments are based on OTTO 100 V2.5. Some shipments from 2021-2023 are based on OTTO 100 V2.4. All information in this manual applies equally to both versions except where otherwise noted.
Mobile robots are inherently hazardous. It is the responsibility of the deployer to ensure that all personnel that may come into contact with the system are trained properly. It is also the responsibility of the deployer to understand the hazards presented and to ensure sufficient safeguards or other mitigations are in place. Refer to the Safety section of this manual for further details.
Shipment Contents
Your Boxer shipment contains the following:
- Clearpath Robotics Boxer
- OTTO 100 Manual Charger
- Handheld Joystick Controller
- Optional: OTTO 100 Fast Charger
If you elected to purchase standard payload modules or custom integration services with Boxer, then additional equipment will be included per your specific configuration, plus further documentation as required.
Hardware Overview
System Architecture
Boxer is built on the OTTO 100 AMR, which provides the core locomotion, safety, and sensing capabilities, along with a ROS 2 API for control of the system. Boxer is typically augmented with a Backpack Computer, which allows for user software to be installed and executed on the system, controlling the Base Unit through the ROS 2 API over a local Ethernet connection. The backpack computer also allows for control and monitoring of any additional payloads added to Boxer.
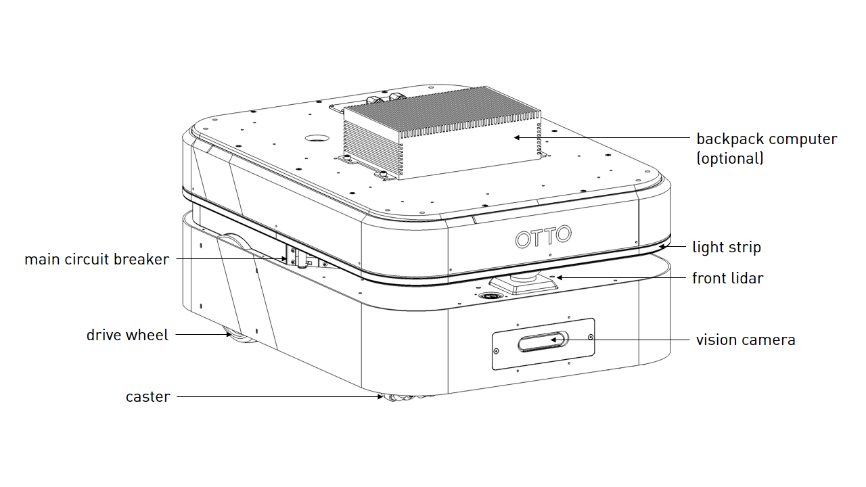
Exterior Features
Below is an overview of the Boxer robot hardware that outlines the key components that you should be aware of in order to get started with using your robot. Note that the front emergency stop button is only present on Boxer V2.5.
- V2.4
- V2.5
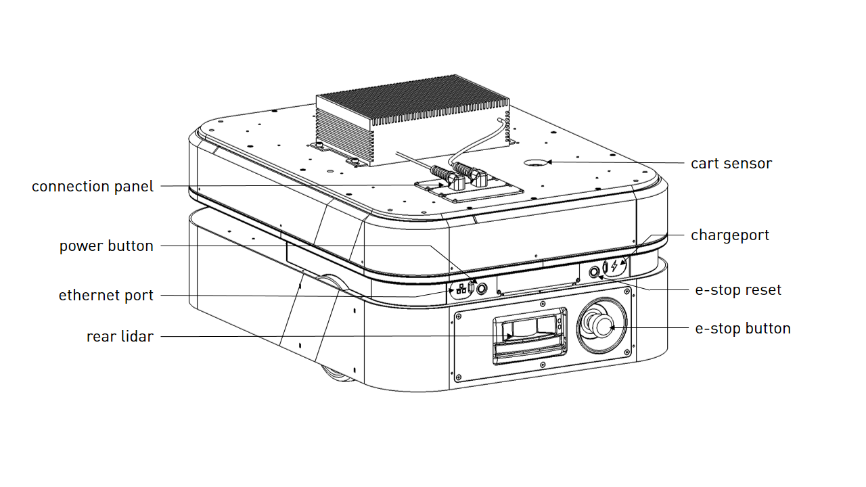


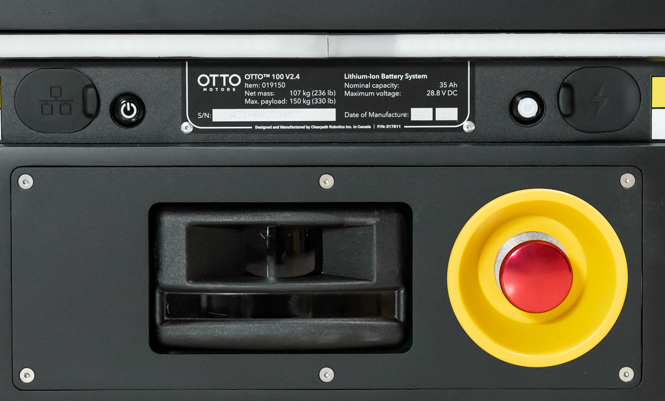
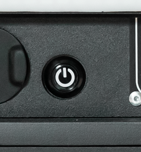
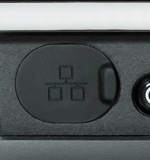
Human-Machine Interface (HMI) Panel
The back of Boxer has the Human-Machine-Interface panel (HMI). The HMI has 5 elements:
- Ethernet port
- Power button
- Emergency stop reset button
- Chargeport
- Rear emergency stop button
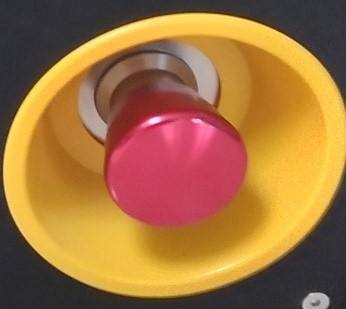
Front Emergency Stop Button
In addition to the rear emergency stop button described in the HMI Panel above, Boxer 2.5 (but not Boxer 2.4) has a front emergency stop button, which is mounted to the right of the front safety LiDAR. Refer to Emergency Stop Buttons for additional details.
Body Lights
Boxer includes RGB LED strips around its body. These lights express system status according to the table below.
| LED Pattern | System State |
|---|---|
| Solid Red | Robot is starting up |
| Flashing Red | Robot is emergency stopped or safety stopped |
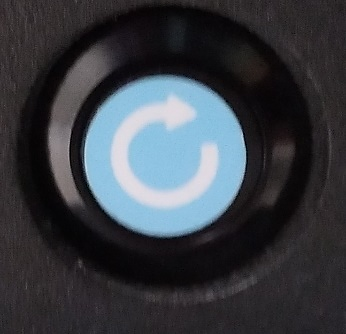
| Circling Blue | Base Unit is in Manual mode, allowing it to be controlled via the ROS 2 API |
At present these lights are not controllable through any ROS topics.
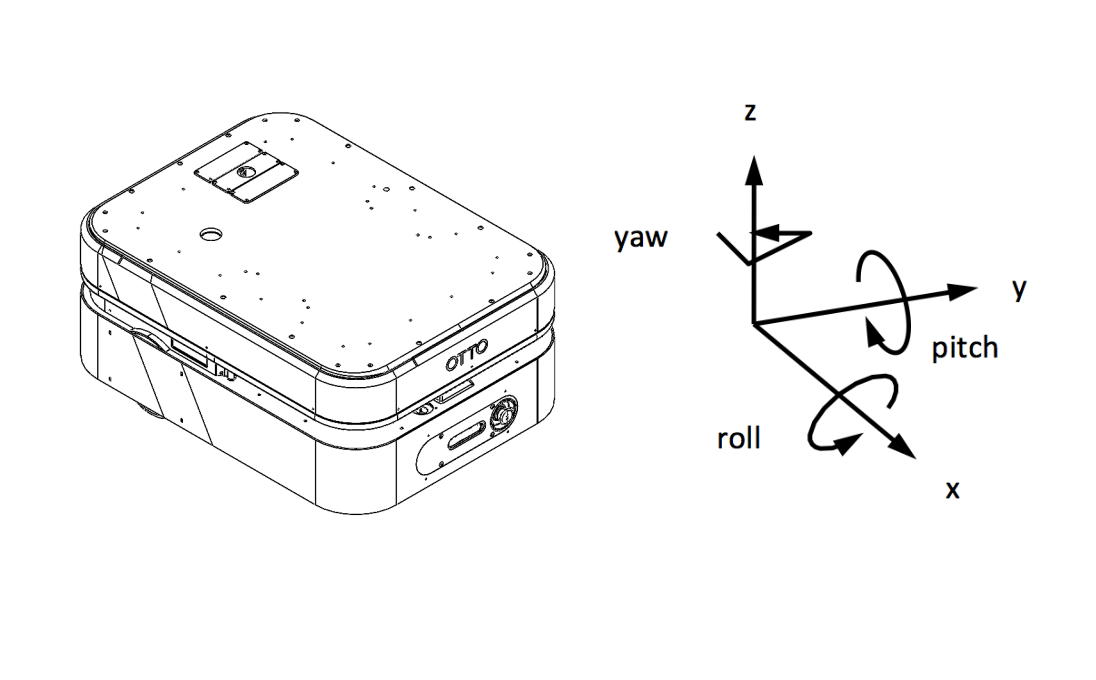
Orientation References
The reference frame used by all Clearpath Robotics ground robots is based on ISO 8855 When commanded with a positive translational velocity (forward), wheels travel in the positive X-direction. The direction of the axes differs from those used for roll, pitch, and yaw in aircraft, and care should be taken to ensure that data is interpreted correctly.
System Specifications
| Specification | Measurement |
|---|---|
| Dimensions, Length | 740 mm |
| Dimensions, Width | 550 mm |
| Dimensions, Height | 320 mm |
| Mass | 114 kg |
| Velocity, Max | 2.0 m/s |
| Obstacle, Max Step Height | 6 mm |
| Obstacle, Floor Gap | 13 mm |
| Operating Relative Humidity, Min | 0 % |
| Operating Relative Humidity, Max | 85 % |
| Operating Temperature, Min | 20 °C |
| Operating Temperature, Max | 30 °C |
| Storage Temperature, Min | -20 °C |
| Storage Temperature, Max | 35 °C |
| Operating Time, Standby | 8 hours |
| Operating Time, Continuous Driving | 3 hours |
Getting Started
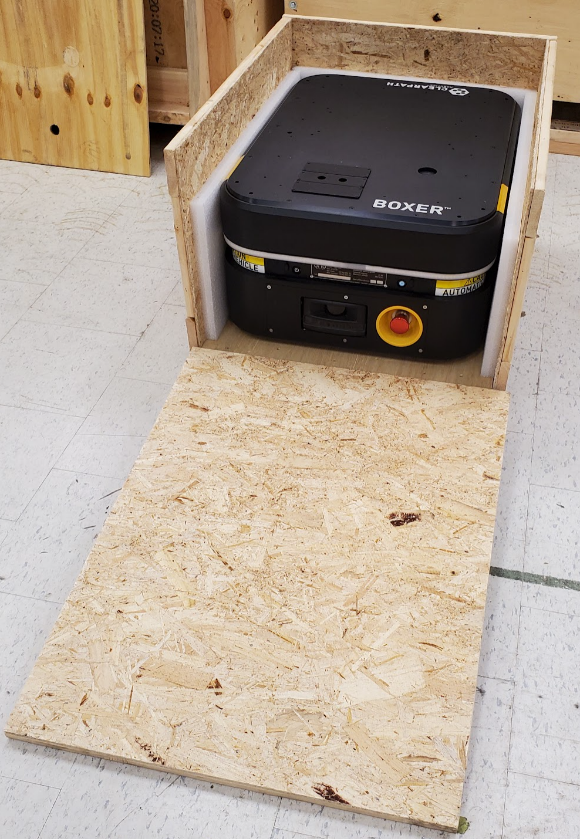
Unboxing
Boxer ships fully assembled and no assembly is required. To unbox, remove the screws holding the top wood panel and the front wood panel. Remove the screws holding the cross bracing. An electric driver should be used to aid in the removal of the screws. Lay the top wood panel down with one end on the edge of the crate and the other end on the ground to create a ramp as shown below. Pull the robot out of the crate by hand, and then roll the robot down the wood ramp.
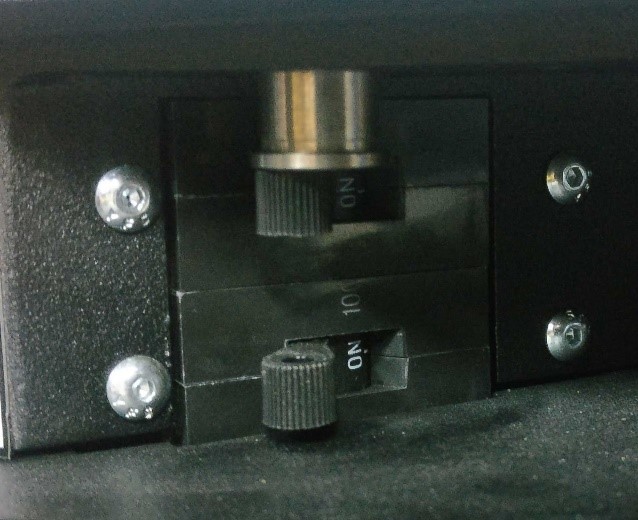
Powering Up
-
Turn the 2 circuit breakers to the on position. You will need to lift the metal bar to do this.
-
Press the Power Button.
-
Wait for the system to boot. The Boxer's lights will go through a sequence of colors during this process:
- All white for approximately 30 seconds
- All red for approximately 30 seconds
- Flashing white for less than 5 seconds
- Then flashing red
Note that the Boxer will be sounding an alarm which will be adjusted during the base unit configuration below.
Base Unit Configuration
Connect the Boxer to the Wi-Fi network using the steps below. Refer to Connecting to a robot using an Ethernet cable and Connecting a robot to a network for more details.
- Configure a network port on your laptop with the IP address <10.255.255.200>.
- Connect a network cable from the port on your laptop to the network port on the rear of the Base Unit.
- On your laptop, open a web-browser like Google Chrome, and go to the address http://10.255.255.1:8090
- Enter the required information to connect to your network.
See your IT administrator for proper settings for your network.

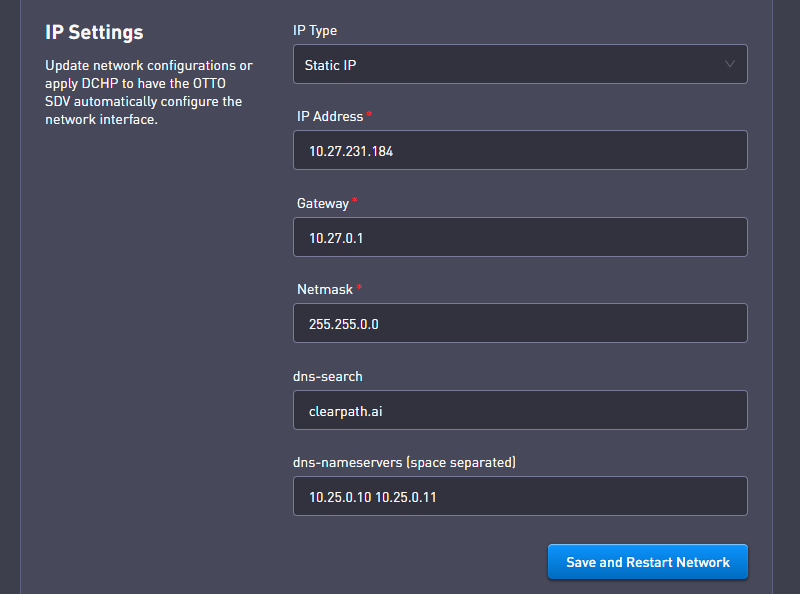
- Take note of the hostname. It will be used in future steps for accessing the robot. You can also find this hostname engraved on the HMI panel, at the rear of the Boxer.
- Click Save and Restart Network.
- Power cycle the Boxer.
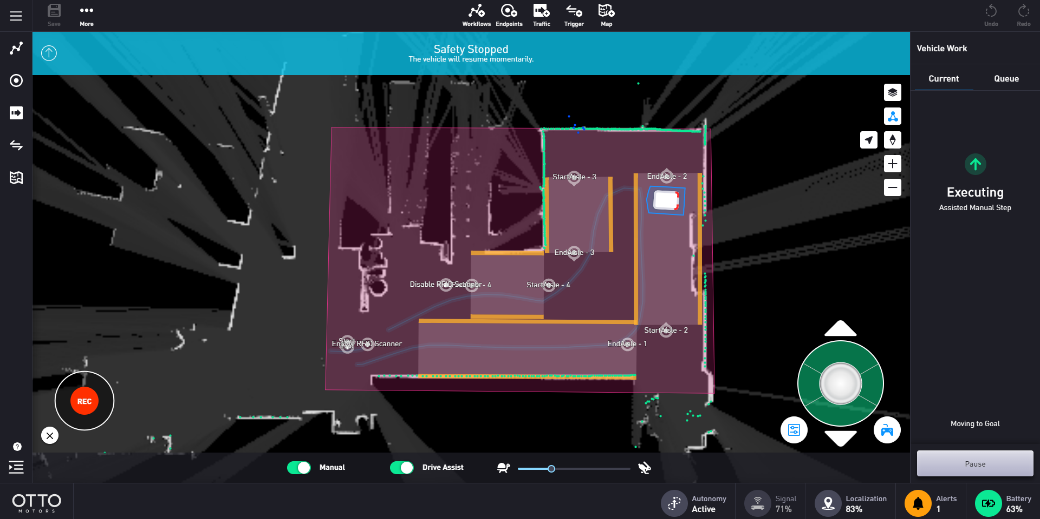
- Using the hostname or static IP set in the Wi-Fi setup above, load the OTTO App user interface by opening a web-browser, and going to the address http://hostname:5000.
(e.g. http://A31-002124076:5000 )
The OTTO App should load, and look similar to the image below.
- Adjust the volume to an appropriate level for your facility by selecting the Vehicle option from the top-left menu and adjusting the volume as appropriate.
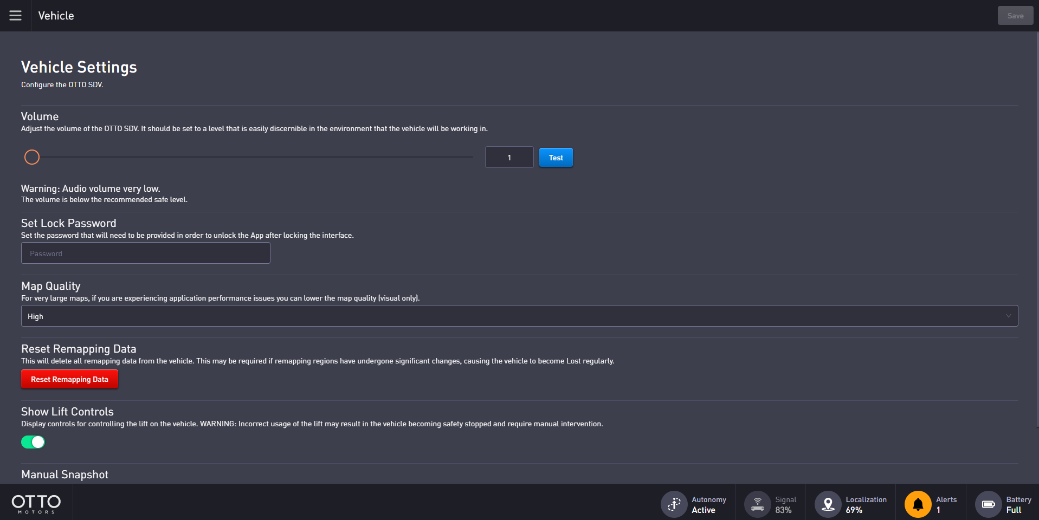
- You have finished onfiguring the Boxer Base Unit, and it's ready for use.
Backpack Computer Configuration
This section outlines how to configure the Backpack Computer attached to the Base Unit. You can omit this section if your Boxer is not equipped with a Backpack Computer.
The Backpack Computer is an add-on computer that is networked with the Base Unit's computer, located inside then Boxer. This Backpack Computer can be used to integrate peripherals, like sensors and manipulators. A ROS bridge automatically runs upon booting the Backpack Computer, and transmits the Base Unit computer's ROS data to the Backpack Computer. This ROS bridge allows you to leverage the Base Unit for your own application. The Backpack Computer uses Netplan as its network configuration tool, and has a static IP address of <192.168.131.1>.
Connecting to the Backpack Computer
You can connect to the Backpack Computer on Boxer over a wired or Wi-Fi connection.
To connect to the Backpack Computer over a wired connection:
- Configure a network port on your laptop with the IP address <192.168.131.100>.
- Connect a network cable from your laptop to an open network port on the Backpack Computer.
- Test the connection between the user computer and Backpack Computer by opening a terminal and entering:
ping 192.168.131.1 - From your laptop's terminal, you can access the Backpack Computer by entering:
ssh administrator@192.168.131.1
To connect to the Backpack Computer over a Wi-Fi connection:
- Connect your laptop to the same Wi-Fi network as the Backpack Computer.
- Note the IP address of the Backpack Computer's wireless interface by running this command the Backpack Computer's terminal:
ip a - To test the connection between your laptop and Backpack Computer, enter this command in a terminal from your laptop:
ping <wireless_ip_address>(eg.ping 192.168.0.11) - From your laptop's terminal, you can access the Backpack Computer by entering:
ssh administrator@<wireless_ip_address>(eg.ssh administrator@192.168.0.11)
Connecting the Backpack Computer to a Wi-Fi Network
To connect the Backpack Computer to a wireless network follow these steps:
-
Access the Backpack Computer over an SSH connection. Since the Backpack Computer is presumably not connected to a Wi-Fi network yet, you will need to access the Backpack Computer over a wired connection. The previous section details how to connect to the Backpack Computer over a wired connection.
-
Once you have accessed the Backpack Computer, create a netplan configuration by running the following command.
sudo touch /etc/netplan/60-wifi.yaml
This will create a file called 60-wifi.yaml inside of the /etc/netplan/ directory.
-
Open /etc/netplan/60-wifi.yaml with your favourite text editor and populate it. Use this example configuration file as reference:
network:
  wifis:
    # change wlp2s0 to exactly match your wireless interface
    # common values are wlp2s0, wlp3s0, wlan0, etc...
    # if you aren't sure, use the `iwconfig` or `ip a` command
    wlp2s0:
      optional: true
      access-points:
        # replace "my-ssid" with the SSID of your wireless network
        my-ssid:
          # put your wireless password here
          password: wifi_password_goes_here
      # DHCP4 should be enabled for most wireless routers
      # alternatively you can use a static IP address.
      # e.g, uncomment the following
      #addresses: [192.168.1.100/24]
      #gateway: 192.168.1.1
      #dhcp4: false
      dhcp4: true
      dhcp4-overrides:
send-hostname: true -
Connect the Backpack Computer to the wireless network by running the command below. Note that this may take a moment to complete:
sudo netplan apply -
To verify that the Backpack Computer is connected to the wireless network, check that the Backpack Computer has an IP address assigned to its wireless interface by running:
ip a
Battery Charging
The system can be charged using an OTTO 100 Manual Charger or an OTTO 100 Fast Charger. Details for use and installation are provided in the linked User Manuals.
Only use the OTTO 100 Manual Charger or OTTO 100 Fast Charger provided with your Boxer. Use of other chargers may cause damage or injury.
Operation
This section outlines how to use the basic functions of the Boxer platform in order to get started quickly. There are several methods of operating the robot.
Getting Started with the OTTO User Interface
This section details how to get the Robot driving around using the OTTO user interface.
-
Power on the system.
-
Ensure that all emergency stop buttons are released by pulling out the red buttons at the front (V2.5 only) and rear of the unit, and then pressing the blue emergency stop Reset button.
-
Using the base Boxer's hostname or static IP, open the OTTO App by entering the following in your laptop's web-browser:
http://<hostname>:5000
-
You are now ready to start driving your system.
Driving Manually
To drive the robot manually, follow the steps below.
- Power up the robot and connect to the OTTO App at
http://<hostname>:5000 - The first time after power-up, it is necessary to take the system out of neutral by clicking on the joystick icon at the bottom right of the interface.
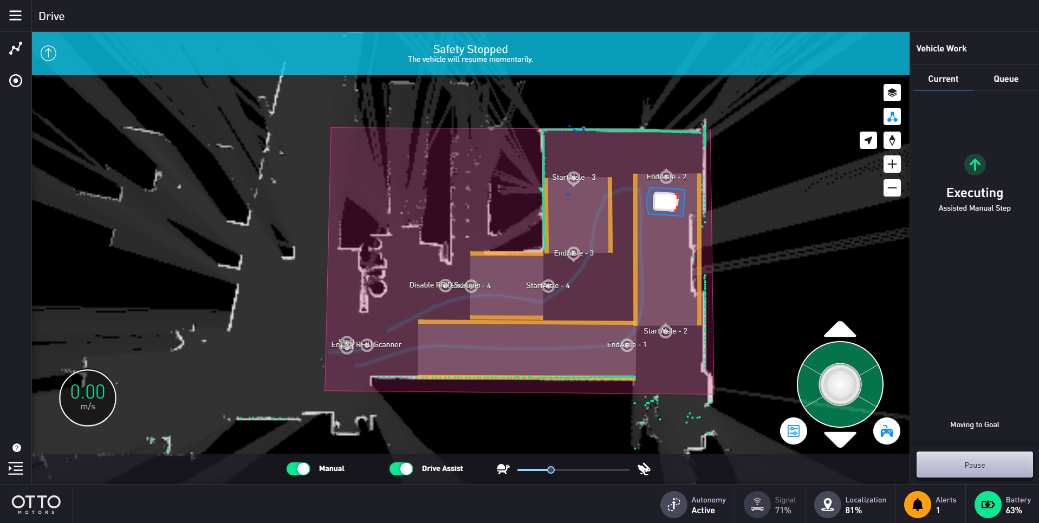
- Ensure that the system is in manual mode and use the thumbstick at the bottom right of the interface to drive the robot in the desired direction.
Note that the maximum speed can be adjusted using the slider Tortoise-Hare at the bottom of the interface.
We recommended you begin at slow speeds until you become comfortable with how to control the robot.
Mapping
Prior to navigating autonomously, a map of the facility must be created. The details of creating a map are beyond the scope of this document. Detailed instructions for mapping can be found here:
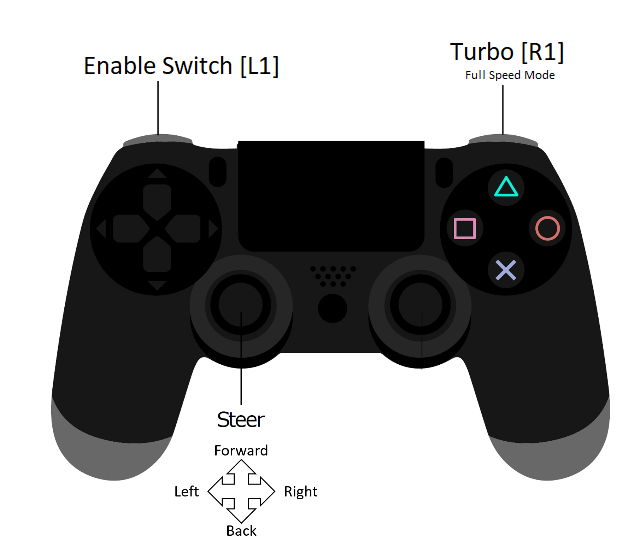
Connecting and Using the Controller
To use your controller, it must be paired with your Boxer and powered on. If your purchased the Backpack Computer from Clearpath Robotics, your controller is already paired with your Boxer. If your controller has become unpaired or if you wish to pair a new controller, following the instructions in the Boxer Tutorials.
To use the controller:
- Power up the robot and connect to the OTTO App at
http://<hostname>:5000 - The system will boot up into a neutral state. Take the robot out of Neutral by clicking the Joystick icon at the bottom right of the interface.
- Release all emergency stop buttons and press the emergency stop reset button.
- Press the PS button on the controller to sync with the robot. Once the blue LED on the top of the controller is solid, the Robot is paired and ready to move. Hold the L1 trigger button to engage the enable switch. Push the left thumbstick in the direction you wish to move the Boxer.
- For full speed mode, hold the R1 trigger.
Note that it is recommended that you use full speed mode only when comfortable with the operation of the Boxer.
Using ROS
Robot Operating System (ROS) is an extensible framework for controlling and working with robotic systems. Clearpath Robotics recommends using ROS with your robot. If this is your first time using ROS, it is strongly recommended to run through our series of ROS tutorials to learn the basics of ROS.
Safety Considerations
Clearpath Robotics is committed to high standards of safety. The Boxer robot contains several features to protect the safety of users and the integrity of the vehicle.
General Warnings
Use of an autonomous robot is inherently dangerous.
For the safety of yourself and others, always conduct initial experiments and software development with the robot raised off the ground. Place a wooden crate, a set of sawhorses, a sturdy storage tub, or any other solid flat structure under Boxer to keep the wheels clear of the ground ("up on blocks").
When starting out, favour slower wheel speeds. Operating at such speeds will allow for more reaction time in the case of unexpected behaviour.
When the robot is operating, keep clear of the wheels.
Refer to the OTTO 100 V2.5 Operation and Maintenance Manual for further safety precautions when using self-driving vehicles.
Emergency Stop Buttons
Ensure the emergency stop buttons are accessible at all times. Avoid mounting payloads that extend over the front or rear of Boxer and would occlude the emergency stop buttons.
Please take time to locate the red emergency stop buttons on the front (V2.5 only) and rear and of the system. The emergency stop function allows a person in the physical vicinity of the robot to halt its motion and prevent re-initiation of motion. This emergency stop system is intended for use in emergency situations. The emergency stop system should not be used as the means of controlling robot motion during regular operation.
When any emergency stop button is pressed, it provides a secure way to stop the robot movement, but does not control power attached by the attachment panel. The emergency stop function can be reset by pulling out all the red emergency stop buttons until they return to an extended position and then pressing the emergency stop reset button. The robot may begin moving again immediately after the emergency stop reset button has been pressed.
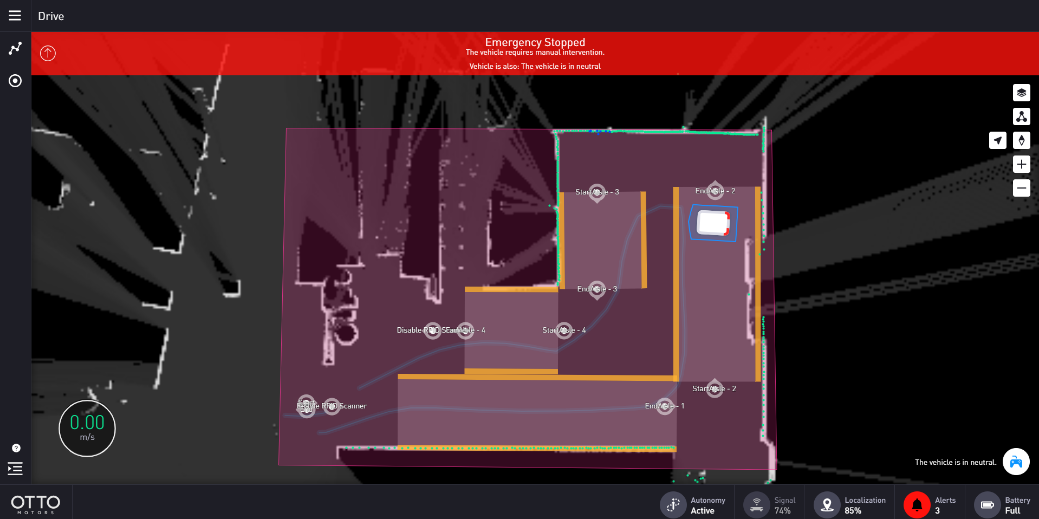
When in emergency stop mode, the light strip will be flashing red and Boxer will not drive. The commands received during emergency stop mode are not buffered; Boxer will always act on the latest commands received. This means that if the commands are stopped before the stop is released, the Boxer will not move. If the commands are continued, Boxer will move at the speed commanded once the stop is released.
Safety Lidars
Boxer is also equipped with safety lidars in the front and back that will cause the robot to lose power if a collision is predicted, or if the robot is operating too fast in an enclosed environment. The safety stop is automatic, and is not controlled through any ROS topics. Once the danger has passed the safety stop will automatically disengage.
If Boxer seems to be stuck in a safety stop, check that there is no dirt or debris on either the front or rear lidars. Wipe the lidars down using an appropriate lidar wipe or soft cloth to remove any dirt.
Recommended Safe Work Procedures
Clearpath Robotics recommends the following procedures be followed to reduce the likelihood of harm.
- Maintain a safe distance of at least 10 m from the robot whenever possible.
- Never assume that the robot can be reliably stopped on command.
- Assert a stop using the remote stop device (if present) before approaching the robot.
- Never place the remote stop device (if present) on or inside the robot.
- Always be vigilant around the robot, even when a stop is asserted.
- Perform no maintenance or troubleshooting on the robot without training and familiarisation.
- Follow electrical safety best practices when working with electrical systems and components.
- Disconnect battery using main disconnect of the robot before working inside robot.
- Wear personal protective equipment including high-visibility clothing, head and eye protection while operating, observing or working on the robot.
- Never climb on or ride the robot.
- Never lie on the ground under or near the robot.
- Avoid operating the robot on slopes and grades.
- Never stand downhill of the robot.
- Operate the robot at the lowest speed possible.
- Never attempt to defeat a safety function for any reason.
- Chock the robot's wheels when the robot will be stationary for more than a few seconds.
- Never work on the robot while it is on a slope.
- Replace fuses only with identical product from specified manufacturer.
- Discontinue use and contact Clearpath Robotics support at the first sign of strange robot behaviour.
- Keep tools and loose parts away from electrical components and out of the robot's bays.
- Check the functionality of stop systems on a regular basis, including before and after each use.
Support
Clearpath is committed to your success. Please get in touch with us and we will do our best to get you rolling again quickly: <support@clearpathrobotics.com>.
To get in touch with a salesperson regarding Clearpath Robotics products, please email <research-sales@clearpathrobotics.com>.
If you have an issue that is specifically about ROS and is something which may be of interest to the broader community, consider asking it on Robotics Stack Exchange. If you do not get a satisfactory response, please ping us and include a link to your question as posted there. If appropriate, we will answer on Robotics Stack Exchange for the benefit of the community.