Husky Observer Maintenance
Hardware Maintenance
Charging the Robot
The robot can be charged wirelessly with the Autocharge Dock or with a wired connection with the Manual Charger.
Autocharge Dock
The operator can start charging the robot using the autocharge dock in two ways, noting that the robot will only charge on the dock when the disconnect is in the "ON" position.
- Manually drive the robot to its position at the dock. The receiver on the robot should be properly aligned with the circle on the dock transmitter.
- Use the OutdoorNav UI to dock the robot autonomously. Please consult Autonomous Missions for further details. This method requires that the base station has been surveyed, the Datum has been set to the coordinates of the test site, and that the dock location has been set.
At ambient temperatures above 35 °C, there may be some automatic throttling of the charge rate when using the autocharge dock. No user intervention is required as the system will charge at the maximum possible rate based on the internal temperatures in the robot.
By default, the autocharge dock is configured to disable charging at ambient temperatures below 0 °C. It is possible to perform charging at ambient temperatures as low as -10 °C in some cases. Contact Support for details.
Manual Charger
The Manual Charger may be used when the robot is far from its wireless charger or when a faster charge rate is desired. For fastest charging, turn off the robot while charging.
- Plug the manual charger into an AC outlet and wait for the power light to turn solid BLUE.
- Remove the cap from the manual charging port (rear of robot) by squeezing the two cap sides and lifting.
- Connect the manual charger plug into port.
After a moment the ORANGE "lightning bolt" will illuminate on the charger indicating that charging has begun. The GREEN battery level indicator on the charger will also flash. When both segments of this indicator turn solid, charging is complete.
Be sure to replace the charge port cap when charging is complete. This will protect the connectors from environmental conditions.
Balancing Batteries
The robot's batteries must be balanced on a regular basis to ensure accurate feedback, consistent performance, and long life. If the batteries are allowed to fall out of balance, they will become unevenly loaded. This can lead to back-feeding between batteries, reduced charge-holding capacity for the system as a whole, and increased stress on both batteries. If the imbalance becomes severe enough, one of the system batteries will enter a protective state and disconnect itself from the system. Once the battery enters this state there is a limited time window to recover it. If that window expires the battery will become irreversibly damaged with no possibility of recovery.
Battery balancing is a slow process that will occur automatically when the fully-charged batteries are held at their float voltage. Because the automatic charger will shut off when it determines that the batteries are fully charged, the system cannot be balanced using the autocharge dock. The manual charger must be used.
To perform a "quick" balance, leave the robot plugged into the manual charger overnight. A quick balance is recommended at least once per week. A full balance of 24+ hours is recommended at least once per month.
Contact Clearpath Robotics for assistance with recovering a battery that has entered a protective state.
Checking Battery Health
A regularly-balanced battery system can be recharged thousands of times before degrading. Eventually, however, the batteries will degrade (their usable capacity will decrease). This translates to reduced run-time and range. The robot will need to be recharged more frequently and overall system availability will be reduced.
It is recommended that the system operator review runtime performance once per year to determine whether battery replacement is required. Runtime measurements should be taken immediately after a full balancing operation. Battery replacement is performed by Clearpath Robotics and is subject to battery availability. Replacement batteries may be purchased in advance and warehoused at Clearpath for future use.
Checking Drivetrain Health
Depending on the environment in which the robot is used in and duty cycle, the robot drivetrain may require maintenance during its life. Maintenance activities can include gearhead replacement, tire tread replacement, motor brush replacement, belt replacement, bearing replacement, etc.
It is recommended that the user perform an auditory inspection of the robot drivetrain once per month. Take note of any clicking, grinding or irregular skipping sounds while the robot is moving. Note that some clicking in the gearheads is normal during stops and starts, due to backlash between the gears.
Checking Wheels
Tire pressure may change with temperature and should be checked monthly with a pressure gauge. Inspecting tires, releasing pressure, and inflating tires are completed through the tire's inflation stem. Tire pressure should not exceed 138 kPa ( 20 psi ), and lower pressure may be desired based on terrain requirements.
A monthly visual inspection of the tire treads is also recommended. Replacement wheel assemblies can be purchased from Clearpath Robotics and can be installed by the user.
If a tire must be removed, first unfasten the four M5 Socket Head Cap Screws that join the wheel to the axle hub, then slide the wheel off the axle. When replacing the wheel, screws should be lubricated with Loctite® 243 and then tightened to 5 N·m ( 3.7 ft-lb ) torque.
Cleaning LiDARs
The lenses of both the 2D and 3D LiDARs must be cleaned on a regular basis. Contamination of the 3D LiDAR can result in a "stuck" robot and sub-optimal navigation performance. Contamination of the 2D LiDAR can result in poor docking performance and inability to automatically maintain battery charge.
Once per week or as required, visually inspect the lenses for dust or dirt. Use a clean microfiber cloth to gently wipe away any contaminants. Do not use cleaners or chemicals on the LiDAR lenses, as they may damage the optical coating.
Cleaning Cameras
The robot's camera lenses should be cleaned at least once per month. The cleaning procedure is the same as that for the LiDAR lenses.
Cleaning Dock Target
During the autonomous docking process, the white material of the dock target provides high remission from the Sick LMS-111 laser scanner. Over time, as the material is exposed to the elements dust/particles may build up on the white plastic part of the dock target and will require some maintenance.
This maintenance simply consists of cleaning the white plastic panels with a microfiber cloth. Ensure that the surfaces are clear of any dust, dirt and/or any other particulate matter.
Cleaning or Replacing Fan Filters
Bottom Fan Filters
The fans between the Husky Observer wheels are intake fans with filters. These filters require periodic maintenance to clean or replace the filters. In very dusty off-road environments, these filters should be inspected after every 20 hours of use and replaced as needed. In typical environments, the fan filters should be inspected after every 50 hours of use and replaced as needed.
To replace the filters:
- Remove the four screws holding the fan cover panel in place as shown in the image below.
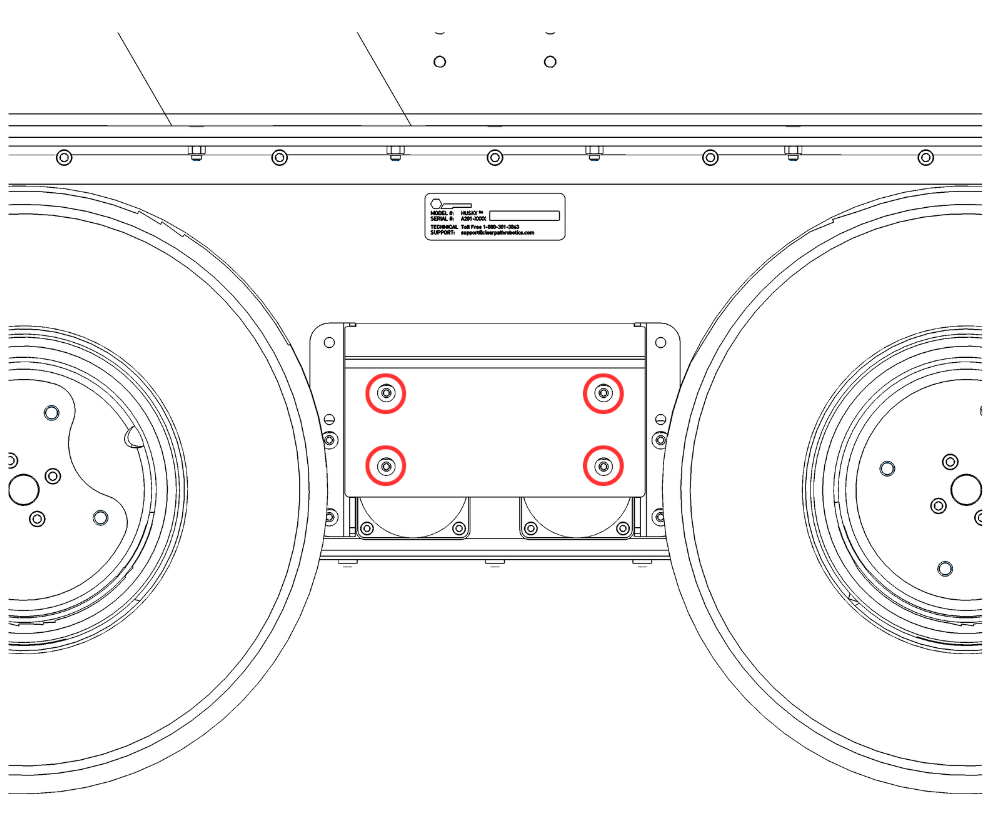
Bottom fan cover panel screws - For each of the two fans, remove the 4 screws holding the fan filter in place.
- Remove the fan filters and replace with new filters. (See Mouser P/N 562-09250-F/100)
- Install the screws holding the fan filters in place.
- Install the screws hold the fan cover panel in place.
Top Fan Filters
The top fans on the front side of Husky Observer are intake fans with filters. These filters require periodic maintenance to clean or replace the filters. In very dusty off-road environments, these filters should be inspected after every 50 hours of use and replaced as needed. In typical environments, the fan filters should be inspected after every 100 hours of use and replaced as needed.
To replace the filters (repeat the steps below for each fan):
- Remove the four screws holding the fan cover screen in place as shown in the image below.
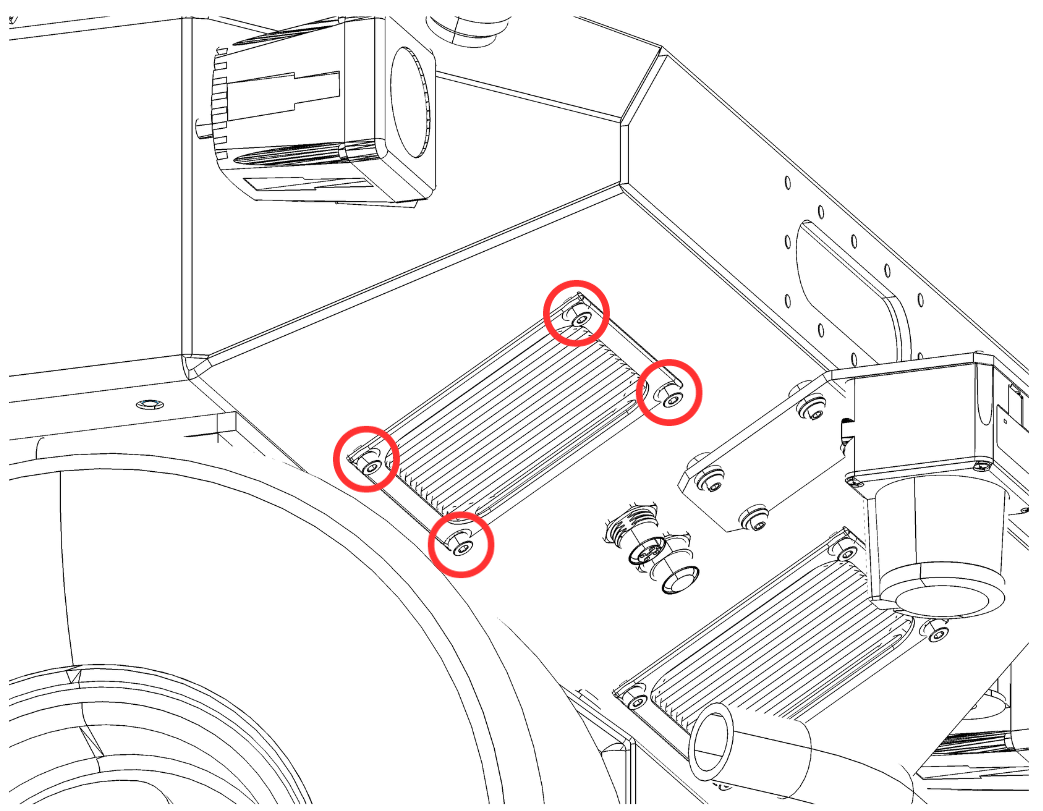
Top fan cover panel screws - Remove the fan cover screen.
- Open the top lid of Husky Observer and pull out the fan assembly from the inside.
- Remove the fan filter and replace with new filter. (See DigiKey P/N 1570-1461-ND)
- Install the fan assembly from the inside.
- Put the fan cover screen in place.
- Install the four screws holding the assembly together.
The top fans on the rear side of Husky Observer are exhaust fans and, as such, the filters on those fans do not require regular maintenance.
Software Maintenance
Getting New Packages
If you are upgrading your robot from an older version of ROS, please refer to our upgrade instructions for upgrading to Melodic, Noetic and ROS 2 Humble.
Clearpath Robotics robots are always being improved, both its own software and the many community ROS packages upon which it depends!
You can use the apt package management system to receive new versions all software running on the platform.
Each robot leaves the factory already configured to pull packages from http://packages.ros.org as well as http://packages.clearpathrobotics.com. To update your package and download new package versions, simply run:
sudo apt-get update
sudo apt-get dist-upgrade
MCU Firmware Update
Customer updates of Husky firmware are not supported at this time. Contact Support if Husky firmware updates are needed.
Motor Controller Firmware Update
Click to expand
1. Tools required:
-
A laptop or development computer running Ubuntu.
-
An internet connection on your development computer.
-
A variety of hand tools to get access to the motor controllers inside your Husky, Dingo, or Ridgeback.
-
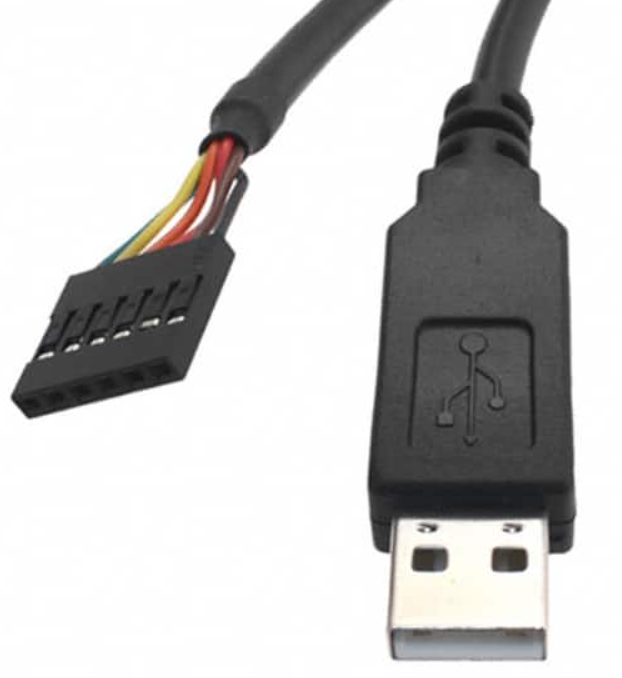
A cable to connect your computer to the robot's motor controller. We use an FTDI TTL-232R-3V3 with it's default pinout. You can purchase this cable from Digi-Key as 768-1015-ND.
2. Get the firmware tools from GitHub.
You can download the firmware tool, and the firmware binary file from this GitHub repository. Refer to the README inside that repository to decide which binary file you should use for your robot platform and application.
You can get these tools by using git clone, or by using the GitHub's Download ZIP button.
3. Get physical access to the motor controllers
Turn off the robot. Use hand tools to remove panels on your robot so you can get access the motor controllers.
4. Connect the cable.
Depending on the robot, you will have 2 or 4 motor controllers installed. You will need to repeat this installation process for each motor controller, so keep track of which ones you have updated.
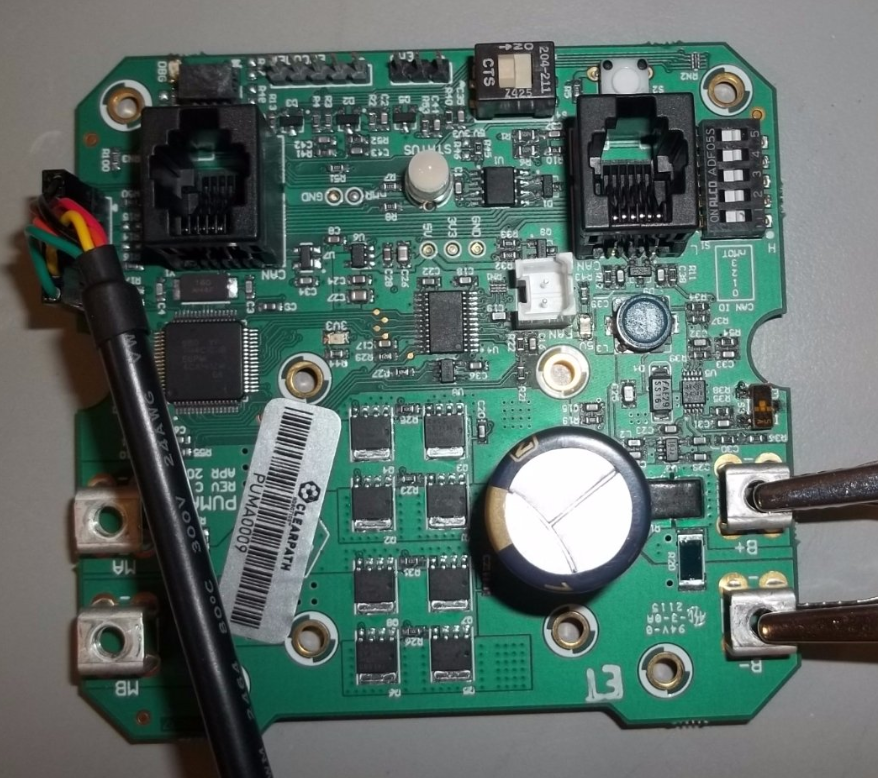
Connect the cable with the orientation as shown in the attached image.
The wrong orientation will irreparably damage the motor controller.
Remove jewlery and similar electrically conductive objects from your hands and arms. The capacitors on the motor controllers store energy even after the robot is turned off. Conductive objects that electrically-short the motor controller's terminals can cause shocks or burns to your hands.
Do not change or remove any of the other components on your motor controllers.
- Switches
- Input power cables
- Motor power cables
- RJ11 communication cables
- DIP switches
- Terminating resistor switch
5. Connect the USB end of the cable to your development computer.
6. Place the motor controller in firmware loading mode.
You can do this by pressing the button shown below, and then turning the robot on. You may release the button 3 seconds after turning the robot on. Notice that the large Status LED is not turned on.
The other motor controllers' Status LEDs will be orange since they are not in firmware loading mode.
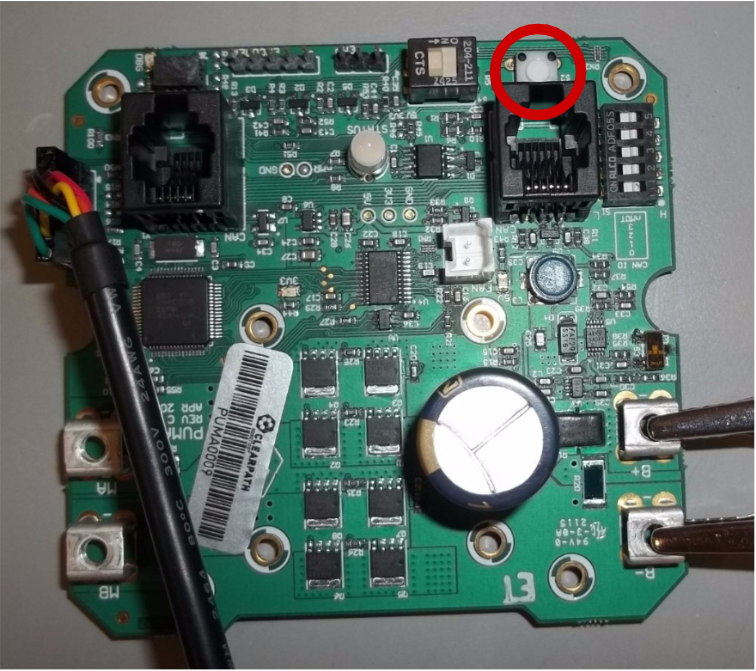
Button shown in the top right corner.
The Status LED is between the RJ11 connectors.
7. Install the new firmware.
Open a new terminal shell on your development computer. Navigate to the folder that you cloned of downloaded from GitHub in Step 2. For example, if you saved the repository to your Downloads folder:
cd ~/Downloads/puma-motor-firmware
Now install the firmware on the motor controller by running the command:
./sflash motor_controller_firmware_husky_001.bin -c /dev/ttyUSB0
Replace motor_controller_firmware_husky_001.bin with whatever firmware file you have chosen for your application.
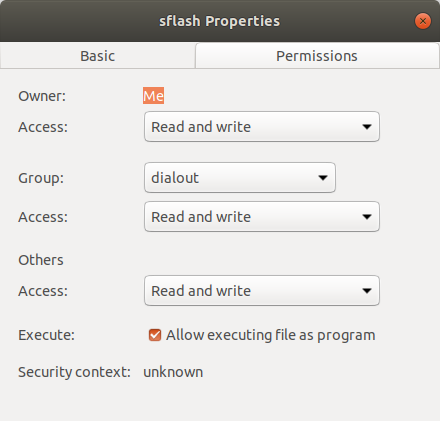
You may need change the permissions of the sflash program.
You can do this by right-clicking on sflash and selecting properties.
Change the permissions to Allow executing file as a program.
Alternatively; you can add execute permissions to sflash using a termainal. Navigate to the file through a terminal, and running:
chmod +x sflash
You should see the program running in the terminal window. You will see the following message when the firmware installation is complete:
Application    : motor_controller_firmware_husky_001.bin
Program Address: 0x0
      COM Port: /dev/ttyUSB0
      Baud Rate: 115200
Erasing Flash:
Remaining Bytes: 00000000
Successfully downloaded to device.
8. Repeat the process for the remaining motor controllers.
You can follow Steps 4 - 7 for the remaining motor controllers. Make sure you turn off the robot each time.
9. Reboot the robot and test.
Power-cycle your robot. Once it has restarted, use a joystick to drive it around.
The robot's dynamics may be very different than what you are familiar with.
The new firmware will change how the motor's react to /cmd_vel messages, so you should test in a controlled setting.
Storage, Shipping, and Disposal
Storing Husky Observer for Extended Periods
All batteries self-discharge over time. To minimise the risk of battery state-of-charge dropping to a dangerously low leve while in storage, the robot should be fully-charged and fully-balanced before being put into storage. In addition, batteries in long-term storage will need to be recharged every 6 months.
The rate of discharge should also be minimised by disconnecting the batteries from the rest of the system. This is achieved by means of a disconnect switch in the robot's rear panel. Turn this switch to "OFF" prior to storing the robot for long periods.
Preparing Husky Observer for Shipping
The following should be considered when preparing to ship the robot and its associated equipment:
- Risk of equipment damage due to shock, vibration and impact
- Risk of equipment damage due to extreme temperatures
- Risk of equipment damage due to contamination, including liquid ingress
- Risk of equipment damage and injury due to over-charged or over-discharged lithium-ion batteries
- Risk of injury as a result of imbalanced or shifting loads
- Risk of environmental damage due to invasive species and/or hazardous material release
Note the shipping temperature ranges and ingress protection ratings in the System Specifications. Secure all equipment using appropriately-rated rigging. Protect the equipment from mechanical damage, liquid ingress and exposure to caustic environments (including sea air). If lumber is used, ensure that it has been appropriately treated to prevent the spread of invasive species.
Lithium-ion batteries (which includes the robot's integrated lithium iron nanophosphate batteries) are considered dangerous goods in many jurisdictions. Ensure that the appropriate dangerous goods signage and paperwork is in place prior to shipping the robot (as applicable). Note that the wireless motion-stop system includes two small stand-alone lithium-ion batteries, and the remote control gamepad includes an integrated lithium-ion battery.
Some jurisdictions require battery states of charge to remain within a certain band during transport. Consult local regulations.
For short-duration transports lasting up to several days, it is recommended that all batteries be charged to the maximum state of charge permitted by applicable regulations. Disconnection of the robot's internal batteries is not required.
For longer-duration transports more than several days, the guidelines for extended storage should be followed (to the degree allowable by applicable regulation).
Disposing of Husky Observer

The robot and associated equipment contain materials that should not be disposed of in a landfill. These include lithium-ion batteries and leaded solder, and may include cadmium, toxic lubricants and adhesives, and other materials that can be harmful to people, animals and ecosystems.
All printed circuit board assemblies, wiring harnesses and other electronics components such as sensors, computers, human-machine interface components, lights and motors should be treated as "e-waste" and disposed of in accordance with local regulations. Lithium-ion batteries should be treated as hazardous goods and disposed of in accordance with local battery disposal regulations.
Support
Clearpath is committed to your success. Please get in touch with us and we will do our best to get you rolling again quickly: <support@clearpathrobotics.com>.
To get in touch with a salesperson regarding Clearpath Robotics products, please email <research-sales@clearpathrobotics.com>.
If you have an issue that is specifically about ROS and is something which may be of interest to the broader community, consider asking it on Robotics Stack Exchange. If you do not get a satisfactory response, please ping us and include a link to your question as posted there. If appropriate, we will answer on Robotics Stack Exchange for the benefit of the community.