Robot Installation
Operating System (OS)
ROS 2 Jazzy uses Ubuntu 24.04 as its Tier 1 operating system. Though other operating systems are supported, it is highly recommended to use Ubuntu 24.04. The preferred method is using the Clearpath Robotics ISO image, which is covered in this section.
The Clearpath Robotics ISO image only targets x86 computers (amd64 architecture).
Clearpath Robotics' ROS 2 Jazzy ISO image will wipe the robot's drive when used.
If your robot has multiple internal drives, or if you need more control over partitioning the drive (e.g.
you want to keep / and /home on different partitions of the same drive) you should use the normal
Ubuntu Server 24.04 ISO
and then use Clearpath's robot installation script
to configure the computer after Ubuntu is installed.
- Clearpath ISO
- Ubuntu Server ISO
Clearpath provides a lightly customized installation image of Ubuntu 24.04 that has the needed script to setup the robot. To install the software on a physical robot through the Clearpath Robotics ISO image, you will first need a USB drive of at least 4 GB to create the installation media, an ethernet cable, a monitor, and a keyboard.
-
Download the ROS 2 Jazzy ISO image.
-
Copy the image to a USB drive using
unetbootin,rufus,balena etcher, or a similar program. For example:sudo unetbootin isofile="clearpath-noble-jazzy-autoinstall.iso" -
Connect your robot computer to internet access (via wired Ethernet), a keyboard, and a monitor. Make sure that the robot is connected to shore power (where applicable) or that the robot's battery is fully charged.
cautionThe next step wipes your robot's hard drive, so make sure you have that important data backed up.
-
Boot your robot computer from the USB drive and let the installer work its magic.
noteYou may need to configure the computer's BIOS to prioritize booting from the USB drive. On most common motherboards, pressing
Deleteduring the initial startup will open the BIOS for configuration. -
The setup process will be automated and may take a long time depending on the speed of your internet connection.
-
Once the setup process is complete, the computer will turn off. Please unplug the USB drive and turn the computer back on.
-
On first boot, the username will be
robotand the password will beclearpath. You should use thepasswdutility to change therobotaccount password. -
Log on to the computer and run
bash -e clearpath_computer_installer.shto install the needed software. This will take a while to complete and has prompts that must be answered.
If your setup requires being able to manually edit your robot's partition table, or if your robot's computer has multiple drives, you can use the official Ubuntu Server ISO from Canonical. This ISO has more options available than the Clearpath ISO.
To install the software you will need a USB drive of at least 4 GB to create the installation media, an ethernet cable, a monitor, and a keyboard.
-
Download the Ubuntu Server ISO image.
-
Copy the image to a USB drive using
unetbootin,rufus,balena etcher, or a similar program. For example:sudo unetbootin isofile="ubuntu-24.04.2-live-server-amd64.iso" -
Connect your robot computer to internet access (via wired Ethernet), a keyboard, and a monitor. Make sure that the robot is connected to shore power (where applicable) or that the robot's battery is fully charged.
cautionThe next step will involve reformatting some or all of the partitions on your robots hard drive. Make sure all important data is backed-up before proceeding.
-
Boot your robot computer from the USB drive and follow the on-screen instructions to install Ubuntu Server 24.04.
noteYou may need to configure the computer's BIOS to prioritize booting from the USB drive. On most common motherboards, pressing
Deleteduring the initial startup will open the BIOS for configuration. -
Allow the setup process to complete. Depending on your internet connection's speed this may take some time.
-
When prompted, remove the USB drive from the computer and press the
ENTERkey to reboot. -
On first boot, log into the robot using the username and password you configured during step
4. To finish configuring the computer for use with a Clearpath robot, run the following commands:sudo apt update
sudo apt install wget
wget https://raw.githubusercontent.com/clearpathrobotics/clearpath_computer_installer/refs/heads/main/clearpath_computer_installer.sh
bash -e clearpath_computer_installer.sh
Internet Connection
Wi-Fi
To configure Wi-Fi, first log in to the robot's computer. This can be done by connecting the computer to a monitor using an HDMI or DisplayPort cable, and connecting a USB keyboard. Power the robot on and wait for the Ubuntu login prompt to show up.
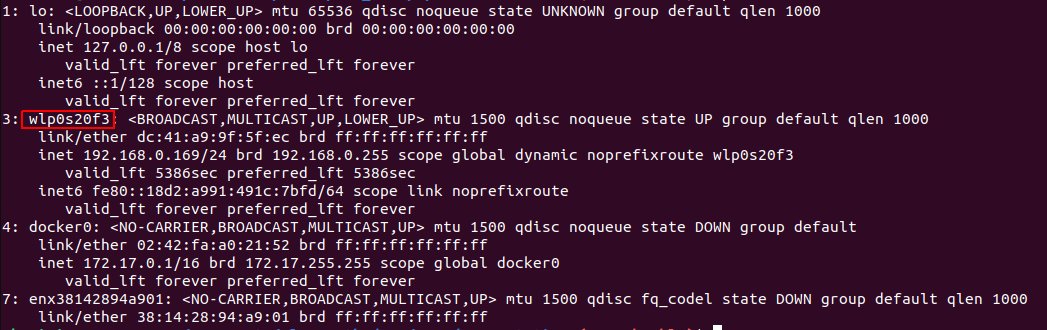
Once logged in, find the name of your Wi-Fi interface by calling ip a. Wi-Fi interface names begin with wl.
Next, create the file /etc/netplan/60-wireless.yaml, and paste the following contents:
network:
  wifis:
    # Replace WIRELESS_INTERFACE with the name of the wireless network device, e.g. wlan0 or wlp3s0
    # Fill in the SSID and PASSWORD fields as appropriate.  The password may be included as plain-text
    # or as a password hash.  To generate the hashed password, run
    #   echo -n 'WIFI_PASSWORD' | iconv -t UTF-16LE | openssl md4 -binary | xxd -p
    # If you have multiple wireless cards you may include a block for each device.
    # For more options, see https://netplan.io/reference/
    WIRELESS_INTERFACE:
      optional: true
      access-points:
        SSID_GOES_HERE:
          password: PASSWORD_GOES_HERE
      dhcp4: true
      dhcp4-overrides:
        send-hostname: true
Replace WIRELESS_INTERFACE with the name of your Wi-Fi interface, SSID_GOES_HERE with your Wi-Fi
SSID, and PASSWORD_GOES_HERE with your Wi-Fi password.
Save the file and call sudo netplan apply to apply the changes. Check ip a again to make sure that
an IP address has been assigned to your Wi-Fi interface.
You should now be able to SSH into the robot by calling ssh robot@<robot_ip> from an offboard computer.
If the Wi-Fi interface indicates down (disabled), enable it using sudo ip link set dev <interface> up.
Replace <interface> with the name of your disabled Wi-Fi interface.
Ethernet
The robot's computer can also be connected to a DHCP network over Ethernet. Connect an Ethernet cable
to the built-in Ethernet port on the robot's computer and check that an IP has been assigned with ip a.
You should now be able to SSH into the robot by calling ssh robot@<robot_ip> from an offboard computer.
Firmware Update
All platforms with the exception of the A200 will require a firmware update to run ROS 2 Jazzy.
Before flashing firmware, place your robot up on blocks or disengage the drivetrain. Firmware loading does not usually result in unintended motion, but it is safest when off the ground.
Download the Clearpath Firmware package from the Clearpath package server
On an external computer, run the following commands:
sudo apt update
sudo apt install ros-jazzy-clearpath-firmware
Prepare the robot
- A300
- J100
- W200
- R100
- DX100
- DX150
The Husky A300 does not need any preparation for flashing firmware as it uses an Ethernet bootloader.
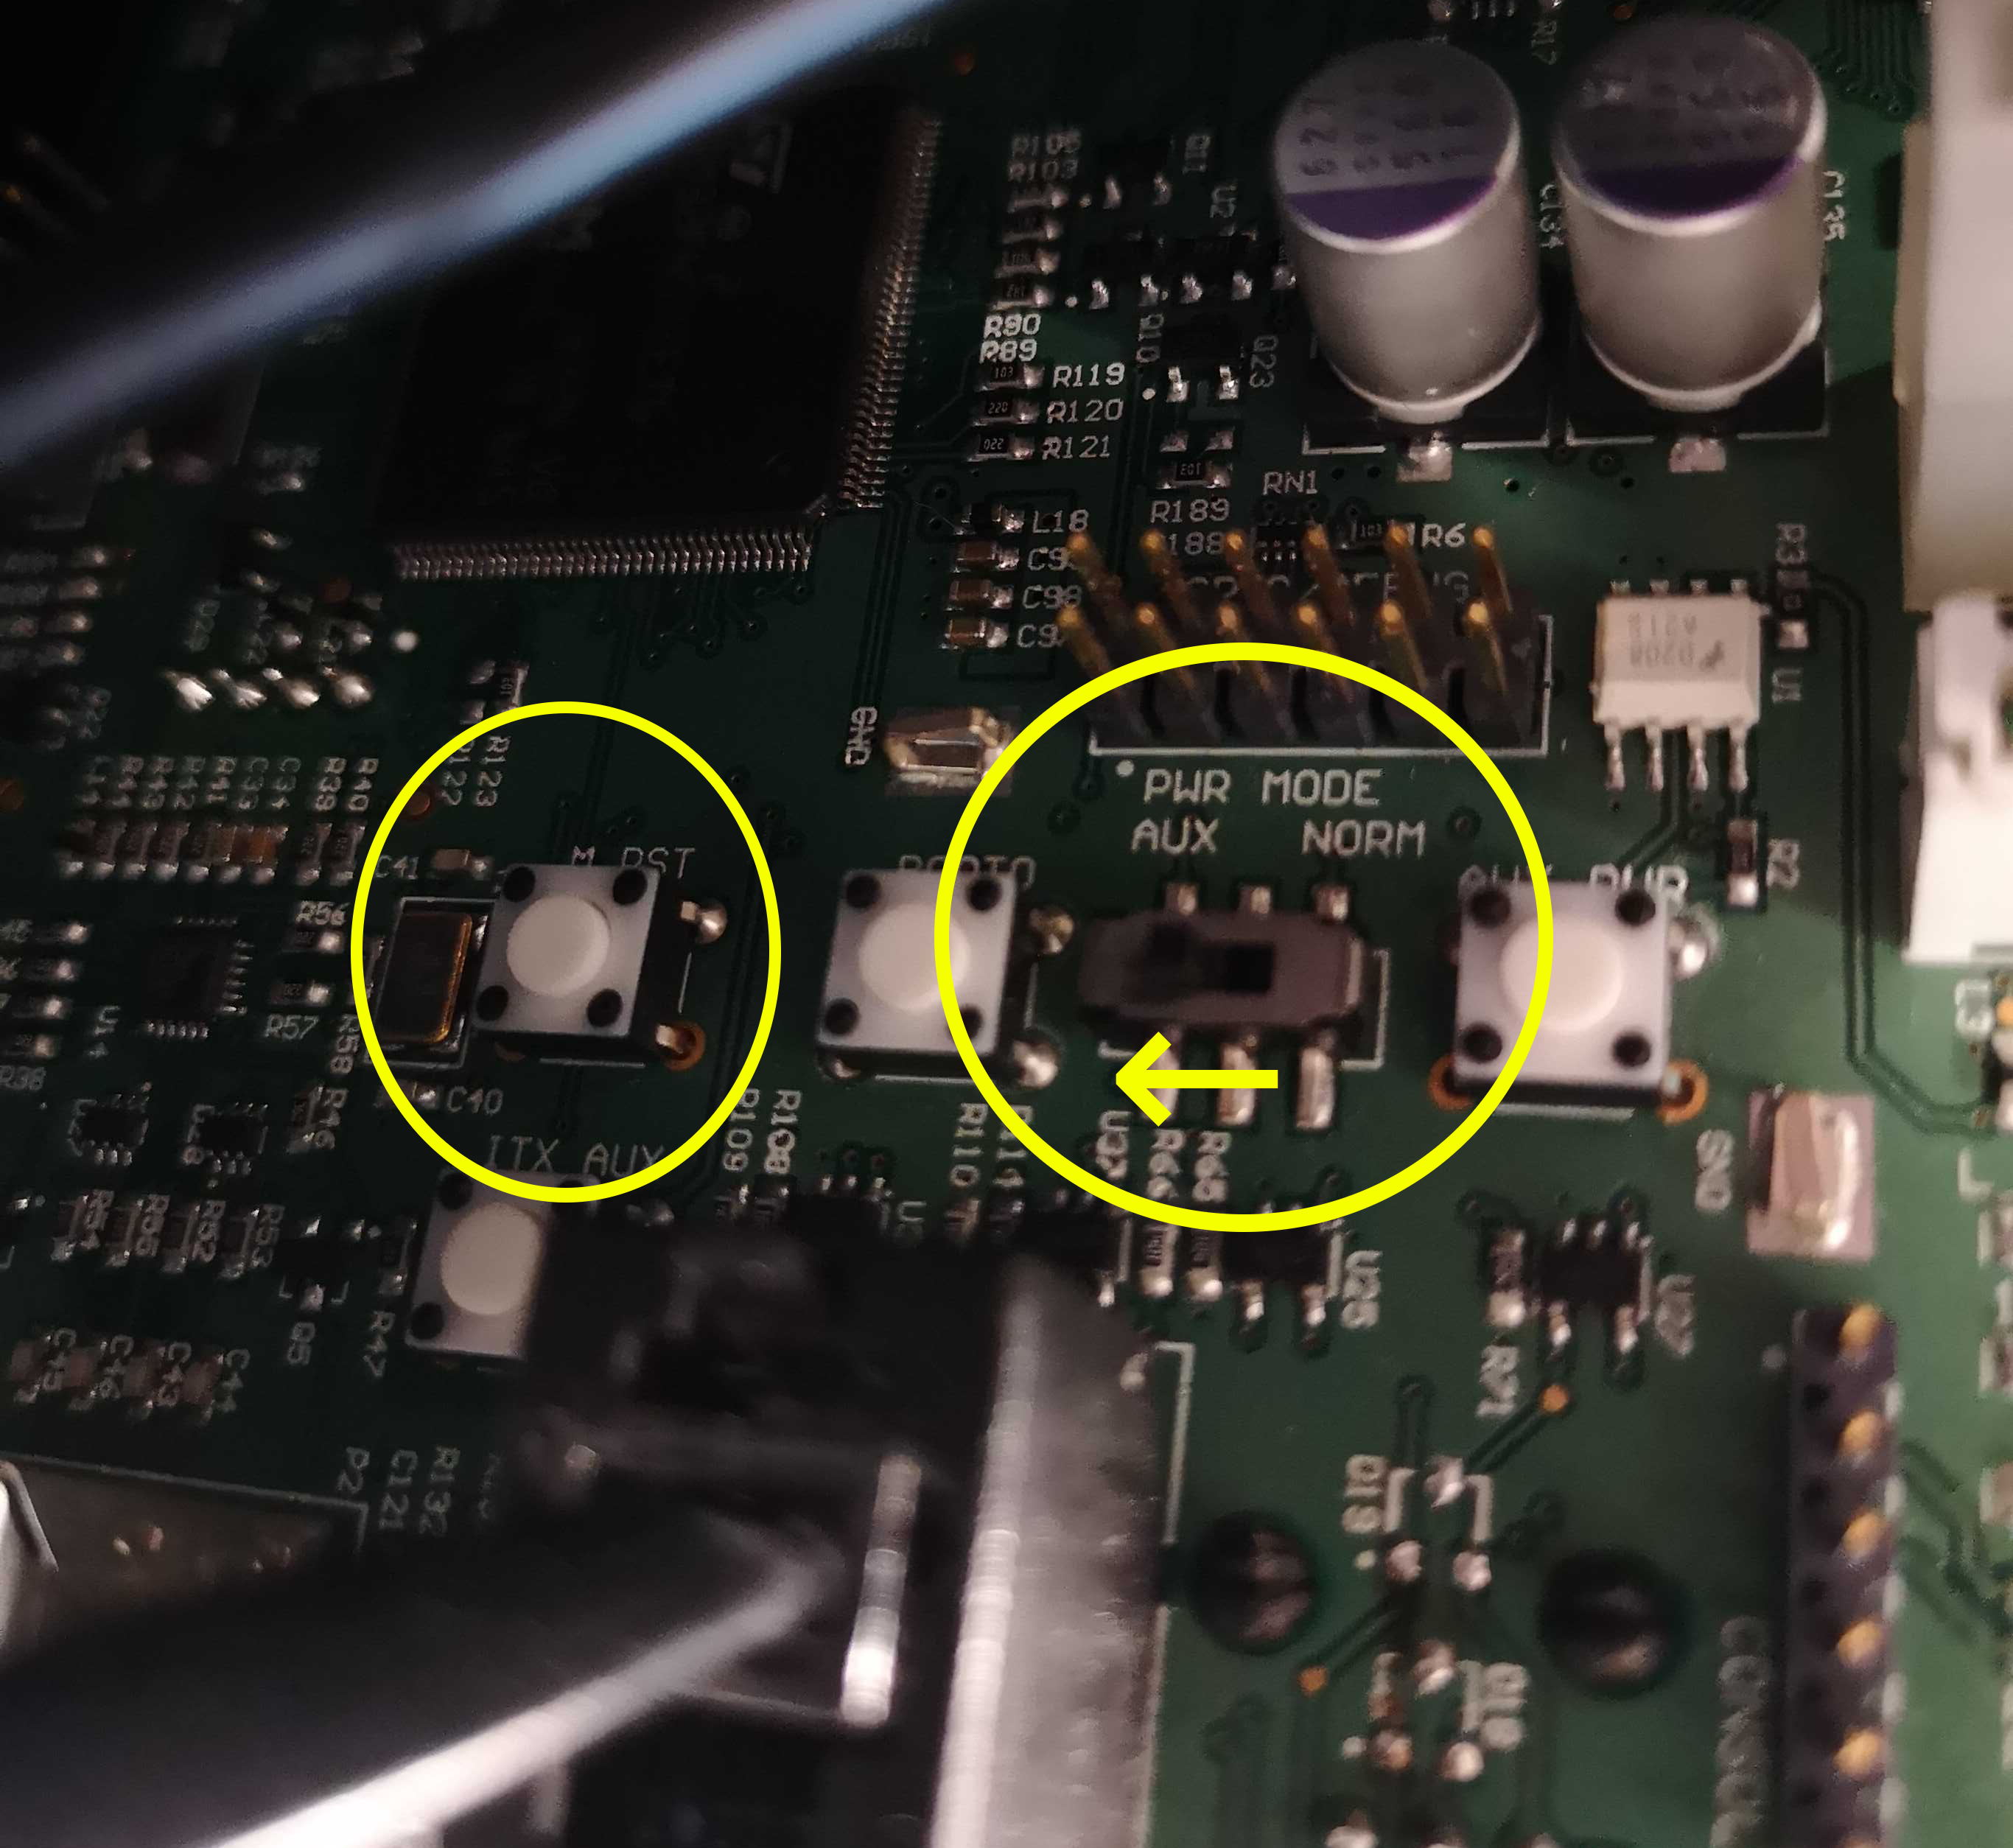
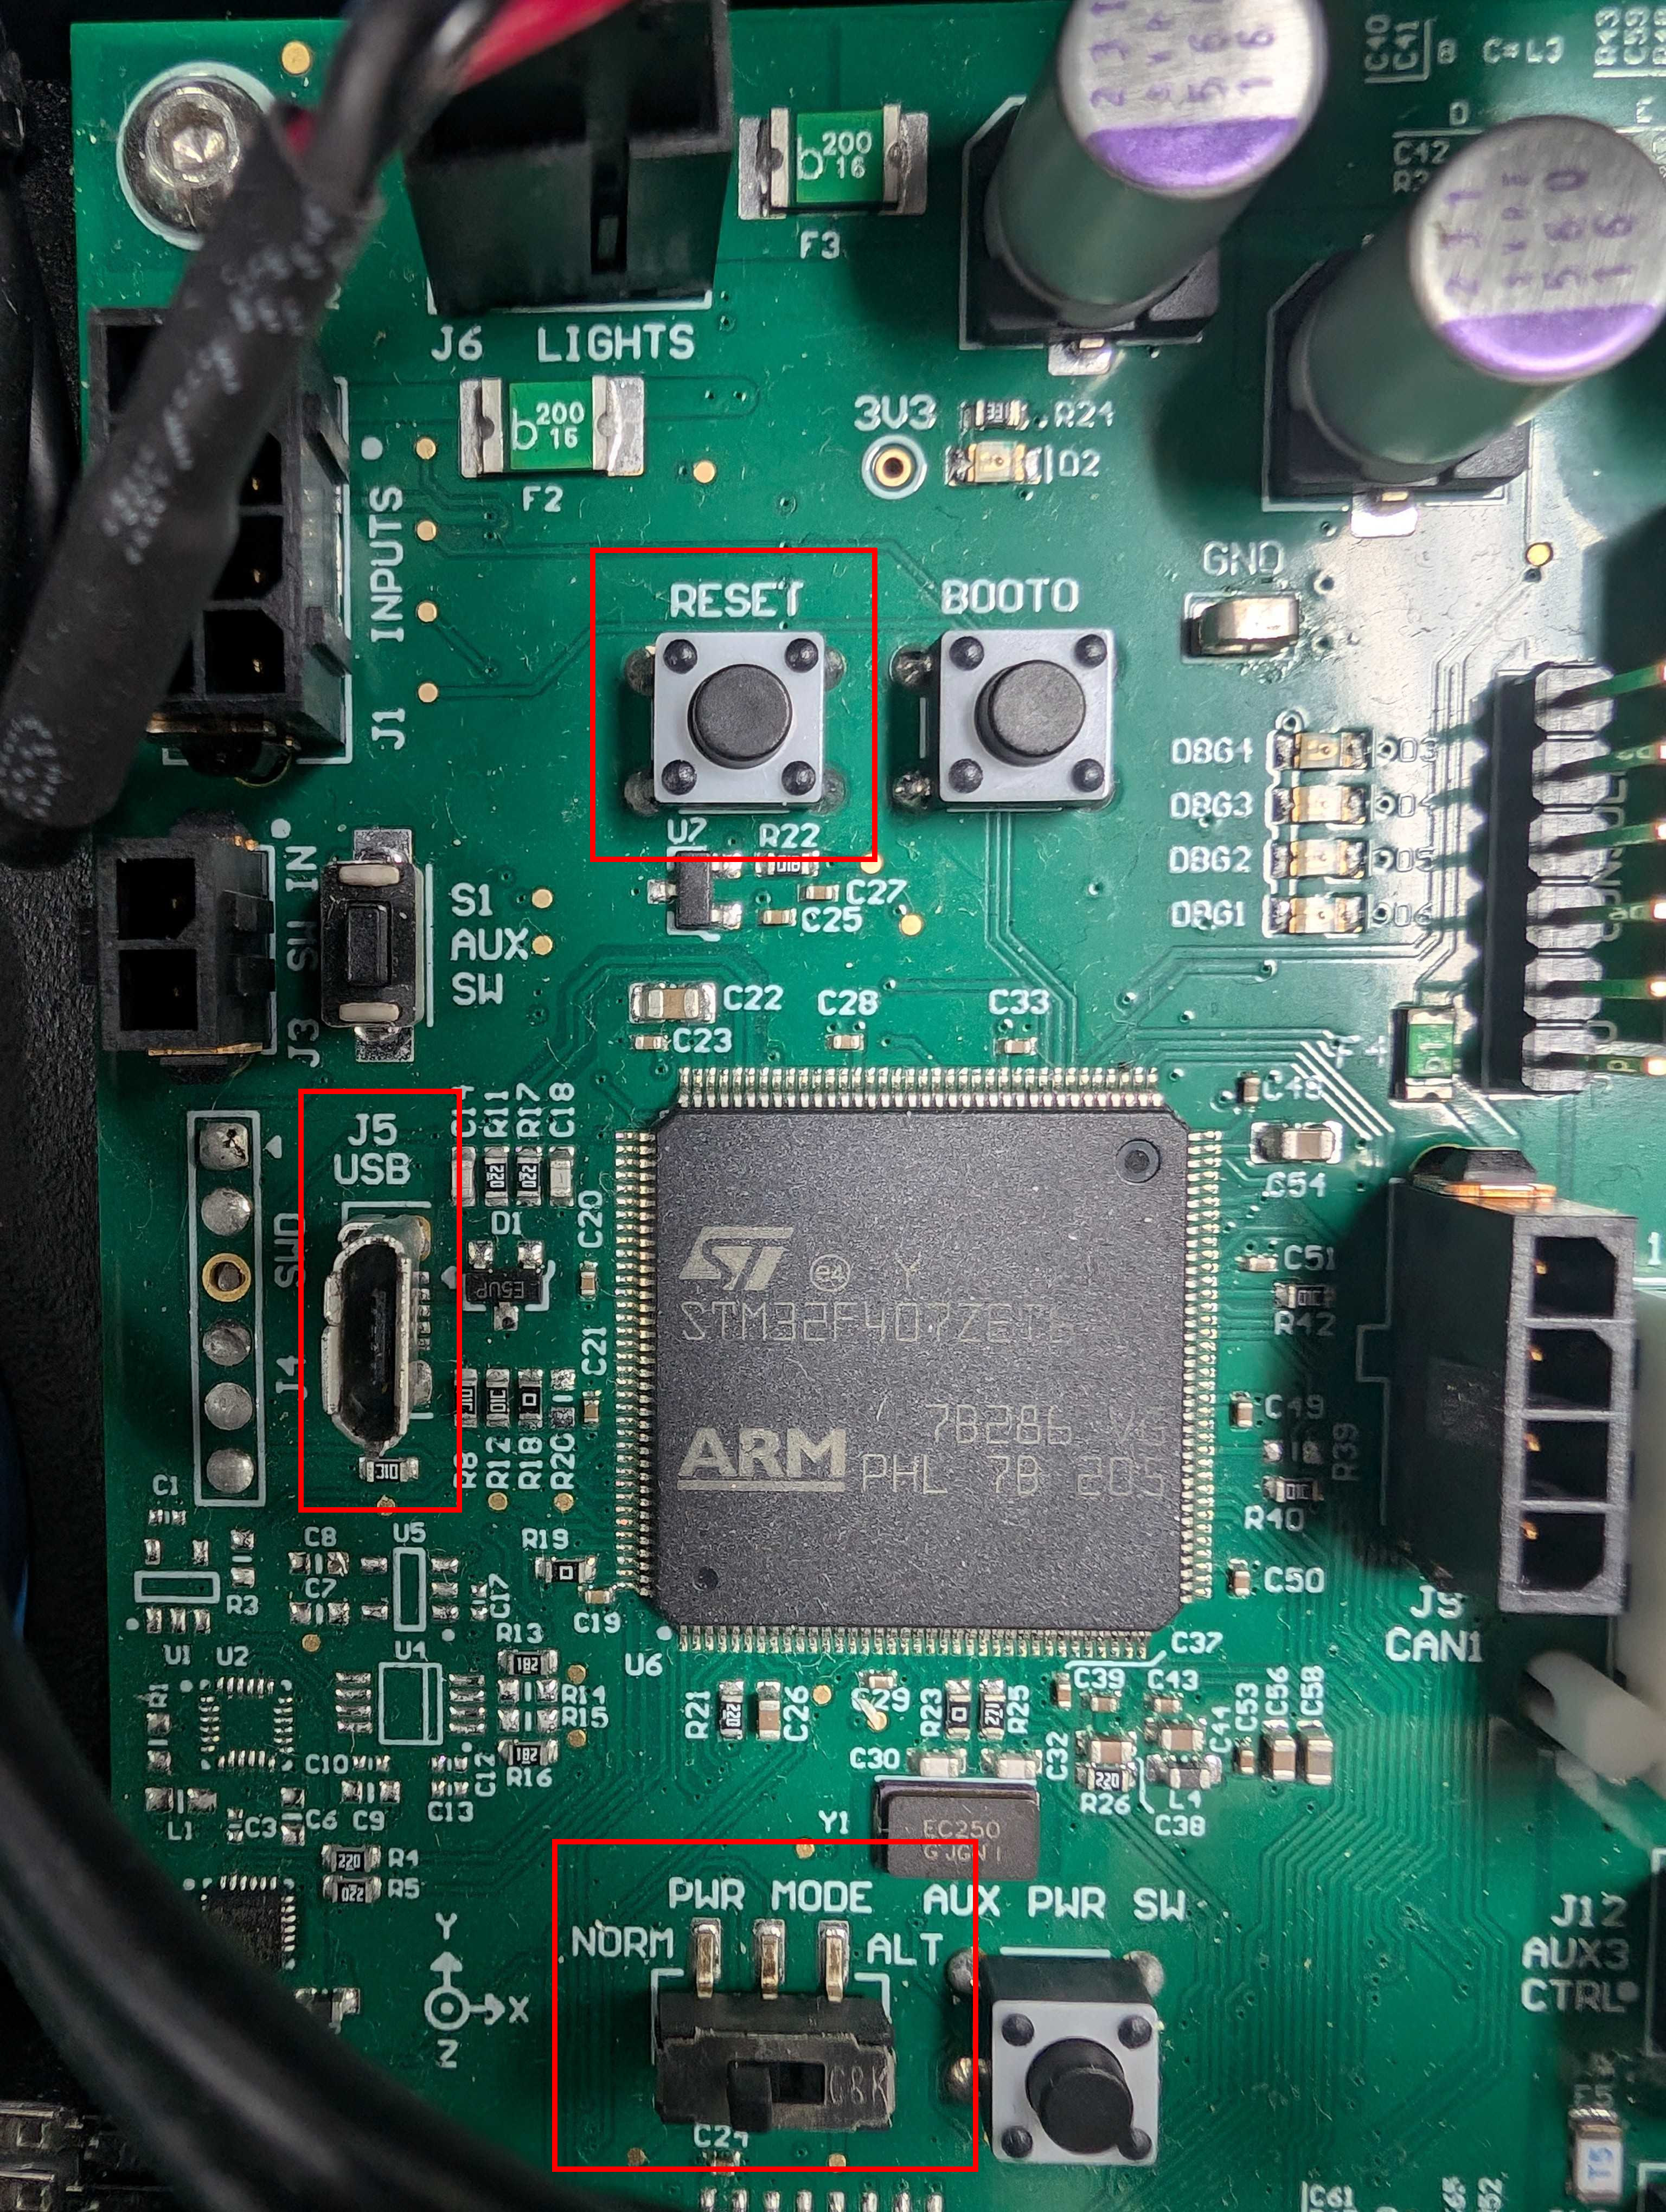
The J100 MCU does not have an Ethernet interface, and therefore cannot be flashed using the Ethernet bootloader. You must follow the subsequent steps to flash the J100 MCU over mini-USB.
The J100 MCU is mounted to the rear inside wall of the robot. To access it, open the lid, keeping the computer tray secured to the underside of the lid.
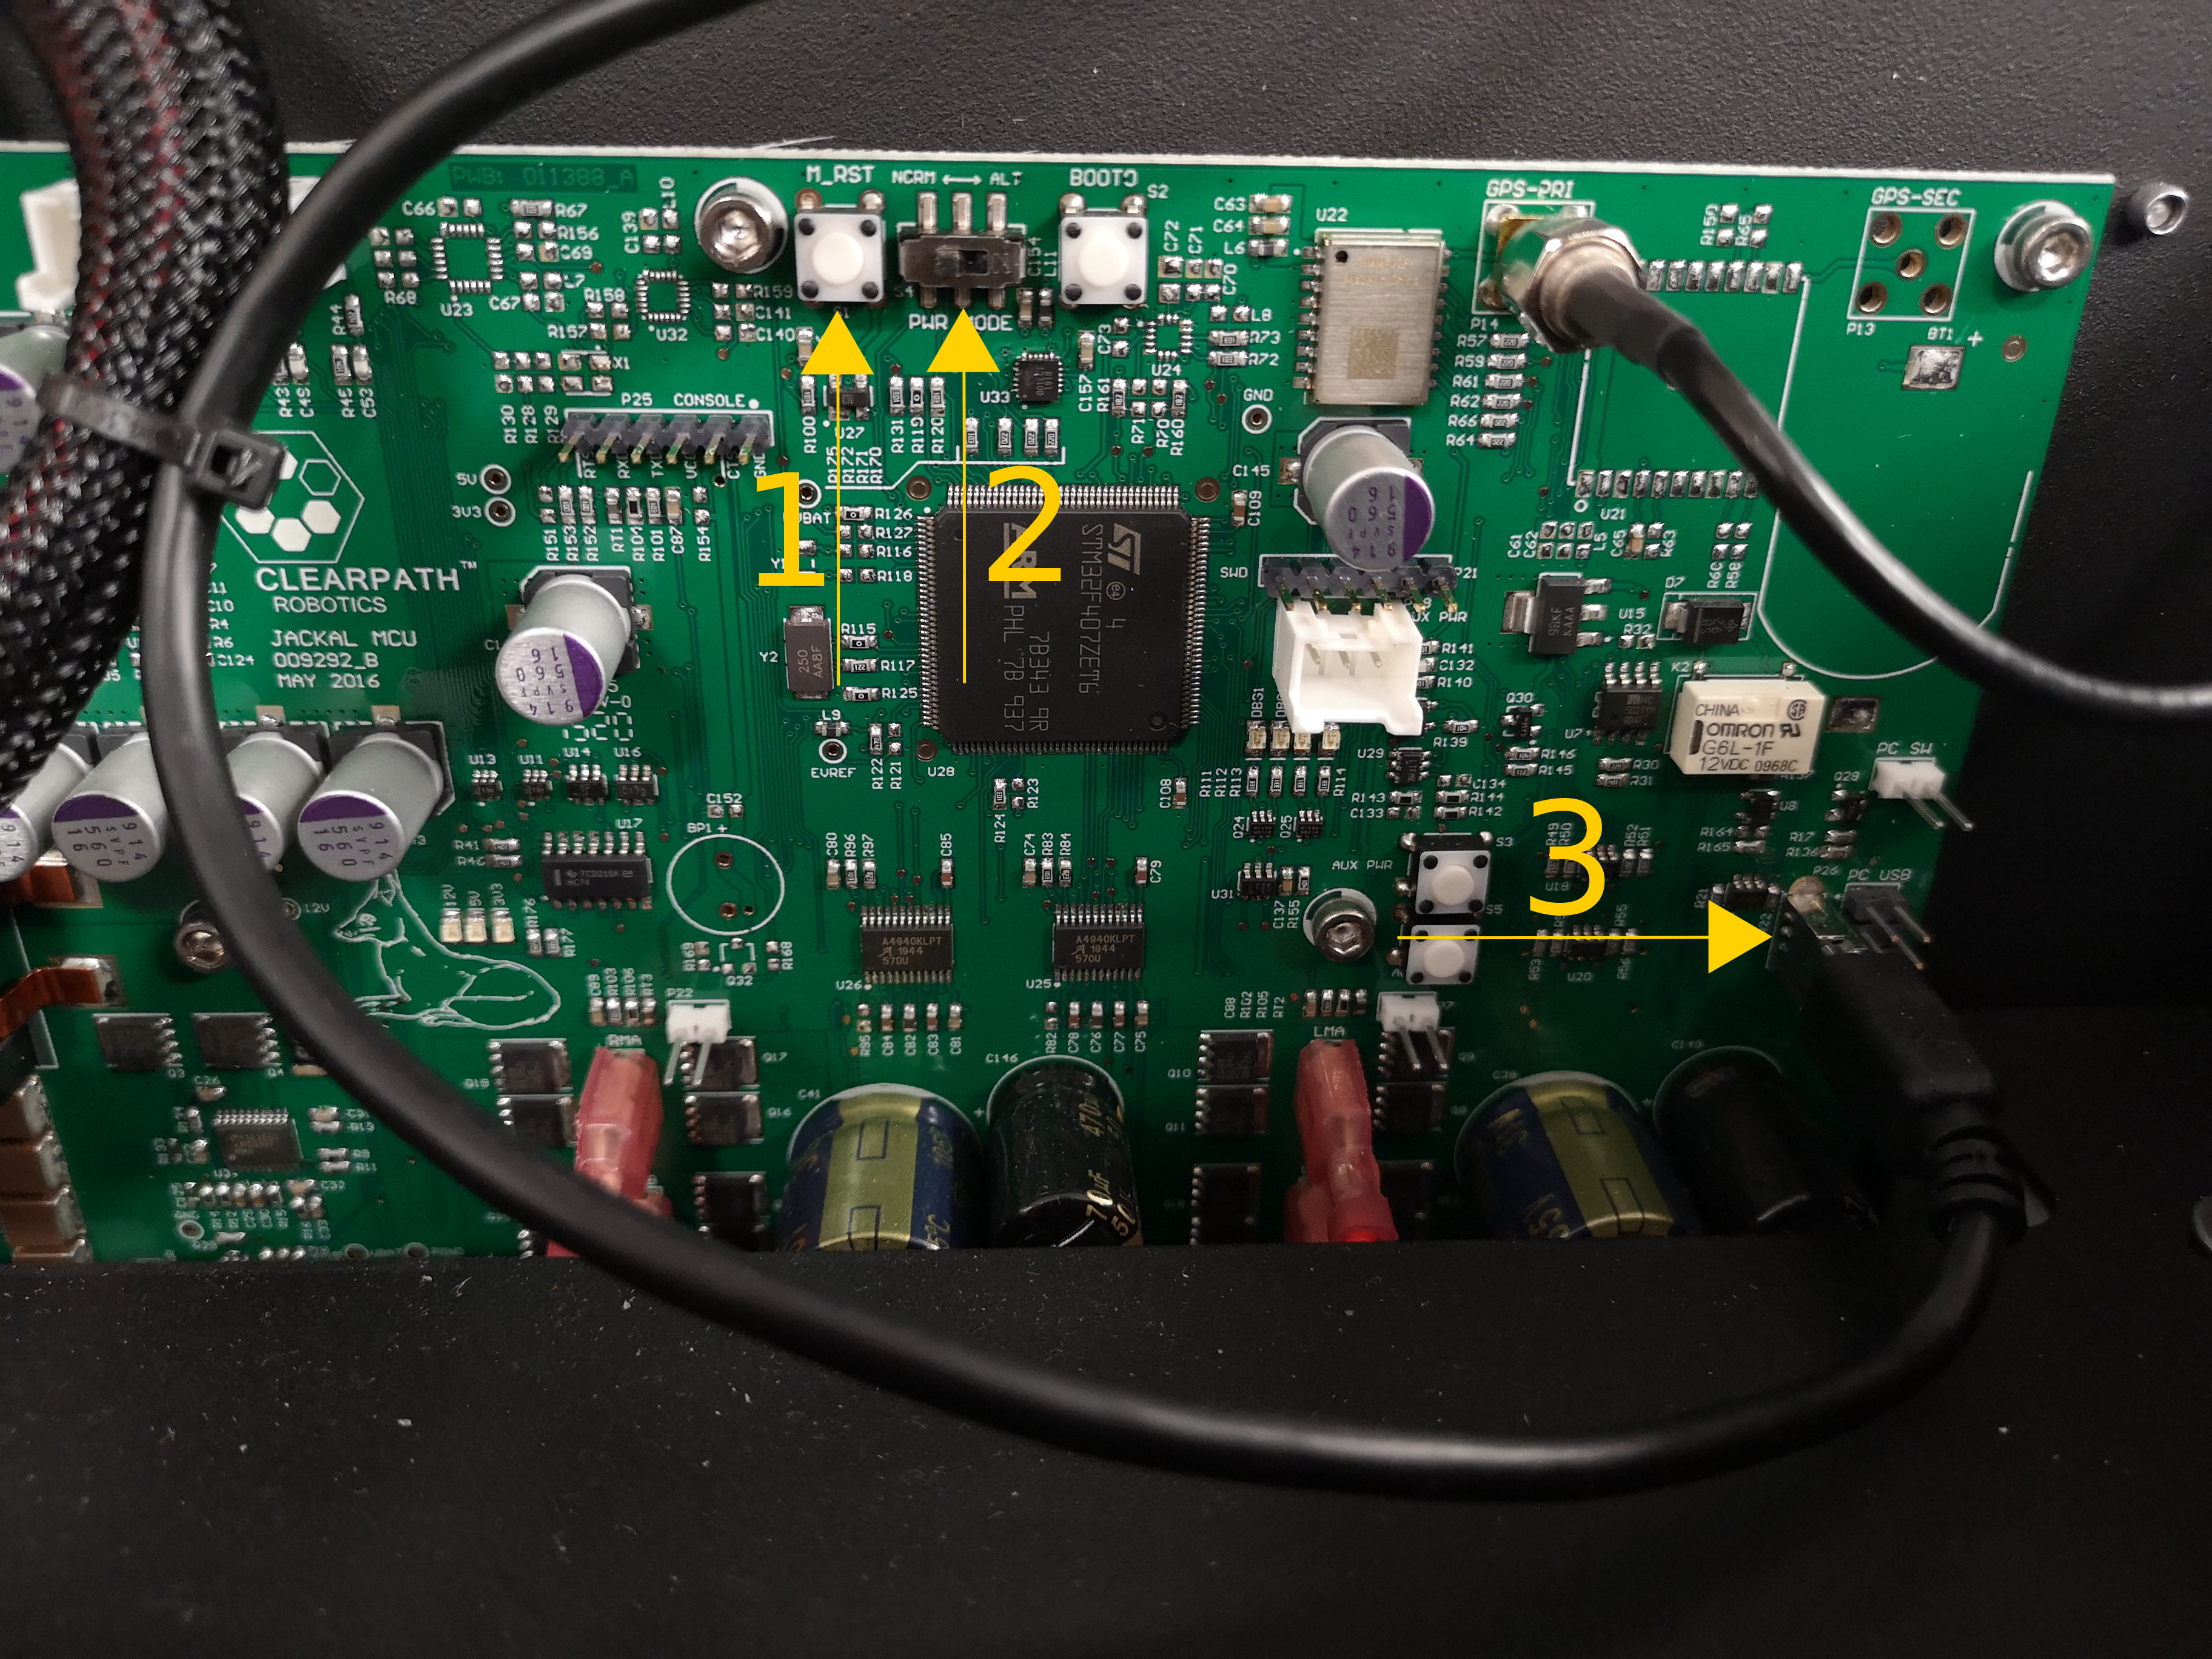
The
M_RSTbutton, used to reset the MCU.The
PWR_MODEswitch. Left isNORMor normal mode, right isALTor bootloader mode. This is used for flashing the firmware.The mini-USB port used for transmitting data. This should be connected to J100's computer for both normal operation and firmware flashing.
Place the J100 MCU into bootloader mode
Open the lid of the robot to expose the MCU and make sure the mini-USB cable is connected to the robot computer.
Switch the PWR_MODE switch from NORM to ALT. If the robot is on, press the M_RST button. Otherwise, turn the robot on with the power button.
ROS 2 Jazzy firmware on W200 must be flashed via USB. Flashing via Ethernet is not supported at this time.
The W200 MCU is located on the underside of the metal frame over the top of the computer.
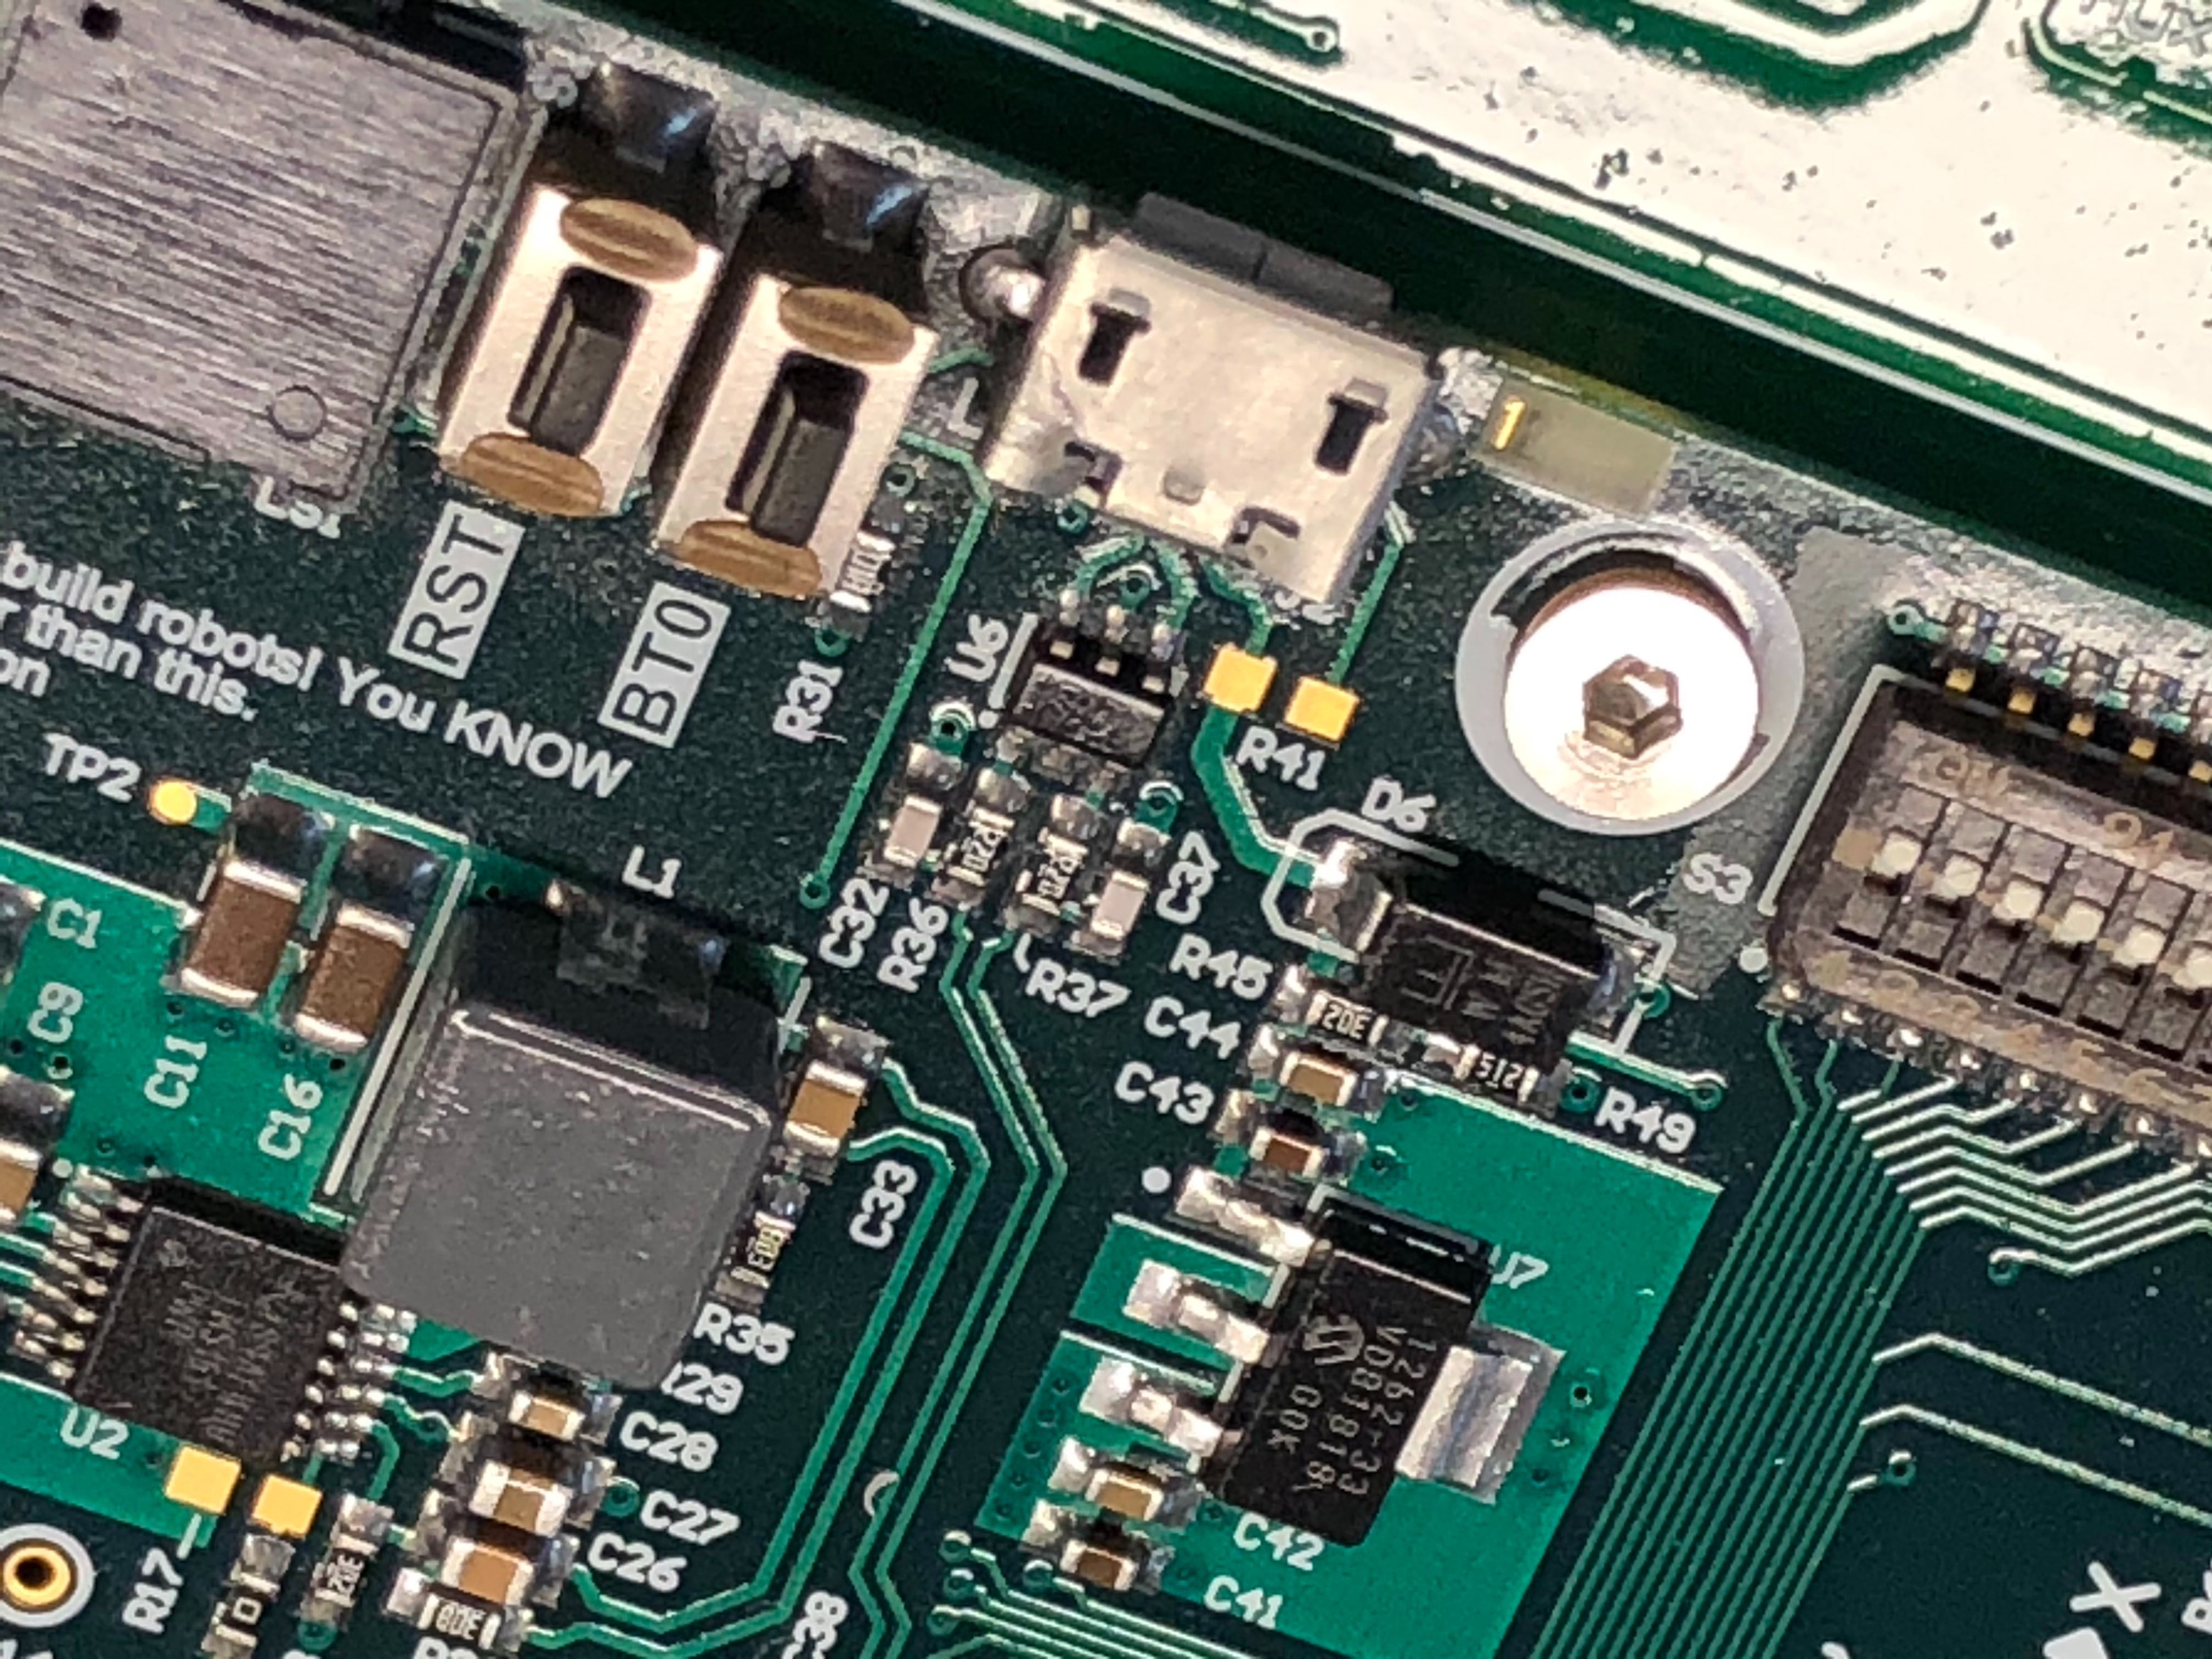
The
RSTbutton, used to reset the MCU.The
BT0button, used to enter the USB bootloader mode.
Place the W200 MCU into bootloader mode
While pressing BT0 on the MCU, connect the external computer to Warthog's MCU using a USB cable.
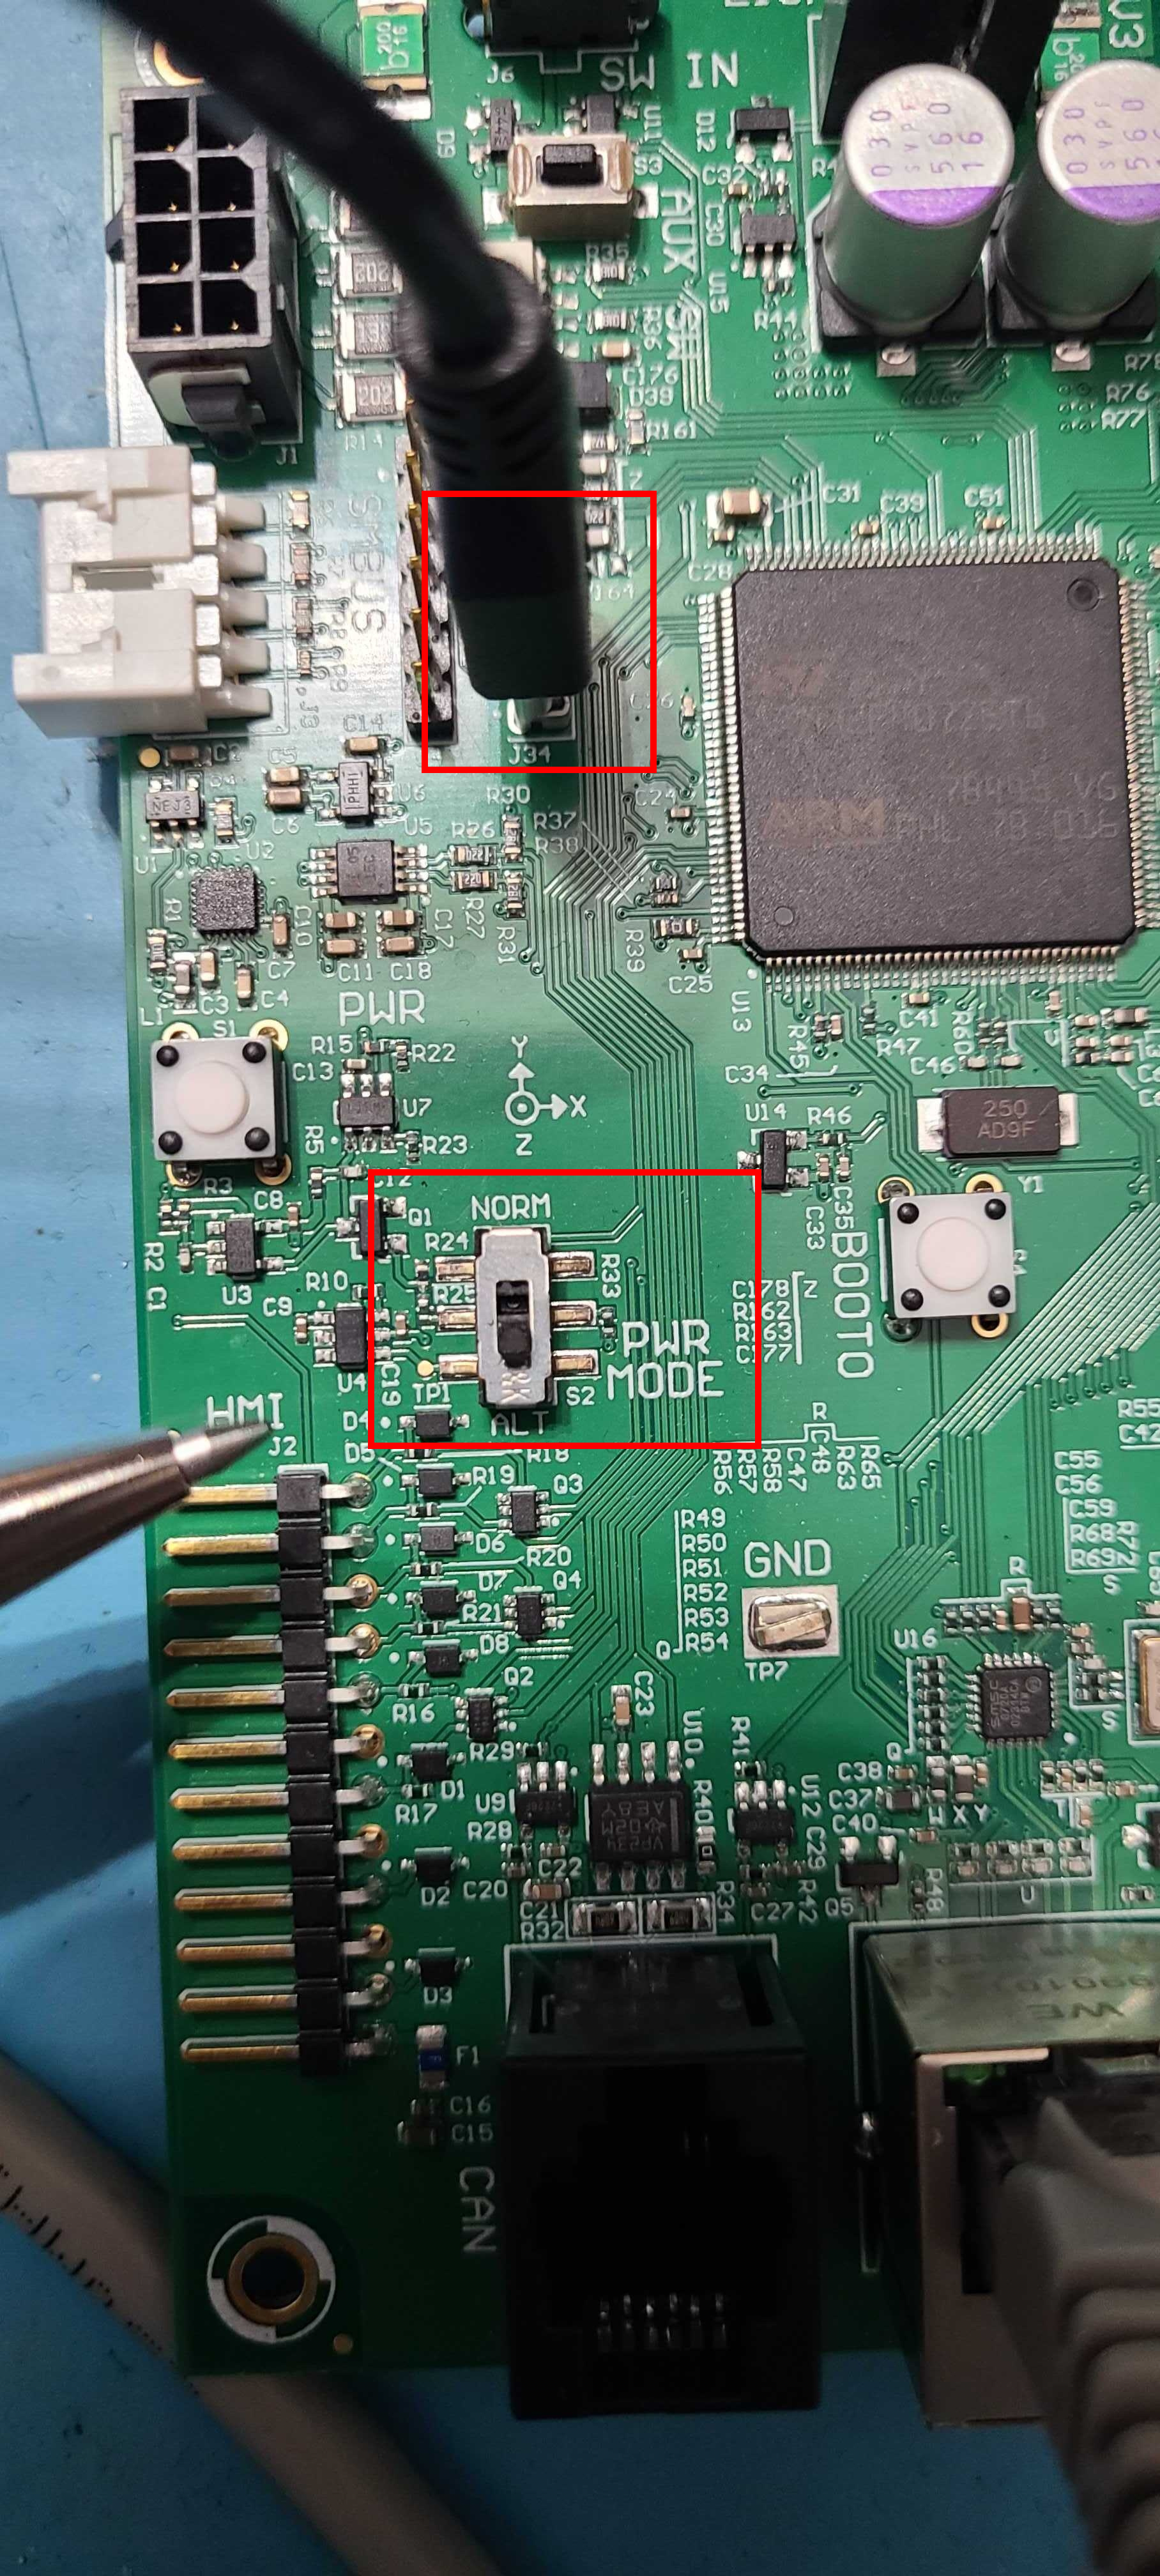
ROS 2 Jazzy firmware on R100 must be flashed via USB. Flashing via Ethernet is not supported at this time.
Place the R100 Ridgeback up on blocks. Firmware loading does not usually result in unintended motion, but it's safest when off the ground.
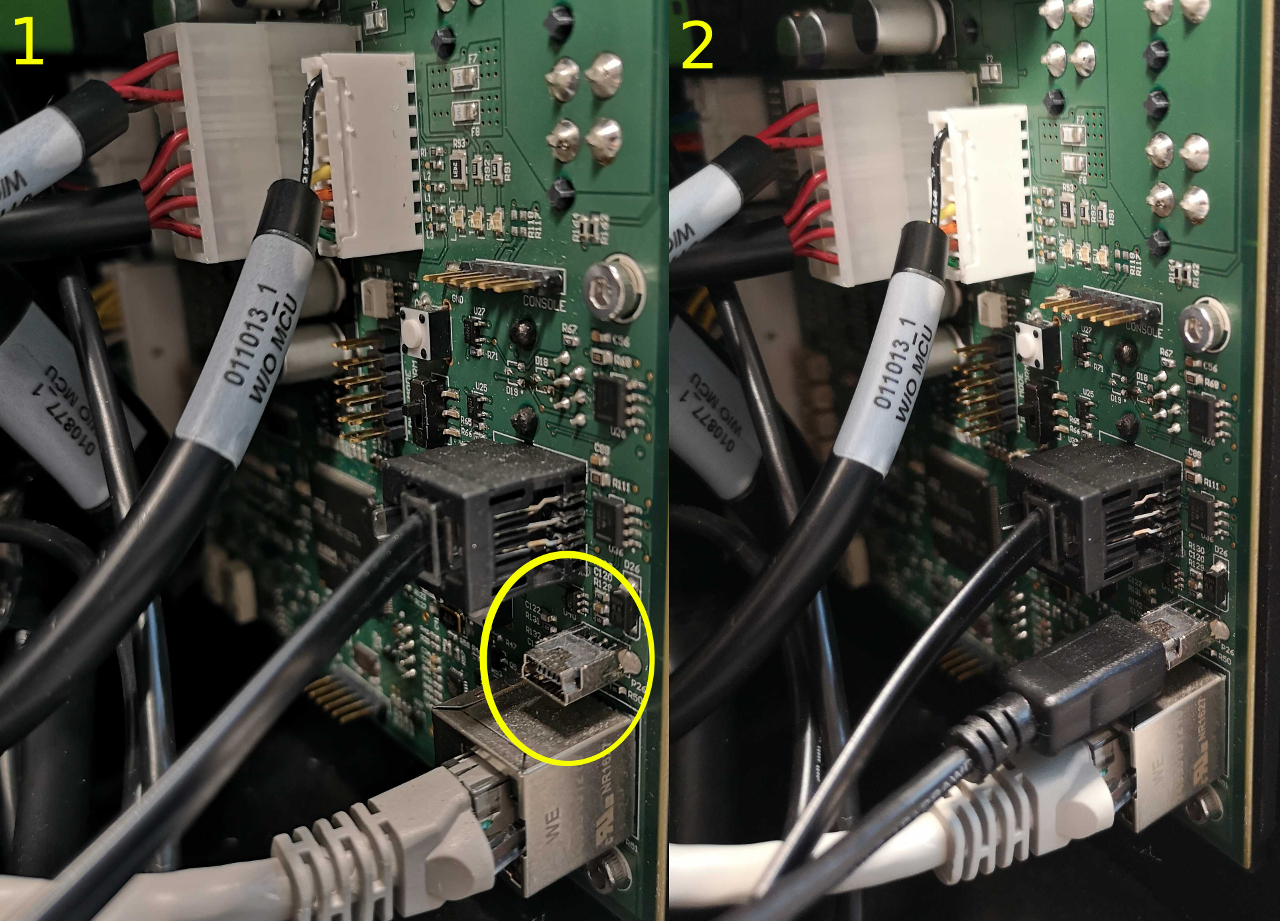
Remove the side panels to access the robot computer and MCU.
Connect the MCU to the R100 Ridgeback's onboard computer using a mini-USB cable connected to the port shown below:
In the middle of the MCU, there is a two-position switch labelled PWR_MODE. Move the switch from the default NORM position to the AUX position.
Press the M_RST to restart the MCU. Now, the MCU is in bootloader mode, ready to receive new firmware.
The Ridgeback's MCU is normally rotated 90 degrees when it is installed in the robot; the NORM position is typically towards the top of the robot's chassis and the AUX position is normally towards the bottom.
ROS 2 Jazzy firmware on DX100 must be flashed via USB. Flashing via Ethernet is not supported at this time.
The DX100 MCU is mounted near the HMI panel towards the rear of the robot. To access it, remove the antennas and the center channel panel.
Connect the MCU to the onboard computer using a micro-USB cable connected to the port as shown below:
As is shown in the image above, set the PWR_MODE switch to the ALT position.
Press the M_RST or restart the robot using the HMI panel. Now, the MCU is in bootloader mode, ready to receive new firmware.
ROS 2 Jazzy firmware on DX150 must be flashed via USB. Flashing via Ethernet is not supported at this time.
The DX150 MCU is mounted near the HMI panel towards the rear of the robot. To access it, remove the antennas and the center channel panel.
Connect the MCU to the onboard computer using a mini-USB cable connected to the port as shown below:
As is shown in the image above, set the PWR_MODE switch to the ALT position.
Press the M_RST or restart the robot using the HMI panel. Now, the MCU is in bootloader mode, ready to receive new firmware.
Flash the firmware
Run the Clearpath firmware flash tool:
source /opt/ros/jazzy/setup.bash
ros2 run clearpath_firmware flash
Select your platform, then select which method of flashing you would like to use.
| Platform | Flashing Method |
|---|---|
| Husky A300 | Ethernet |
| Jackal J100 | USB |
| Warthog W200 | USB |
| Ridgeback R100 | USB |
| Dingo DD100 / DO100 | USB |
| Dingo DD150 / DO150 | USB |
Do not turn the robot off or unplug the cable while flashing firmware. If an error occurs while flashing, you can attempt to flash again over USB.
Place the robot back into normal operating mode
- A300
- J100
- W200
- R100
- DX100
- DX150
After flashing, the robot powers off. Power the robot back on by pressing the Power button.
Switch the PWR_MODE switch from ALT back to NORM. The robot will turn off.
Power it back on with the power button.
Press the RST button. The MCU should enter regular operation.
Switch the PWR_MODE switch from ALT back to NORM. The robot will turn off.
Power it back on with the power button.
Switch the PWR_MODE switch from ALT back to NORM. The robot will turn off.
Power it back on with the power button.
Switch the PWR_MODE switch from ALT back to NORM. The robot will turn off.
Power it back on with the power button.
Package Install
Option 1: Install Script
Package Sourcing, and Install
wget -c https://raw.githubusercontent.com/clearpathrobotics/clearpath_computer_installer/main/clearpath_computer_installer.sh && bash -e clearpath_computer_installer.sh
Network Configuration
The default networking configuration for a robot's computer is to bridge all Ethernet interfaces and assign the computer
the IP address 192.168.131.1. See Reserved IP Addresses for a detailed list of IP ranges.
Changing or removing the default bridge configuration may result in your robot no longer working
properly. Certain components inside the robot rely on static IP addresses in the 192.168.131.0/24
subnet.
To configure the default bridge, create or edit /etc/netplan/50-clearpath-standard.yaml to
contain the following:
network:
  version: 2
  renderer: networkd
  ethernets:
    bridge_enp:
      match:
        name: "enp*"
      dhcp4: false
      dhcp6: false
    bridge_enx:
      match:
        name: "enx*"
      dhcp4: false
      dhcp6: false
    bridge_eth:
      match:
        name: "eth*"
      dhcp4: false
      dhcp6: false
  bridges:
    br0:
      addresses:
      - "192.168.131.1/24"
      dhcp4: true
      dhcp6: false
      interfaces:
      - bridge_eth
      - bridge_enx
      - bridge_enp
This will bridge all physical ethernet ports together into the br0 bridge, which is assigned
the static address 192.168.131.1. The bridge can also be used to connect to a wired DHCP
server to provide internet access to the robot.
After editing the file, run the following commands to apply the changes:
sudo netplan --debug generate-- this will verify your netplan configuration files and notify you if there are errors. Correct any errors before proceeding.sudo netplan try-- this will try running the new configuration, but will automatically roll back if it doesn't work correctly.sudo netplan apply-- this will apply the new configuration. Note that if you are logged in over SSH from a remote computer you may lose your SSH connection if the active interface was modified.
For details on setting up custom network interface settings see Robot Network Configuration.
Robot YAML
The robot.yaml file defines the configuration of the robot including the robot model, all
supported accessories and any extra URDF elements or ROS parameters. Information about the Robot YAML
is found in the Robot Configuration section. This YAML is used to generate the launch,
URDF and ROS parameter files during runtime.
Create your robot.yaml file and then copy it into /etc/clearpath/ and replace the existing file.
Start Service
This script used robot_upstart to install the systemd services
that will launch platform and sensor launch files as background processes.
To start the services, call
sudo systemctl daemon-reload && sudo systemctl start clearpath-robot.service
Option 2: Manual Source Install
Click to expand the manual source install instructions. Only use this option if you know what you are doing.
ROS 2 Jazzy
Follow the official instructions for installing ROS 2 Jazzy from debian packages.
Clearpath Package Server
The Clearpath package server needs to be added to the robot computer to access robot packages.
Configure Ubuntu's APT package manager to add the package server:
1. Install the authentication key for the packages.clearpathrobotics.com repository
wget https://packages.clearpathrobotics.com/public.key -O - | sudo apt-key add -
2. Add the debian sources for the repository
sudo sh -c 'echo "deb https://packages.clearpathrobotics.com/stable/ubuntu $(lsb_release -cs) main" > /etc/apt/sources.list.d/clearpath-latest.list'
3. Update your computer’s package cache
sudo apt update
Network Configuration
The clearpath_computer_setup package offers a terminal menu tool for configuring a robot computer.
The main feature of this tool is the ability to generate netplan configurations. The clearpath_computer_setup
package is available on the Clearpath package server.
It should be installed on the robot's computer:
sudo apt install python3-clearpath-computer-setup
To run the tool, call:
sudo clearpath-computer-setup
Standard Clearpath Bridge
The default networking configuration for a robot's computer is to bridge all Ethernet interfaces and assign the computer
the IP address 192.168.131.1. See Reserved IP Addresses for a detailed list of IP ranges.
Changing or removing the default bridge configuration may result in your robot no longer working
properly. Certain components inside the robot rely on static IP addresses in the 192.168.131.0/24
subnet.
To configure the default bridge, create or edit /etc/netplan/50-clearpath-standard.yaml to
contain the following:
network:
  version: 2
  renderer: networkd
  ethernets:
    bridge_enp:
      match:
        name: "enp*"
      dhcp4: false
      dhcp6: false
    bridge_enx:
      match:
        name: "enx*"
      dhcp4: false
      dhcp6: false
    bridge_eth:
      match:
        name: "eth*"
      dhcp4: false
      dhcp6: false
  bridges:
    br0:
      addresses:
      - "192.168.131.1/24"
      dhcp4: true
      dhcp6: false
      interfaces:
      - bridge_eth
      - bridge_enx
      - bridge_enp
This will bridge all physical ethernet ports together into the br0 bridge, which is assigned
the static address 192.168.131.1. The bridge can also be used to connect to a wired DHCP
server to provide internet access to the robot.
After editing the file, run the following commands to apply the changes:
sudo netplan --debug generate-- this will verify your netplan configuration files and notify you if there are errors. Correct any errors before proceeding.sudo netplan try-- this will try running the new configuration, but will automatically roll back if it doesn't work correctly.sudo netplan apply-- this will apply the new configuration. Note that if you are logged in over SSH from a remote computer you may lose your SSH connection if the active interface was modified.
For details on setting up custom network interface settings see Robot Network Configuration.
Clearpath Robot metapackage
Once the Clearpath package server has been added, the Clearpath Robot metapackage can be installed.
sudo apt install ros-jazzy-clearpath-robot
Installing this package will also install all dependencies required to run any Clearpath robot and supported sensors, other than Clearpath firmware packages.
Source install
1. Create a workspace on the robot's computer for the clearpath packages
mkdir ~/clearpath_ws/src -p
2. Import dependencies
source /opt/ros/jazzy/setup.bash
sudo apt install python3-vcstool
cd ~/clearpath_ws
wget https://raw.githubusercontent.com/clearpathrobotics/clearpath_robot/jazzy/dependencies.repos
vcs import src < dependencies.repos
cd ~/clearpath_ws/src
git clone https://github.com/clearpathrobotics/clearpath_robot.git
cd ~/clearpath_ws
rosdep install -r --from-paths src -i -y
3. Build packages
colcon build --symlink-install
4. Link the workspace
Add the following line to your ~/clearpath_ws/src/clearpath_robot/clearpath_robot/scripts/generate file,
right under where ROS is sourced:
source /home/robot/clearpath_ws/install/setup.bash
This workspace will also need to be sourced in your robot.yaml file as described in the ROS2 Environment section.
Setup folder
Create the setup folder where the robot.yaml file will be stored, and where files will be generated:
sudo mkdir /etc/clearpath/ -p && sudo chmod 777 /etc/clearpath/
Robot YAML
The robot.yaml file defines the configuration of the robot including the robot model, all
supported accessories and any extra URDF elements or ROS parameters. Information about the Robot YAML
is found in the Robot Configuration section. This YAML is used to generate the launch,
URDF and ROS parameter files during runtime.
Create your robot.yaml file and then copy it into /etc/clearpath/.
Robot services
Clearpath robot services can now be installed with the following command:
ros2 run clearpath_generator_robot generate_launch
ros2 run clearpath_robot install
sudo systemctl enable clearpath-robot
This script uses robot_upstart to install the systemd services
that will launch platform and sensor launch files as background processes.
To start the services, call
sudo systemctl daemon-reload && sudo systemctl start clearpath-robot.service
Add the following line to your ~/.bashrc file to automatically source the generated setup.bash file in new terminals:
source /etc/clearpath/setup.bash
Additional settings
Certain sensors may require additional setup, please review the Accessories pages for any additional instructions for the sensors that you are using. For example, the Blackfly camera has additional instructions listed under software bringup.